UNIVERSIDAD DE VALLADOLID
ESCUELA DE INGENIERIAS INDUSTRIALES
Grado en Ingeniería Mecánica
Mecanismo elevador de los contenedores
soterrados
Autor:
Renedo Diez, Francisco
Marta Herráez Sánchez
Valladolid, Junio 2016
TFG REALIZADO EN PROGRAMA DE INTERCAMBIOTÍTULO: Lifting Mechanism of the Underground Containers ALUMNO: Francisco Renedo Diez
FECHA: 08/06/2016
En el TFG realizado fue diseñado el mecanismo de elevación de los contenedores soterrados, el cual permitía elevar una mayor cantidad de carga en un menor tiempo de funcionamiento gracias al mecanismo doble de tijera diseñado.
Dicho mecanismo funcionaba gracias a dos cilindros para los cuales fue calculado toda la instalación hidráulica que requería el diseño, también fue calculadas las fuerzas y tensiones resultantes en cada barra del mecanismo para poder diseñar adecuadamente cada unión entre barras.
Mediante el software de diseño 3D (CATIA), toda la estructura, al igual que los elementos auxiliares de la instalación fueron modelados, también fue realizado el proceso de manufactura de una de las piezas mediante fresado.
Por ultimo un estudio económico sobre la factibilidad del proyecto fue calculado y expuesto.
Palabras Clave.
Picture List ... 6
Table List ... 8
1. Introduction ... 9
2. Analysis of similar designs ... 10
1. Loading systems ... 10
1. Side loading systems ... 10
2. Dual hook crane system ... 11
3. Swing crane system ... 13
4. Underground compactors ... 14
5. Rear load system ... 17
2. Analysis of cylinders ... 20
1. Single-acting cylindres ... 20
2. Double effect cylinders ... 20
3. Construction Calculations ... 21
1. Excavation ... 21
2. Steel plates ... 23
3. Scissors mechanism ... 24
4. Structure ... 33
5. Ramp regulation cylinders ... 35
6. Trash boxes ... 36
7. Weight to lift ... 38
8. Construction of cylinders ... 40
9. Study of the bolts in critical joints. ... 42
4. Kinematic Calculations... 46
1. Cylinders position ... 46
2. Movement of the platform. ... 47
3. Angle between bars ... 49
4. Movement of the wheels... 51
5. Hydraulic Calculations ... 53
1. Force required ... 53
2. Design of parameters ... 54
3. Thickness of the cylinder ... 60
6. Economics Calculations ... 65
1. Direct costs ... 65
1. Personal costs ... 65
2. Software costs ... 67
3. Material costs ... 68
2. Indirect costs ... 70
3. Other costs ... 71
4. Final cost of the project ... 71
7. Environmental and safety study ... 72
Conclusion ... 74
Picture List
Pic 1. Side loading garbage truck ... 11
Pic 2. Mechanism of lifting (Hooks and rings) ... 12
Pic 3. Garbage truck picking up the containers thanks to a crane ... 12
Pic 5. Movement of the container and the garbage box ... 14
Pic 6. Underground Compactor ... 15
Pic 7. Garbage truck for compactors ... 16
Pic 9. Underground rise containers... 17
Pic 10. Side-opening underground containers ... 18
Pic 11. Remote control of opening containers ... 19
Pic 12. Design of precast concrete pit ... 22
Pic.13 Plates in the bottom of the holes... 23
Pic 14. Design of the scissors lifting mechanism ... 24
Pic 15. Joint between hitch, steel plate and bar ... 25
Pic 16. Joint between hitch, steel plate and bar (Bolt) ... 26
Pic 17. Mechanical rotation joint of both of the bars ... 29
Pic 18. Rotational joint between wheel and bar. ... 29
Pic 19. Rolling profiles. ... 31
Pic 20. Crossbars which join both of the scissors bars. ... 32
Pic 21. Steel welding sheet ... 32
Pic. 22 Steel profile structure ... 33
Pic. 23 Small sheet in the bottom ... 34
Pic. 24 Structure with steel sheets ... 34
Pic. 25 Uneven ground regulators ... 35
Pic. 26 Telescopic ramp regulation cylinders ... 36
Pic. 27 Platform with the garbage boxes. ... 37
Pic 29. Bottom of the cylinder. ... 40
Pic. 30 Top of the cylinder. ... 41
Pic. 31 FEM analysis. ... 42
Pic. 32 Working Model Analysis. ... 43
Pic. 33 FEM analysis M10 bolt ... 44
Pic. 35 FEM Analysis Clevis Pin M20 ... 45
Pic.36 Maximum angle of the cylinders ... 47
Pic. 37 Minimum angle of the cylinders... 47
Pic. 38 Platform with the containers in the upper position ... 48
Pic. 39 Angles between bars in the off position. ... 49
Pic. 40 Angles between bars in the up position. ... 50
Pic. 41 Position of the wheels when the platform is down ... 51
Pic.42 Position of the wheels when the platform is up ... 52
Pic.43 Parts and materials of each part ... 55
Pic.44 Supports of cylinder. ... 57
Pic.45 Graphic 80mm diameter size ... 57
Pic.46 Graphic 100mm diameter size ... 58
Pic.47 Distribution tangential and radial of the stresses. ... 61
Table List
Table 1 Mechanical properties of annealed AISI 8620 alloy steel ... 27
Table 2 Summary of the profiles ... 34
Table 3 Mass of each part ... 38
Table 4 Equivalence between bore and rod sizes. ... 56
Table 5 Characteristics ... 56
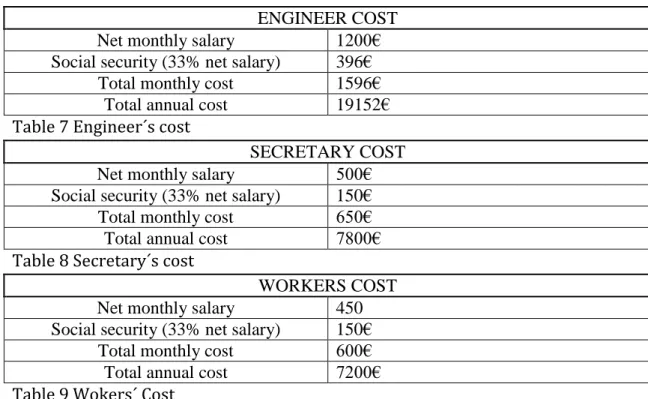
Table 7 Engineer´s cost ... 65
Table 8 Secretary´s cost ... 65
Table 9 Wokers´ Cost ... 65
Table 10 Working days... 66
Table 11 Costs per hour ... 66
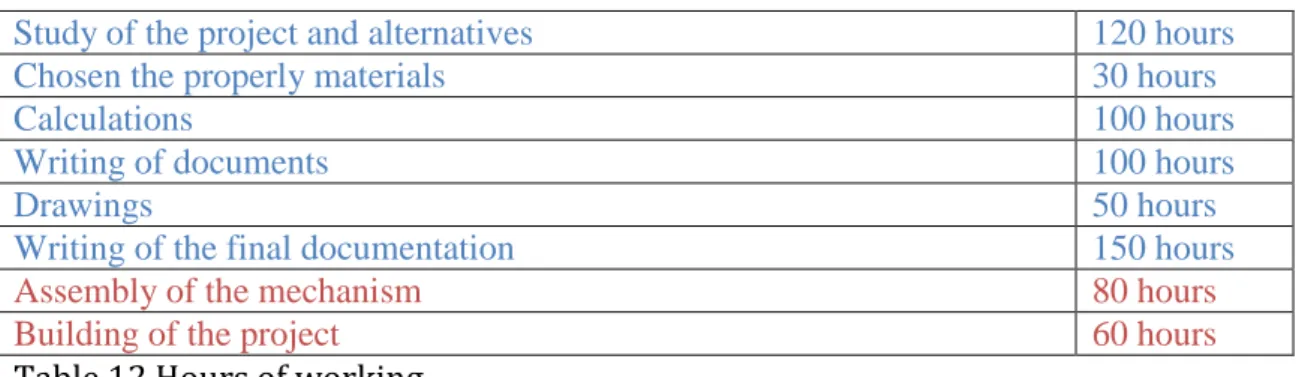
Table 12 Hours of working ... 66
Table 13 Software costs ... 67
Table 14 Material costs... 68
Table 15 Hydraulic costs ... 69
Table 16 Structure costs ... 69
Table 17 Summary material costs ... 69
Table 18 Direct costs ... 69
1.
Introduction
Underground containers are getting popular in the main cities of the world however they continue suffering some problems related with the design or the facilities that these can offer.
Everybody knows that this kind of technology can improve the quality of a city becoming it in a greener and cleaner city, it has also some advantages since these kind of technology avoid people doing vandalism cause of the burying garbage, beside of this, the underground containers avoid the bad smell that the organic garbage makes when it is shined by the sunbeams or warmed by the own heat of the city.
In spite of the advantages, underground containers have still some kind of disadvantages related with several aspects as could be the load that the containers can support or the space that this new construction requires in the underground. It is common find troubles related with the time of the lifting and emptying of the containers, nevertheless all of these troubles can be removed studying a new design and introducing few improvements in the mechanism and structure of the containers, this is the target of this project.
According to the European normative every country must develop and implant these kind of environmental technology before the next ten years however most of the hottest countries have already implanted it before the accorded time in order to avoid the bad smell in the warmest months.
In the current project it has been studied the different mechanism and kind of underground containers in order to develop one of them which would be able to improve the oldest ones since they are obsolete in many aspects as could be specially the admissible load and the times of lifting, due to this the study includes all the calculations and possible designs which let my own mechanism get better facilities than the others.
Anyways this project can be carried out in every city which there are not underground containers yet, the popularity of this technology will increase during the following years so it must be had in mind that while the popularity is increasing and the European normative is getting more and more strict, there is no chance of refusing this new technology.
2.
Analysis of similar designs
1. Loading systems
If we speak about the kinds of containers we must have in mind two important differences between them, on the one hand we can find the rubbish containers that we have had in the past and which we still have in many cities, however some years ago a law was proclaimed which said that in few years all the outside containers should be removed in order to replace them for underground containers.
This is one of the reasons why the underground containers must be developed and improved continuously.
If we study the differences between all of them it is necessary to have in mind the different kinds of containers as far as collection mechanism refers, most of them are lifted cause of a hydraulic system and afterwards the garbage can be put in the garbage truck, but this mechanism can vary between the different kind of containers so we will analyze the different cases of collecting the garbage.
1. Side loading systems
This kind of garbage collection system consists like everyone else in a lifting mechanism that let take out the containers to the work zone where you can pick up them in order to collect the garbage in the truck, the main difference that we can find is the kind of truck that you need to do this kind of collection since if you pretend to collect the garbage in an automatic way, it is necessary to have in mind several disadvantages of this system.
Pic 1. Side loading garbage truck
As we can see in the picture the garbage truck has a mechanism in the right side of the truck which is able to pick up the containers that previously has been lifted by the lifting mechanism.
The collection´s process follows several steps, first of all the garbage truck must get near the containers in order to collect it, afterwards the lifting mechanism of the main containers plant lift the underground containers until a surface level, in this way the mechanism of the garbage truck can pick up the containers from the platform to the truck in an automatic way.
In spite of the fact that this kind of system allows working without the manual job, it has yet several problems due to the difficulty involved in the process since most of the times, this process takes a longer time than a manual process.
That problem before is the main reason why I have not chosen this system as my thesis development, such a slow system cannot be carried out in a capital city as Vilnius, beside of this, there is another problem related with the requirement of the renew in every truck which are nowadays working in the city, in fact this development would lead to more spending than the benefit that is achieved.
2. Dual hook crane system
This kind of collection is done by truck equipped with a pen, which rises the trash box and the container body on it, and later convert their content with the opening of the floodgates, this process can be apply in different kind of containers as could be paper, glass or organic containers. It does not matter the kind of container that the crane will lift since the process will be the same.
wear that can provokes the breakdown in the mechanism and preventing its normal and daily use
The trucks which this process requires are completely different to the side loading collection´s trucks since it would be necessary to count with these trucks. In the following picture can be seen the mechanism of dual hook.
Pic 2. Mechanism of lifting (Hooks and rings)
Nowadays much of the cities have this crane garbage truck so the main disadvantage of these containers is not here since every city could improve their trucks to this kind of them. The main disadvantage is the long time which is taken when the crane is moving until you can grab the hook and the container´s rings.
Before lifting the container the crane will take a long time, in spite of the fact that the truck does not need to approach millimeter to the containers what makes that this step does not take a long time. The problem appear in the next step since when the driver try to approach the crane to the dual rings of the container, it must be too precise then, the drive who controls the crane must be such an experienced driver in order to make shorter the process, unless it would take a long time.
Pic 4. Ring which has suffered the effects of corrosion
Another issue on which it is harder to act is related with the rings and the deterioration due to the environmental agents and the friction with the hook of the crane. When the crane grabs the ring too many times, there will be a friction which helped of the atmospheric effect can produce breaking of the rings. In wet environmental as for example Lithuania, this effect is more likely to occur cause of metal oxidation occurs more easily when there is an oxidation corrosion, later that leads to the origin of small micro-breakages which over time can produce the service failure.
The problems of the necessary change and renovation of the trucks, the longtime of the process and the problems related with the corrosion the problems and friction in the rings of the trash box of the containers makes that this system has been rejected for my thesis since it would not be sufficiently profitable.
3. Swing crane system
Pic 5. Movement of the container and the garbage box
As you can see in the picture above, which the process of movement of the container is shown, the container needs the help of a crane in order to deposit the garbage in the truck by opening the bottom of the container.
This system has almost the same disadvantages that the dual hook crane since you also need the crane to pick up the container what means that the process will take a longtime too, beside of this, the container can be destabilized while the process of lifting is being carried out.
The only advantage over the dual hook crane is that in this case the rings don’t suffer corrosion and oxidation effects due to the fact that they are hidden under the garbage boxes and the rain or a wet environment has no impact on it, however the friction cause of the lifting process of the crane it cannot be avoided.
This system also requires a renewal of the entire existing fleet of trucks in the city since the common behind collection garbage trucks are not able to be useful since you must need a crane. This renewal requires a big invest of money so the swing crane system has several disadvantages that avoid that it could be chosen as a project to be carried out during the study of this bachelor thesis.
4. Underground compactors
This new system which is not yet developed consists in a big underground box in which the garbage is deposit in order to be compacted by a hydraulic machine, this kind of system let deposit too much garbage than others since each certain time the garbage is compacted so that the free space is increased.
A compactor has two main parts:
-An iron box, where the waste is stored.
The residue is placed at the mouth of the compactor, where a presser plate, which is simply a metal plate, push the residue through the engine inwardly. The residue will be introduced in the iron box until it fills its interior.
Once filled, the next time the residue enter again and the pressing plate push it, all the residue begin to be compressed by the force of pressure of the machine.
In this way, the air bags will disappear and the lower volume of waste.
Pic 6. Underground Compactor
The main advantage of this system is the big load of garbage that can be deposit in it and the frequency of garbage collection by garbage trucks since this is less load than in other systems, however this system has also several disadvantages that become this system and mechanism in a not profitable one.
Pic 7. Garbage truck for compactors
These trucks also need a huge free place in order to load the containers so the civil works required is a high economic cost as well as the visual impact that is required to accommodate the prefabricated where containers are located.
This type of mechanism for these underground containers also represents a significant energy expenditure during the processes of collection, it is true that there is a kind of self-sufficient containers thanks to solar energy, although it is undergoing testing, it is ruled to be implanted in a country like Lithuania because to the few hours of sunlight during the cold months so that the overall balance makes the economic cost is higher than in other types of underground containers.
The process of lifting the compactor container takes the longest time over all the different systems studied, in spite of the fact that it is not necessary to be picked up as frequently as other systems, it is necessary to note that every time you want to discharge the waste, the mechanism must raise the compactor, after that the garbage truck will pick up trash compactor in order to download it in a landfill, during which time the ecological plant will be without compactor, or other logical solution would be replaced by another compactor.
5. Rear load system
The system is hydraulic, it can also work with a remote control, which lets the containers to grade the road to be manually removed by the operator of the service, pushing him toward the truck. The containers have wheels so that they can be pushed. It is the most economic system cause of several reasons, first of all this system does not force the city to renew the fleet of trucks since the common trucks that work in the city are able to do the job of collecting the garbage as the garbage trucks did with the other old containers, the not underground containers.
Another advantage is the time that the lifting mechanism takes while the containers are being raised, this time is shorter than others types, however the load that you can deposit in these rear load system containers is pretty smaller than in others system, this is the unique disadvantage that we can find in this kind.
The civil work required is not too expensive since it involves an undercut in which the mechanism with the various hydraulic systems, containers and then finally boxes, where they can deposit the garbage is installed, the highest cost is the lifting mechanism, the main part for studying in this project.
Also it is necessary to study the way in which the garbage boxes will be opened since it is not the same when the rise together with the containers than when the containers open laterally.
In the first case, as the following picture shows, the garbage box is raised cause of the lifting mechanism.
Pic 9. Underground rise containers
also less, however the space that it requires is higher cause of the height that the garbage box reach.
The other possibility of system is the laterally opening, this a more sophisticated and difficult to carry out, beside of this, if you have a breakdown the repair cost will be higher, it does not need such a high space than the other one, however you need more space in the sidewalk.
Pic 10. Side-opening underground containers
Finally the choice is for the vertical opening since it is easier to be designed and also to be carried out, the possibilities of breakdown are less than in the side-opening system. In spite of the fact that it is necessary a higher space in this system, from my point of view it is more uncomfortable when an object gets in the way of the own pedestrians than when an object is raise without obstructing pedestrians nothing else than the part already occupied at ground level, so simply creates a little ugly and unpleasant visual effect.
The last point to be discussed is the system of activation of the lifting mechanism, the mechanism will be able to rise cause of the hydraulic mechanism that allows the fluid flows along the pipes. Thanks to the hydraulic force applied over the cylinders of the mechanism, the mechanism can lift all containers and also garbage.
Since it is possible to choose between a remote control and a manual activation, we opted for the remote control mode, as with the simple action of pressing a button the mechanism will raise the containers without the need for the hydraulic connection from the garbage truck own.
Pic 11. Remote control of opening containers
The mechanism´s structure will be designed in order to make the process of raising and lowering the containers as quickly as possible, this is achieved with a light structure but at the same time one that will not break when the full weight were on load and one which supports the efforts of tension.
As conclusion, I have chosen to design a lifting mechanism using a light steel as material which will be lifted thanks to a remote control, this remote control can activate the mechanism from the own truck.
The containers that it will contain will be raise vertically in order to avoid the obstructions on the sidewalk and the garbage truck will pick up the garbage with a rear load system.
2. Analysis of cylinders
To develop the strength to raise the platform has been chosen the system of the hydraulic cylinder since they are elements capable of producing work by moving a linear acting load. There is a plunger located inside the cylinders which is pushed by the fluid causing the stem to move. Although there are several types cylinder, the most important are single-acting cylinders and double effect.
1. Single-acting cylindres
The work is done only in one movement direction, one spring let the plunger go back to the starting position. Some seals are placed between the piston and his plunger in order to prevent leakage of fluid between the piston and liner, they are made with a flexible material which is able to adapt to the walls of the liner, avoiding leakage.
The single-acting cylinders are only used when the force required and the rectilinear motions are small because the coil spring restricts movement. It is recommended that the stroke will not exceed 3 times the diameter. The typical hydraulic jack is a single-acting cylinder.
2. Double effect cylinders
These cylinders work in both directions, they don´t need spring and they can make longer strokes beside of placing the plunger in whichever intermediate position. The area of the rear face is less than that of the front face, then for the same pressure forces will be different. To avoid this problem, they are constructed with double-acting cylinders and double rod.
In order to choose the hydraulic cylinder required for the scissor mechanism, we have to have in mind the following parameters:
Dimensions of both compressed and extended piston
Stroke of the plunger
Minimum diameter of the plunger in order to avoid buckling
Working pressure of the fluid
3.
Construction Calculations
1. Excavation
When an underground container´s project is going to be built, there are many parts in the project that must be studied before starting the building. The assembly of the project is composed by several parts that are related directly with the lifting machines, however before starting with the design of the mechanism it is totally necessary to dig a hole in the ground in which all the assembly is going to be hidden during the repose position. There could be some excavations in which water can enter in the dig, so this wet surface would be removed as soon as possible and after this be replaced with concrete, also the unexpected places, as can be holes from stones extracted must be filled with concrete. The trench walls must be vertical and clean to avoid falling stones, filling in concrete. The fund will be clean, tamped and perfectly horizontal before to proceed with concrete filling.
We need to know the free space that I have for the mechanism design, if the space for the containers can not be more than 26.5m3, I have to choose some values for the measures that allows that the volume will not be bigger than that.
These values are enough in order to build a space with that volume and beside of this, the precast will be designed with 90mm width walls of concrete so it is not such a difficult task calculate the total dimensions of the sand excavated in order to place the precast.
After this excavation of the main hole, there are also two holes in which the cylinders will be located so for this reason we have to calculate also the volume of both holes.
The dimensions of the hole excavated will be bigger since we must keep in mind that it should be reinforced with concrete so the measures will increase.
The height won´t increase.
Since there is two holes, and one big cube excavated, the total amount will be:
If we want to study approximately how much concrete is required for this case, we just have to know the volume that the precast occupies.
The quantity of volume that is required to be excavated is around 32m3.
This is the volume that let install the lifting mechanism which lifts 4 big containers, we must know that beside of the lifting machines, the containers and the structure which holds them have to fit in the free space of the cube.
After the excavation is necessary to strengthen the walls with concrete, this precast concrete pit is made of H-25 concrete and with an armature formed by steel frame S-275.
The average strength of precast concrete and the steel as well according to the control quality is around 420 Kg./cm² after 7 days of curing, which gives them high resistance to shock, breakages and even fire, this strength is cause of the mix of steel and concrete, which assures that the walls are not going to be ruined during the shelf life.
This precast concrete frame has been designed with 90mm width walls around the entire perimeter in which the lifting mechanism will be installed, so we have to calculate how much concrete we need in the design, first of all we know the volume excavated, which was 32m3
Once I designed the hole, using the CAD software it is not such a difficult task to calculate the volume of concrete that is required when the 90mm width walls and the floor surface are built, using the command “Measure Item” I got a value of 4,486m3.
2. Steel plates
The lifting mechanism fixes in a large steel plate, this plate is installed over the bottom surface of the concrete precast, this plate cover almost all the free surface that there was available in the bottom of the precast.
There will be also two plates in the bottom of the holes in order to join the cylinders to the bottom of these holes.
Pic.13 Plates in the bottom of the holes
Improving the way of fixing the mechanism to the surface is the main target that the plate has, this plate is built with a steel material called Sanicro28, it is a high-alloy multi-purpose austenitic stainless steel for service in highly corrosive conditions. The grade is characterized by:
Very high corrosion resistance in strong acids
Very good resistance to stress corrosion cracking (SCC) and intergranular corrosion in various environments
High resistance to pitting and crevice corrosion
Good weldability
Sandvik Sanicro 28 possesses good weldability. Suitable welding methods are manual metal-arc welding with covered electrodes and gas-shielded arc welding, such as TIG and MIG. The heat input should be maximum 1 kJ/mm and the interpass temperature maximum 150°C (300°F). A stringer bead welding technique should be used. The current should not exceed 100-120 A in TIG welding. Welding should be undertaken without preheating and, if correctly performed, there will be no need for any subsequent heat treatment. To maintain full corrosion resistance of the weld joint, welding must be followed by thorough cleaning to ensure removal of all oxides and slag particles.
3. Scissors mechanism
The scissors mechanism has been designed with the following structure:
Pic 14. Design of the scissors lifting mechanism.
This mechanism has been designed for lifting a huge weight so it needs 4 scissors in order to allow a quickly and easy lift of the containers.
Pic 15. Joint between hitch, steel plate and bar
Once that the hitch is joined to the bottom plate it is necessary to design how the steel bar which is one of the main parts of the mechanism must be joined to the hitch, this bar needs to have an axis rotation movement respect to the hitch, so the best way to allow it is using a bolt.
The hole that the hitch has is 10mm, beside of this we have to have in mind the width that the parts have:
The bolt which must be chosen has to be longer than 50mm, even much longer since it is joined using a nut, in this case the internal width of the hitch is 30mm however the bar is designed with a width of 20mm, anyways washers are required in this kind of rotation joints since the friction is decreased because such a big mechanical stress can not rotate while almost all the surface is rubbing with the other surface, this is the reason why the washers have been used.
Since the bolt´s width has to be longer than 50mm and beside of this the there is another length cause of the nut that is added, the bolt chosen is:
ISO 4016 BOLT M10x80 STEEL GRADE C HEXAGON HEAD
The characteristics that the bolt has are the followings values:
8
In this way the bolt has a length without thread which covers the length required for the hitch, the threaded length is almost 30 mm so there is enough space for the nut.
The specification of the nut is the following:
ISO 4034 NUT M10 STEEL GRADE C HEXAGON HEAD
Four washers are used as well, however the washers used are different, there is one of them which is placed between the head of the bolt and one of the surfaces of the hitch, and the other one which is placed between the nut and the other surface of the hitch. Both of them are the same: ISO 7089 WASHER 10x20 STEEL GRADE A PLAIN NORMAL SERIES
However the other two washers that I chose for avoiding that the bar twists are different, the specification is the following one: ISO 8738 WASHER 10 STEEL GRADE A PLAIN WASHER FOR CLEVIS PIN
Pic 16. Joint between hitch, steel plate and bar (Bolt)
After knowing how the hitch and the joint are, it is necessary to say that in the assembly there will be eight couples of these, four in each corner of the steel bottom place, and another four in the top surface that support the containers.
The material which is used in the hitches is ASTM A484 304 Stainless Steel, The main characteristics of this steel are that it is semi-smooth, it also has a dull grey finish and the legs are tapered.
The physical properties that it has are these following:
8
( ) ( )
( )
8 Type 304 has a very good drawability. Their combination of low yield strength and high elongation permits successful forming of complex shapes. However, these grades work harden rapidly. To relieve stresses produced in severe forming or spinning, parts should be full annealed or stressrelief annealed as soon as possible after forming.
The austenitic class of stainless steels is generally considered to be weldable by the common fusion and resistance techniques. Special consideration is required to avoid weld ”hot cracking“ by assuring formation of ferrite in the weld deposit. Type 304 is generally considered to be the most common alloys of this stainless class.
The bolts nuts and washers are made of a steel material called AISI 8620 alloy steel, AISI 8620 alloy steel is a common, carburizing alloy steel. This alloy steel is flexible during hardening treatments, thus enabling improvement of case/core properties. The following datasheet will provide more details about AISI 8620 alloy steel.
8
With respect to the bars, they have been designed with the same material than the hitches, the ASTM A484 304 Stainless Steel which allows them such a great strength and a good resistance to the stress. These bars are joined to the hitch in one end as I explained previously, and to the wheel in the other end.
The mechanism has 8 bars in total, also 8 wheels. It means that the mechanism is formed by 8 wheels, 8 hitches and 8 bars. The bars are joined between them by a clevis pin which must be longer than the length between the two bars and the free space that allow them twist each other.
It is useful to add a washer in order to allow a better twist between them since if you do not use it the friction between the bars will be bigger than if the washers are not used, so if the mechanism needs a washer between the two bars, and another 2 washers in the end of the clevis pin, the widths of the washers must be had in mind as well, then:
This means that the clevis pin has to be at least longer than 50mm, beside of this there is a free space that includes the bolt and the nut which work as stop in the end.
Cause of the previously explained, I chose a clevis pin with a 65mm length since it is enough for including everything required for the properly rotation joint of the clevis pin. The normalized names of the parts that we need for the assembly (clevis pin, 3 washers, nut and bolt) are the following:
ISO 2341 CLEVIS PIN 20x65 STEEL WITH HEAD TYPE B WITH SPLIT PIN HOLE
ISO 7089 WASHER 20x37 STEEL GRADE A PLAIN NORMAL SERIES ISO 4014 BOLT M5x25 STEEL GRADE A HEXAGON HEAD
Pic 17. Mechanical rotation joint of both of the bars
In the mechanism we can find 4 of these joints, that allow the perfect rotation between the bars through the same axis.
These rotation joints are located in the middle of the bar, however there are another rotation joints in the end of the bar, these joints are which join the wheel with the bars and allow the translation and rotation of the wheel.
The study of both of these joints can be seen in the part of study of the bolts in critical joints.
This rotation joint requires also a little study about what bolt is the most suitable, first of all I need to know the width of the parts that I would like to join, and in this case it is just the wheel and the bar, it is also appropriate adding a small space where the washer should be placed.
In this rotational joint there are 4 washers, two of the located in each end of the bar, and the other two between the bar and the wheel.
The washers chosen have the following name: ISO 7089 WASHER 10x20 STEEL GRADE A PLAIN NORMAL SERIES
In this joint a nut is also required in order to avoid that the bolt moves, so the following one has been chosen ISO 4032 NUT M10 STEEL GRADE A HEXAGON
8
Knowing these the minimum length that the bolt requires can be calculated:
8
So the bolt must be longer than 100mm at least, however 100mm is a suitable value for the length of the bolt since the threaded length will be only along the nut´s length, since 100 mm is a suitable length it can be chosen and the normalized name will be the following one ISO 4016 BOLT M10x100 STEEL GRADE C HEXAGON HEAD. There are some important parts in the assembly of the mechanism, these parts are the wheels since thanks to them, the mechanism can be raised and lowered, these wheels are made with a steel disc in the main part of it, and the rubber tyre around the steel.
Pic 19. Rolling profiles.
The function of the profiles appear in the picture, how the wheels can move along them profiles until, which allows that the mechanism could be raised and lowered, in the end of the profiles I decided to install some stops in each end of it since they can avoid that the wheels get out the profile.
There are also some stops over the lower profile in order to absorb the movement when the upper profile reach its lowest limit, it is have been designed since when the mechanism is during the rest position and the containers are hidden, the hydraulic mechanism will not need to be acting so strong, since all the weight of the containers and the structure will be supported over the stops located on the profile.
In the picture 19, only the right side of the mechanism appears since the other side is hidden, it is true to say that the complete mechanism have scissors bars in both of the sides, these sides are joined with crossbars which give more stability and a better supporting to the stress suffered by the weight of the containers.
These crossbars are made with ASTM A484 304 Stainless Steel, they are steel profiles with the following measures, 60x40x4, one of them is longer than the other and they are joined to both of the scissors mechanism, bar by bar, there are 8 crossbars in total, 4 long and other 4 pretty shorter than the others, which guaranteed the perfect raising and lowering without suffering any kind of twist the structure of the mechanism.
Pic 20. Crossbars which join both of the scissors bars.
There are two steel sheets which join the upper profile and the structure, these sheets are necessary since the structure is made of profiles, and the surface that would be welded is not large enough, so the best choice in order to guaranteed a good joint is using these steel sheets between the profile and the structure of the containers.
These sheets are made with ASTM A484 304 Stainless Steel, which allows a good weldability between the structure´s profile and the wheel´s profile.
4. Structure
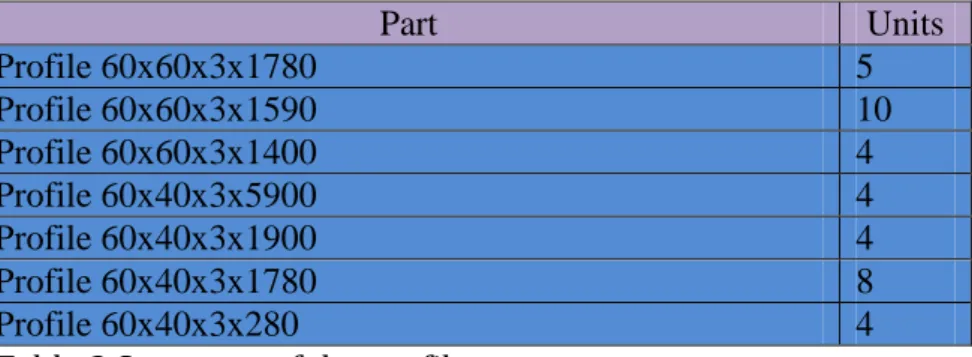
The next part of the assembly is the structure for the containers, the structure for the containers is formed by several ASTM A484 304 Stainless steel profiles, there are some profiles different, for example the bottom structure and the top structure, which are made with a rectangular profile while the others are square profiles.
Since the objective was use 2600 litres containers, there is enough space for them cause of the maximum container´s measures are the following ones:
Pic. 22 Steel profile structure
As it can be seen in the previously picture, there are several cross profiles in all the structure, designing the structure in this way, it is totally strong and resistant to any kind of stresses and strains.
Part Units
Profile 60x60x3x1780 5
Profile 60x60x3x1590 10
Profile 60x60x3x1400 4
Profile 60x40x3x5900 4
Profile 60x40x3x1900 4
Profile 60x40x3x1780 8
Profile 60x40x3x280 4
Table 2 Summary of the profiles
In the bottom of the structure, there is one small sheet in each corner in order to be used as lifting surface, the upper hitches are welded in this sheet and thanks to it and the movement of the bars, the structure can be lifted while the steel profile structure is not damaged.
Pic. 23 Small sheet in the bottom
The floor of the structure will be made with 6mm sheets of ASTM A484 304 Stainless steel, this sheets will be over the perimeter profile and over the cross profiles as well.
As we can see in the picture of the structure, there are 4 different spaces, in each of these spaces there are steel sheets which can be taken out when the mechanism requires to be repaired.
The containers will be located over these sheets; there is a huge free space in each of the divisions that has the following values:
The free space that we have in each of the divisions is around 4m3 which is bigger than the containers volume (3.13m3 ) so it is enough.
5. Ramp regulation cylinders
Once that the structure is already explained, the following part is important since it is one element that can regulate uneven grounds, this component is a telescopic hydraulic cylinder which can be adjusted depending the ramp of the ground.
The assembly counts with six regulation cylinders, 4 of them in each corner of the upper structure and two of them in between corner and corner in each side of the upper structure, the objective of this is regulate each one of them with a different value of the cylinder stroke in order to absorb the ramp.
These cylinders are made with a AISI-SAE 1045 steel.
Pic. 25 Uneven ground regulators
After choosing these cylinders, the maximum ramp will be calculated, first of all it is necessary to know the telescopic cylinder stroke.
8
Pic. 26 Telescopic ramp regulation cylinders
Using these telescopic uneven cylinders, the maximum ramp that where we can implement this assembly is 4.5%, it is enough since the length of the assembly is too long in order to implement it in steep ramps.
6. Trash boxes
The last part of this mechanism is the platform where the trash boxes will be located, this platform will be implemented over the telescopic uneven cylinders. This platform is a ASTM A484 304 Stainless steel sheet, it is 8mm width.
It has also some holes which are designed in order to let the garbage trash go through them towards the container, these holes are under each garbage box.
Pic. 27 Platform with the garbage boxes.
This is the assembly design made for the mechanism and all the parts that is required for a properly working, the containers that are used for this design are made of a mix of plastics, these plastics are the following ones with their densities
.
7. Weight to lift
Once done the study of the design of each part, the next step is calculate the weight that the hydraulic mechanism, which has not been included in the previously pictures, should lift.
These calculations can be done knowing the mass of each part, since all of these parts has been designed and implemented in CAD, it is not such a difficult task knowing the volume that they occupy, once that we know the volume and the material´s density, it is easy to know the mass.
There are some parts of the assembly that don´t requires to know the mass since they are not intervening in the lifting process as can be the 2 wheel profiles in the over the bottom surface.
The parts involved in the weight that the mechanism is going to lift are the following one:
Platform with the garbage boxes
Structure, steel sheet and ramp telescopic cylinders
Bars of the scissors mechanism
4 hitches
2 wheel profile and their steel sheets for welding
4 wheels
Containers
Table 3 Mass of each part
PART MATERIAL Nº DENSITY(Kg/m3) VOLUMEN(Unit) m3 MASS Kg
SCISSORS MECHANISM
Bars ASTM A484 304 Stainless Steel 8 8003 0,004 256,096
Upper hitches ASTM A484 304 Stainless Steel 4 8003 0,000271 8,675252
Short cross profiles ASTM A484 304 Stainless Steel 4 8003 0,0012 38,4144
Long cross profiles ASTM A484 304 Stainless Steel 4 8003 0,0013 41,6156
Reinforcements of cyl. Bar ASTM A484 304 Stainless Steel 4 8003 0,0006327 20,2539924 WHEELS
Wheels Steel+Rubber 4 Not Uniform 0,001 17,48
Wheels profile ASTM A484 304 Stainless Steel 2 8003 0,011 176,066
Stops Rubber 4 910 0,0001219 0,443716
Welding Sheet ASTM A484 304 Stainless Steel 2 8003 0,0009048 14,4822288
STRUCTURE
Profiles of the structure ASTM A484 304 Stainless Steel 1 8003 0,04724 378,06172
Steel sheet ASTM A484 304 Stainless Steel 4 8003 0,01675 536,201
Hitch steel sheets ASTM A484 304 Stainless Steel 4 8003 0,00044 14,08528
Telescopic cylinders AISI-SAE 1045 (UNS G10450) Steel 6 7870 0,000293 13,83546 PLATFORM
Garbage boxes Brass 4 8261 0,018 594,792
Platform sheet ASTM A484 304 Stainless Steel 1 8003 0,091 728,273
SCREWS
Wheel AISI 8620 alloy steel 4 7840 0,0000125 0,392
Hitches AISI 8620 alloy steel 4 7840 0,00001118 0,3506048
Once that I know the weight of each part involved in the mechanism, there are another parts which should have in mind. These parts are the containers and the garbage that can fit inside.
The containers are made of the following plastics:
( Linear-low-density-polyethylene) (Polypropylene)
( )
So the maximum weight without garbage would be 8 After knowing this value, it is necessary to make a estimation about the maximum garbage´s weight that it can fit in a container, these containers are designed for a capacity of 2600litres.
2.6m3 is the capacity of a container however I should know the mass that it can fit in one container. After doing a researching, I could found that the average of weight´s garbage is between 200 and 300 kg/m3 so I will choose a louder value since this is just an average and sometimes it can vary, so the value chosen is 350kg/m3.
( )
8. Construction of cylinders
Pic 29. Bottom of the cylinder.
The hydraulic cylinders will be located in the steel sheets in the bottom of the precast, this has been designed in this way in order to avoid the big forces that would be required.
There is one hitch in each cylinder that let it twist while the angle between the cylinder and the sheet is changing due to the lifting of the mechanism.
The joint of these two parts, cylinder and hitch is going to be thanks to a bolt and a nut, the specification of these is the following one:
ISO 4014 BOLT M30x220 STEEL GRADE B HEXAGON HEAD ISO 4032 NUT M30 STEEL GRADE A HEXAGON
The top of the cylinder´s plunger will be joined to the corresponding hitch in a similar way than the previously one, the unique difference is the length of the bolt since in this case the specification is the next one.
Pic. 30 Top of the cylinder.
In this case there is one critical point which must be studied, in the joint between the plunger and the hitch, the bolt may suffer such a big stress due to the force applied by the cylinder.
In the hydraulic calculations topic, it has been calculated the value of the forces that the cylinders were going to develop so for these calculates those values will be used.
The position of the cylinders will be changing continuously so the force that is required will also change as well, anyways the calculation must be done in the most unfavourable case that it will be when the force must be 38446.77N as it is explained in the hydraulic calculations.
Then the bolt has been simulated with the FEM software.
Both of the ends of the bolt are fixed since the force will be applied over the surface of the middle of it, since the force required was 38446.77 N, it has been simulated with a 40000N force applied over the surface of it.
Pic. 31 FEM analysis.
The most critical point are in the end of the bolt, the values of the Von Misses forces are smaller than the yield stress so this bolt is valuable.
The biggest Von Mises stress is: 113Mpa
The yield stress is 385Mpa
This bolt can be used in this mechanism as element that will receive all the force of the hydraulic cylinders.
9. Study of the bolts in critical joints.
In order to study the stress in the bolts in the joints, first of all it is necessary to study the forces that will be applied in this joints, knowing the weight that it will be lifted and the force that the cylinders will develop (Force required), the mechanism has been carried out with the software “Working Model”.
This software can calculate the forces in each point of the mechanism always that it had been properly modelled.
Pic. 32 Working Model Analysis.
The critical stresses are the following ones:
In the case of the bolts of the hitches, we only need to study the one which supports such a bigger stress.
Pic. 33 FEM analysis M10 bolt
In this case the biggest Von Misses stress is in the side where the bar is acting, since in there are no big stresses in the places where it is joined to the hitch.
The biggest Von Misses stress is: 113Mpa 113<385Mpa
This means the this bolt which its measures will be available for the mechanism.
The next study will be carried out with the clevis pin which joins both bars in the middle allowing them the rotation each other.
Pic. 34 FEM Analysis Clevis Pin M16
In this case, when the pin has a 16mm diameter, the Von Misses stresses that will be developed are higher than other cases, it does not reach the critical stress but it is still high.
Cause of this, it has been thought to develop a thicker pin in order to avoid such a big maximum stress in the end of the bolt, the following study shows how a 20mm diameter pin can avoid these big stresses and reduce the internal forces in it.
Pic. 35 FEM Analysis Clevis Pin M20
As we can see in the previously picture, if the diameter is increased the stresses will be lower so it is better to use this since the difference between the higher Von Misses stress and the Yield Stress is much bigger.
4.
Kinematic Calculations
1. Cylinders position
Once the cylinders where chosen cause of the requirements of force, stress and pressure that they need, the next step is knowing how the cylinder´s stroke is influenced in the mechanism since the space between the sheet which join the cylinders and the bars is limited.
The height between the sheet for the cylinder´s hitches and the platform is: 700mm. The main objective of these extra holes is avoid the huge force that would be required if the cylinders will start the lifting movement from a horizontally position.
The characteristics of the cylinder chosen in which respect of lengths are the following ones:
88
Since the fixed objective was getting a lifting height lower than 1750mm, it is important to manage the best combination according to the lengths and the free space that there is in the mechanism.
While the containers are in the low position, the cylinders are almost vertical what allows them working with a smaller force cause of the components of the forces.
While the mechanism is moving, the angle between the cylinder´s axis and the steel sheet that join them is changing, it changes from a almost vertically position until a medium angle position.
Pic.36 Maximum angle of the cylinders
When the cylinders are moving and the plunger is extending, the angle between the cylinder and the steel sheet decrease because the bars are moving up and to the side, so the angle decreases until it reaches
Pic. 37 Minimum angle of the cylinders
While the cylinders are working, all the platform rises, the cylinders allow the mechanism rise the platform in which the containers are located from the bottom to a height of 1750mm, beside of this height, they stroke of the cylinders is smaller than it but cause of the system of bars and the mechanism it can reach such a high elevation.
2. Movement of the platform.
The next step is calculate the time that is required for the cylinders in order to move and extend themselves, knowing the following values is more than enough.
The lowest position of the platform is when the upper wheeling profile is in contact with the stops that are located over the lower wheeling profile, this position is 0mm over the
87º
bottom, what it means that all the mechanism is hidden in the concrete precast, however when the mechanism needs to be lifted, all of it will rise 1750mm until the sheet of the platform which contains the containers is going to be at the same level than the ground of the street.
Pic. 38 Platform with the containers in the upper position
For the movement of the containers, it is important to know the lineal speed with the containers and the platform rises, knowing the distance that the platform moves and the time required for the total extending of the cylinders, this tasks is not more complex than a simple equation.
3. Angle between bars
The lifting of the platform is notoriously caused by the movement of the bars, once that the cylinder is extending and thanks to the rotation and translation of the wheels, these will cause that the angle between the two bars will change.
In the off position, the bars will be almost horizontally so the angle between both of them are quite big.
Pic. 39 Angles between bars in the off position.
When the wheels are moving towards the end of the profiles, the bars will close each other, in other words, the angle between the bars is going to decrease cause of this movement which allows the platform rise.
In the case of the Clevis pin, the middle point of the bars, it will moves with the speed that will be calculated in the following equation:
( ) ( )
8
8
The speed which the clevis pin rises is 175mm/s.
Once that the platform has been lifted, we can know the angle between bars and in this way calculate the value that the angle decrease and the average speed with which it decreases.
Pic. 40 Angles between bars in the up position.
The grades that the angle will decrease can be calculated with the following relation:
( ) ( )
4. Movement of the wheels
In this mechanism there are eight wheels which allows the mechanism lifting, the objective of these are wheeling along the profile in order to favor the lifting of the mechanism since the friction is lower than when there are no wheels.
Pic. 41 Position of the wheels when the platform is down
This is the position in which both wheels are near, they cannot get nearer cause of the stops that there are between of the wheels profiles, also the cylinders work as stops since there is no too much stroke in order to go down, anyways the top sheet will be touching with the precast so it is impossible that the up profile go down and therefore the wheels get nearer.
The position of the wheels will move until they reach almost the end of the profile, however the profile has been designed with some stops in order to avoid the problems that could cause a derailment of the wheels.
In spite of the fact that the strokes of the cylinders is limited since it cannot reach such a higher distance, it would be better prevent the problematic than a derailment of the wheels could cause.
So the next step will be calculate how the translation of the wheels is influence since knowing it is possible to know the rotation speed that it will develop the wheels, so for this case the horizontally distance that the wheels moved can be calculated knowing the distance of the wheels in the up position.
Pic.42 Position of the wheels when the platform is up
( ) ( )
8
8
Knowing the length and the circumference of the wheel, the amount of laps can be calculated.
Each wheel needs less than 2 laps in order to make the track in the profile.
5.
Hydraulic Calculations
1. Force required
The first step in the hydraulic calculations is the election of the hydraulic cylinders that will raise the structure with the containers, once that we know the weight that the mechanism should raise, we have to design were the cylinders are located and their characteristics.
8 8
This is the force which belongs to the weight of the containers and the platform in a vertical way, we must have in mind that the force that the cylinders will make is going to be pretty bigger due to the fact that they are not lifting the mechanism totally vertical. Cause of the position of the cylinders, in the most adverse position due to the angle of the lifting, the cylinders will have to make such a bigger force.
The normal force over the surface of the cylinder can be calculated following the next trigonometric equation.
( )
( )
Since the mechanism has two scissors lifting mechanism, it will require 2 hydraulic cylinders in each side of the mechanism, these cylinders will be located and welded in the steel sheet of the bottom and also joined to a cross profile.
There will be a rotation joint in each end of the cylinder, which allows the mechanism rotate in order to avoid the twist that could be produced when the structure lowers and raises.
In order to calculate the value of the force that each cylinder should make, just knowing that we have two cylinders and the maximum force of the weight, we can calculate it.
2. Design of parameters
Once we know the force required, it is mandatory to have in mind that one of the most important aspects in the design is studying the plunger since the cylinder is too long, and we need to avoid that the cylinder develops buckling.
Once that we study the different positions, the cylinder will occupy around 885mm
while the reposes position, however it will occupy when it is extended 1600mm.
The minimum diameter that the cylinder plunger should have can be calculated using the Euler´s equation.
( ) √
When there are rotation joints in both ends of the cylinder, the is 2.0
88
8 ( )
√
√
check that the force which is necessary for the buckling with that diameter is bigger than the force which the mechanism is working.
88
88
( )
The cylinder which will be chosen belongs to the group of CHSG which can works with different pressures between 3,5MPa and 16MPa, this group of cylinders is designed with long strokes
The following pictures and table show the different parts of the cylinder and the main
characteristics as well.
Pic.43 Parts and materials of each part
Table 4 Equivalence between bore and rod sizes.
Then once that the diameter has been chosen, one that guarantees the properly working of the mechanism, the next step is checking that the stroke can be chosen for ours. Anyways this study will be carried out with the two possibilities of diameter that I can imagine the chosen previously and one which assure a safer working.
Table 5 Characteristics
In the second table can be checked that a 80 or 100 mm cylinder allows a stroke up to 800 or 1000 mm respectively , the stroke required for our mechanism is 715 and for this reason this cylinder is good enough in order to be carried out.
First of all, it is mandatory to know that each position and joint of the cylinders change the requirements of stroke, in the graphic there are several curves for each kind of supports.
Pic.44 Supports of cylinder.
The supports that these cylinders have are the number one since each of the ends allows the rotation.
Pic.45 Graphic 80mm diameter size
As we can see in this graphic, a 80mm diameter cylinder would not be able to develop such a big force in order to raise the weight cause of the too much length of the stroke. The next step is checking if 100mm can be enough for it.
Str
oke
Pic.46 Graphic 100mm diameter size
As we can see in the preciously graphic, the values of stress which would be developed by the cylinder are lower than the values that it can support according to the graphic so we can assure that the cylinders will work without problems.
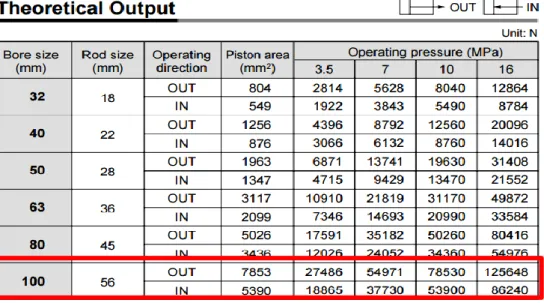
Indeed, the maximum force that will be working in the cylinders will be less than the force that is necessary in order to develop buckling with the measures chosen, the hydraulic cylinders for this design will have the following characteristics:
Since we chose a 56mm rod cylinder, the bore size will be 100mm as the following table shows.
Str
oke
Table 6 forces that the mechanism can develop
The previously table shows the forces that the cylinder would develop, since the piston area does not change, the force will be influenced by the operating pressure which one the hydraulic bomb is working.
Since this is a double effect cylinder, it will have a different force when it is rising and when it is lowering because the working areas are different. When it is rising the oil will work over all the bore area while when it is lowering it will work over the bore area without the rod or plunger area.
This system is valuable for our mechanism due to the fact that the biggest force must be done in the lifting movement since the containers will be full and the weight would be bigger.
In this case the biggest force that the mechanism can develop will be limited because of the long stroke, since we have a 56mm rod and 715mm length of stroke, according with the graphic, the biggest force that the cylinder can support will be around 65000N, it is enough for our mechanism.
This is the pressure that is required for the maximum force.
8
8
The maximum pressure that the cylinder can use is
Since 4.4Mpa is not a normalized pressure, it will be calculated what is the limit of pressure that it can support cause of the limit of the force of 65000N.
This means that the pressure that we will use is 7MPa
As we can see in the table of the forces depending of the pressure, we have different values for both movements of the cylinder but both of them are suitable for our mechanism:
3. Thickness of the cylinder
Now it is time to calculate the thickness of the cylinder, for this calculation we have to study the stress that is produced in the cylinder, for this topic we have to make the distinction between two assumptions, one is that the cylinder can be thin wall or thick wall since the stress are not the same in both cases.
If the cylinder is thin wall, the relation should be the following one: e<d/40
If the cylinder is thin wall, the relation should be the following one: e>d/40 Since the thickness is unknown, the process will be choose one of these assumptions as right one and check later if it is right, then we will have our cylinder, otherwise the right one is the other.
In the cylinder and pressurized elements, as can be the hydraulic cylinders that will be used in this system there are radial and tangential stresses with an intensity which depends of the radio of the element.
Pic.47 Distribution tangential and radial of the stresses.
Since the distributions are the following ones:
( )
( )
The longitudinal stress when the piston absorbers the reaction in the ends cause of the internal pressure is:
Considering that the cylinder is a thin wall item with , in these cases the radial stress will be so small if we compare it with the tangential stress, it is the radial stress which supports the force that tries to split the two halves of the cylinder acting over all the stress area.
The longitudinal stress is supposed uniformly distributed as well: ( ) 8 8
Now we calculate the Von Mises stresses.
√ ( ) ( ) ( ) √
Now we pose the following equation:
√ 88
4. Flow calculations
First of all, knowing that the maximum speed allowed for the cylinder is 500mm/s the flow that the cylinder requires will be calculated following the next equation;
( ) ( )
Since the flow depends of the area, there will be two different flow cause of the areas which are different when the rod is going up and when it goes down. This is due to the fact that the surfaces are different, and the fluid will make a different force.
When we calculate the flow, we have to know that if 500mm/s is used as speed, the flow will be so huge so it is better to avoid this problem and use such a quite smaller speed in order to get smaller flow which allow the mechanism lifts properly and fast as well without the costs of the other one.
The speed chosen is: 150mm/s
8
After studying the prices of the pumps, there are 4 options to evaluate: 1. Two 70 litres/min flow pumps = 2x 935,92= 1871.84€
2. One 140litres/min flow pump, one way. = > not possible cause of dangerous limit of flow.
3. One 164litres/min flow pump, one way => 1489.60 €
4. One 71-71 litres/min flow pump, two ways. = 1971.86€
Pic.48 Properties of the pump
Highly refined hydraulic fluids for stringent working conditions.
They contain anti-wear, anticorrosive, antioxidant and antifoaming additives. Meet the ISO 6743 standard HM class and DIN 51524 Part 2, HLP class.