A retro style based shooter
61
0
0
Texto completo
(2) Mario Tormo García. Final Degree project. 2.
(3) Mario Tormo García. Final Degree project. Summary This document summarizes and explains the process of creating a spaceship shooter game from the perspective of game design, programming and art. In terms of game design, it is intended to be a twist of classics like asteroids, adding original mechanics like using the recoil force as an impulse or sharing the same meter for the health and ammo and making the most of it through the level and enemy’s design without resulting unfair or boring. Some of the techniques and decisions made in the design process such as the use of colour, shapes or the structure of the level to guide the player and introduce new mechanics will be explained here. All those ideas in the paper must be turned into something playable, for that we use the programming. Some complex algorithms have been developed for the behavior of enemy AI, for example, that of basic enemies, able to surround the player and avoid losing sight of the target to shoot him or the ability to reorganize when another enemy is eliminated. There are also examples in the player mechanics as the system to charge the shots or regenerate the health/ammo meter among others. On the art side, some shaders are developed with Shader Graph, Unity's new tool for developing shaders without coding, along with the use of post-processing tools to match the neon aesthetic goal and, ultimately, to improve visuals.. 3.
(4) Mario Tormo García. Final Degree project. Contents (Index) 1 Introduction. 7. 1.1 Work motivation. 9. 1.2 Objectives. 9. 1.3 Justification. 11. 2 Planning and resources evaluation. 13. 2.1 Planning. 13. 2.2 Resources evaluation. 17. 3 System analysis and design. 21. 3.1 Artistic design. 21. 3.2 Game design. 25. 4 Work development. 31. 4.1 Technical development. 31. 4.2 Artistic development. 39. 4.3 Results. 53. 5 Final Planning. 55. 6 Conclusions and future work. 57. 6.1 Conclusions. 57. 6.2 Future work. 58. Bibliography. 59. 4.
(5) Mario Tormo García. Final Degree project. Figures Index Figure 1: PinOut. 8. Figure 2: Geometry Wars 3. 8. Figure 3: Gantt chart 1. 16. Figure 4: Gantt chart 2. 16. Figure 5: Gantt chart 3. 17. Figure 6: Battlezone. 21. Figure 7: Asteroids. 22. Figure 8: Tron (1982). 23. Figure 9: Tron: Legacy (2010). 23. Figure 10: Player’s ship design. 24. Figure 11: Chromatic aberration. 25. Figure 12: Game feel comparison (off). 27. Figure 13: Game feel comparison (on). 27. Figure 14: Level design, first room. 29. Figure 15: Level design, second room. 30. Figure 16: Activity Diagram PlayerScript. 32. Figure 17: Activity Diagram PlayerProjectileScript. 34. Figure 18: Activity Diagram EnemyScript. 37. Figure 19: Regular enemies’ AI. 38. Figure 20: Turret AI. 39. Figure 21: Ships and projectile models. 40. Figure 22: Other models. 40. Figure 23: Ships’ textures. 41. Figure 24: In-game textures appearance. 42. Figure 25: Floor texture. 42. 5.
(6) Mario Tormo García. Final Degree project. Figure 26: UI textures. 43. Figure 27: Health/ammo bar textures. 43. Figure 28: Main menu. 44. Figure 29: Post-processing comparison. 45. Figure 30: Muzzle flash effect. 46. Figure 31: Missile explosion effect. 46. Figure 32: Missile trail effect. 47. Figure 33: Shader Graph, neon wall shader (1). 48. Figure 34: Shader Graph, neon wall shader (2). 48. Figure 35: Neon wall shader properties. 49. Figure 36: Neon wall shader, scene view. 49. Figure 37: Shader Graph, floor shader (1). 50. Figure 38: Shader Graph, floor shader (2). 50. Figure 39: floor shader properties. 51. Figure 40: Result Image 1. 54. Figure 41: Result Image 2. 54. Figure 42: Future work example. 58. 6.
(7) Mario Tormo García. Final Degree project. 1 Introduction The first video games in the 80s were all about playability, they had a small premise at best but gameplay came first. Due to the hardware limitations, they were way more simple but also more difficult than today’s game, as they were shorter and have fewer inputs they had to be harder to last longer. Arcade machines were all over the place, space was a trend at the time so most of them were for playing space games, all decorated with that classic cyber futuristic look. Movies like Tron (1982), thanks to the amazing designs done by Syd Mead and Jean Giraud among others, embodied that aesthetic of polygonal meshes, grids and neon lights perfectly. Meanwhile in the music panorama synths were used in plenty of genres like techno or house but also pop and rock, such recognizable sonorous and visual factors were used as a sign in later nostalgic artistic movements from the 2000s and 2010s like the synthwave, retrowave or vaporwave among many other names. Those will be the main references for this game, the design will be closer to an arcade game but introducing more current elements and both music and graphics will emulate those artistic movements mentioned above. Games that follow the same patterns and therefore are also referents, would be PinOut (Figure 1) and Geometry Wars (Figure 2). The main areas of development on which this report will focus are the following: · Game design: As said, it will be a simple game in terms of objectives and mechanics, but it will be tried to make the most of the possibilities they offer. The player can only perform two actions, moving and shooting, those would be the main mechanics and it will be through them that he will be able to interact with the environment. There will be many levels and they will consist of a series of more or less labyrinthine scenarios in which the player must reach the end to reveal the next one. To prevent it, these will be full of traps to dodge, segments against the clock or rooms with enemies to defeat to unlock the way forward. · Programming: There is lots of work to do to translate the design ideas from the paper to Unity but the most important and difficult parts to get right are the player’s mechanics and the enemies’ AI. Since it's a very movement-based game, getting a good response is one of the hardest things to do along with an enemy AI capable of surrounding the player. · Art: As it has been said the game will try to evoke that retrowave style, all surrounded by neon lights. Each piece of geometry will be simple to be easily recognizable. Things which are capable of damaging the player will be straight and pointy, while everything else will tend to be more rounded. Same with colors. Particle effects and shaders developed with Unity's new tool will also be used to achieve a better look.. 7.
(8) Mario Tormo García. Final Degree project. Figure 1: Pin Out is one of the visual references. [F1].. Figure 2: Geometry Wars 3: Dimensions is a visual and playable reference. [ F2].. 8.
(9) Mario Tormo García. Final Degree project. 1.1 Work motivation That idea came to me back in 2017 when I saw a video in Game Maker's Toolkit youtube channel announcing a game jam. The theme was based on a game called Downwell, a simple game where almost every mechanic serves multiple purposes. I began thinking about several possible ideas and then something came up to me. When the mechanics were all decided the next to think about had to be the elements that challenged those mechanics. Many ideas were written down but none of them were implemented, the project was filed and I moved on. I got to the fourth grade and enrolled in the final grade work, I was sure I wanted to make a video game by myself because until now I had never faced the process alone. It was also clear to me that I wanted to develop all facets equally (art, programming and design) without any of them standing out from the others. That's when I remembered that abandoned project and decided to go back to it so I could prove myself that I was capable of doing it, also I was very interested in learning the basics of shader development and becoming familiar with Unity's new tool, Shader Graph, so I combined those two objectives for this project.. 1.2 Objectives · Obj 1: Create a demo corresponding to the first level where all the main characteristics of the first idea I came to watching that Game Maker’s Toolkit video can be appreciated. An arcade-inspired game with few versatile and profound mechanics. · T1: Enemies and traps that require shooting to get the impulse that comes with it. · T2: Segments against the clock to force the player to take risks. · Obj 2: Introduce the mechanics gradually and create an adjusted difficulty curve. Guide the player through the level. · T1: Start in a safe environment and make sure that the player understands what has to do before allowing him to move forward. · Obj 3: To implement a satisfactory control of the Player through physics. Movement-focused gameplay. · T1: Move the spaceship by applying forces instead of updating its position. · T2: Resistance to any change in its velocity (inertia). · Obj 4: Apply some Game feel techniques to make the game’s response feeling, better. · T1: develop an invokable camera shake script.. 9.
(10) Mario Tormo García. Final Degree project. · T2: develop an invokable camera freeze script. · T3: hit animations for the player and enemies, along with other effects. · Obj 5: Get an enemy AI that puts the player in trouble. · T1: Enemies capable of surrounding the player. · T2: Guided missiles to a player's previous position (delayed effect). · Obj 6: Establish a balance between risk/reward mechanics. ·T1: the act of shooting lowers your health meter and stopping firing for a few seconds regenerates it. · T2: Shooting can fly the player away from danger thanks to its impulse at the expense of losing health. · Obj 7: Develop visually appealing and coherent graphics learning and using shaders, particle systems and post-processing effects. · T1: Make projectiles as a kind of particle, not regular objects. · T2: Particle effects for some object’s destroying animations. · T3: Neon walls shader. · T4: Floor shader animation. · Obj 8: Achieve a professional appearance in all aspects of the game. · T1: Appealing art style. · T2: Quality music and sound effects. · T3: Polished gameplay without bugs.. 10.
(11) Mario Tormo García. Final Degree project. 1.3 Justification I've always been a big fan of games heavily based on playability, where nothing stands between you and fun. That indescribable feeling of chaining combos without being touched in a hack and slash, making a perfect lap in a racing game or linking jumps without losing momentum in a platform game; those moments when you enter "the zone" and are invincible. From the beginning, I wanted this to be that kind of game, as minimum text as possible, and the ability to restart instantly, so you don't waste time on anything but playing. That's why the movement is so important, so much that the fact of shooting causes the player to move, to the point that it is often necessary to use it in your favor. This detail, apart from making the game more original, simplifies the gameplay while providing more depth at the same time. In a way, that comes close to the essence of classic games even though it is a 3D game and is developed with current technology. Capturing that essence was always the goal, so instead of doing it in 8 bits with chiptune music as the games were back then, it is intended to recreate the aesthetics and the feelings they conveyed so as not to replicate every detail of those games, but to produce a similar general feeling in the player.. 11.
(12) Mario Tormo García. Final Degree project. 12.
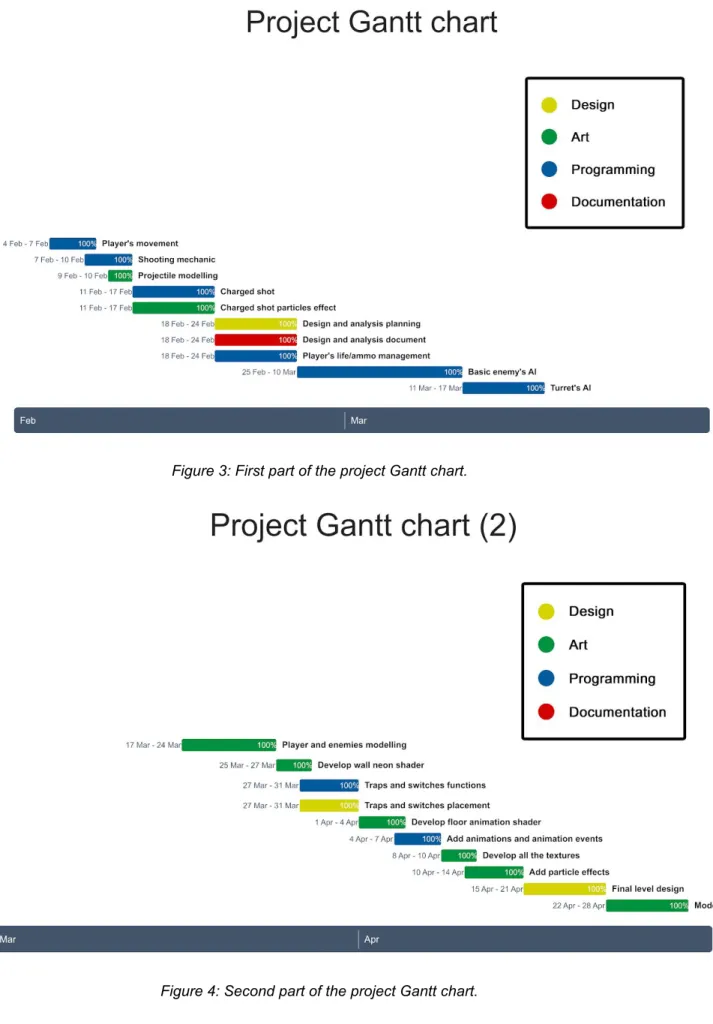
(13) Mario Tormo García. Final Degree project. 2 Planning and resources evaluation 2.1 Planning At first, it was planned about 300 working hours to have everything finished by the first deadline, but given that the finish of the work came very tight for the delivery date, the planning was reorganized to give a greater margin this time with the second deadline as an objective. From the beginning of the project on February 4th until the end, on June 16th, there are 19 weeks, which leaves about 15 hours of work per week. Work divided into 4 main categories: ·Design [30h]: As it has been said previously, the process of designing the mechanics was already done since it was an old idea brought back for this project, but several adjustments will still be needed after programming and testing the functionality. ·Game design: adjusting the mechanics, enemies abilities and behaviour, object’s interaction, stats values… [10h] ·Level design: Think and combine the arrangement of the elements, build the stage. [20h] ·Art [55h]: ·Modelling the player, enemies and projectiles. [2h] ·Modelling the stage. [30h] ·Painting textures. [2h] ·Create the particle effects. [10h] ·Post-processing. [1h] ·Shader development. [10h] ·Programming [140h]: ·Player: Movement, Charge shot, recoil impulse, health management. [30h] ·Enemies AI: Regular enemies’ surrounding ability, Missile guidance. [30h] ·Game states: Harming enemies, getting damage, game over, winning. [20h] ·Camera movement: smooth camera, camera shake. [20h]. 13.
(14) Mario Tormo García. Final Degree project. ·Animations: Animator states, trigger animations, animation events. [10h] ·Adding Sounds. [15h] ·Menu. [15h] ·Documentation [70h]: ·Technical proposal. [5h] ·Design and analysis document. [15h] ·Definitive report. [45h] ·Slide presentation. [5h]. WEEKS 4-10 February. TASKS. TYPE. ●. Player’s movement. Programming. ●. Shooting mechanic. Programming. 11-17 February. ●. Charged shot effect. Programming and art. 18-24 February. ●. Design and analysis document. Design and documents. ●. health/ammo management. Programming. 25 February - 3 March. ●. Basic enemy’s AI. Programming. 4-10 March. ●. Basic enemy’s AI. Programming. 11-17 March. ●. Turret’s AI. Programming. ●. Camera shake and freeze scripts. Programming. 18-24 March. ●. Player, enemies and stages’ modelling. Art. 25-31 March. ●. Develop neon shader. Art and programming. ●. Design the traps function and. Design. 14.
(15) Mario Tormo García. Final Degree project. placement on the stage. Programming. ●. Develop the functioning of the traps and the damage system. ●. Develop floor shader. Art and programming. ●. Add the animations and program their execution and animation events. Programming. 8-14 April. ●. Finish developing the art. Art. 15-21 April. ●. Final level design. Design. 22-28 April. ●. Model the level. Art. 29 April - 5 May. ●. Build level. Design. ●. Polish playability, design and art All. 6-12 May. ●. Bug testing and fixing. Programming. 13-19 May. ●. Make a first report version with the information gathered day by day. Documents. 20-26 May. ●. Add music and sounds. Programming. 27 mayo - 2 June. ●. Make the Menu art. Art. ●. Program the menu. Programming. ●. Final testing and adjustments. All. 3-9 June. ●. Finish developing the memory and submit for corrections. Documents. 10-16 June. ●. Video recording and slide show preparation. Documents. 1-7 April. 15.
(16) Mario Tormo García. Final Degree project. Figure 3: First part of the project Gantt chart.. Figure 4: Second part of the project Gantt chart.. 16.
(17) Mario Tormo García. Final Degree project. Figure 5: Third part of the project Gantt chart.. 2.2 Resources evaluation I work in a moderately powerful PC, although some of the pieces are a bit too old and can’t be considered top end, they are enough to be placed above most of the casual domestic computers and allow me to use some specific and demanding programs without many problems; at the same time, I can assure that if the game runs well on my computer it will work fine in a more modern PC. · Hardware: · CPU: i5 4690k · GPU: Radeon HD 6950 2GB GDDR5 · RAM: 8GB DDR3 · Software: · [Unity]: Is a cross-platform game engine developed by Unity Technologies. It is suitable for the developing of 3D, 2D, VR and AR games among other experiences. It was chosen because it is one of the most used game engines. 17.
(18) Mario Tormo García. Final Degree project. in the industry, it is free, is easy to find lots of tutorials and documentation online and also has a great variety of tools to choose from his asset store: · Shader Graph: It is a tool included in the Unity 2018’s LightWeight Render Pipeline in which shaders can be developed without programming. As programming shaders is difficult for beginners because it is different from what you may have known about object-oriented programming, this tool offers a more visual approach and although may have its limits, it is perfect for the simplest shaders. · [Pro Builder]: Is a tool for 3D modelling inside the Unity editor, perfect for blocking the level design but also for obtaining final results as it permits texturing too. As it might seem it is a very useful tool because allows you to apply changes and test them instantaneously, always having the references in sight and letting you forget about scales and measurement systems. · [Pro Grids]: A tool useful for helping with the stage modelling, it provides grids and snapping functions that combined with Pro Builder delivers a great experience. · [TextMesh Pro]: it is a better option than Unity’s default text tool useful for creating the UI text of the game. · [Universal Sound FX]: An extense sound library. · [Ultimate Game Music Collection]: An extense music library. · [Blender]: It is a free and open-source 3D computer graphics software toolset with multiple purposes (modelling, sculpting, rigging, texturing, animating...), but in this case was used for modelling the player and enemies along with their projectiles because it was easier for unwrapping and painting the textures. · [Photoshop]: It is a raster graphics editor published by Adobe Inc. and one of the standard programs used in the video games industry for plenty of applications. All the textures maps for the objects and shaders and the main title of the game were developed with it. · Google Docs: It is a free word processor offered by Google within its Google Drive service. It was used for writing all the needed documents. · Google Slides: It is a free presentation program offered by Google within its Google Drive service. It was used for making the slide presentation. · [Google Drive]: A file storage and synchronization developed by Google, very useful for storing all the documents of the project, accessing from everywhere and preventing from losing any advance.. 18.
(19) Mario Tormo García. Final Degree project. · [Trello]: It is a list-making application used for planning and managing projects. At first, I thought I could plan everything in my head because it was a project I had in mind for a long time, but it ended being necessary. · [GitHub]: It is a program that provides hosting for software developing and was used for sharing the project code.. 19.
(20) Mario Tormo García. Final Degree project. 20.
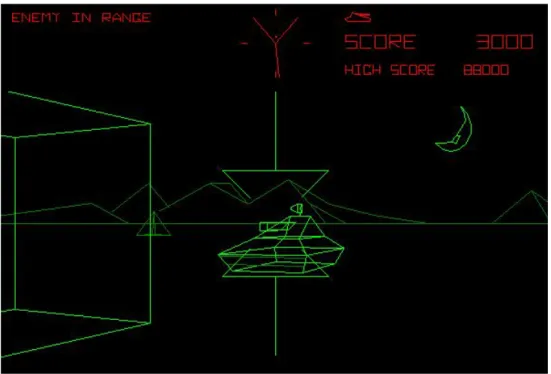
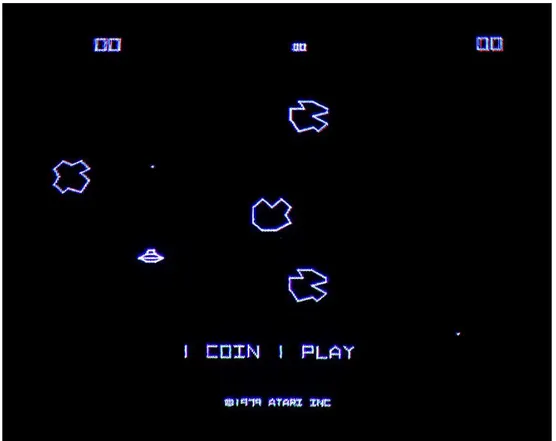
(21) Mario Tormo García. Final Degree project. 3 System analysis and design Design is an essential part of any product, not only defines the first impression you get visually, but also the user experience. In the specific case of video games we can find two big sections of the design, artistic design and game design, both equally important. Taking references from the real world, video games and other media is highly recommended during the designing process, almost necessary. It helps to set a goal and with that in mind is much easier to develop the idea in a way that is coherent a cohesive, which means minimizing the appearance of discordant or random elements that detract from the global vision that is wanted to achieve. More detail on the two major design sections, as well as the sub-sections and inspirations taken for each of them, will be provided below.. 3.1 Artistic Design At the beginning, only the gameplay was planned, so when the idea was rescued for this project, the question arose as to how the game will look. The mechanics were already inspired by games like asteroids, it made sense for the aesthetics to go in the same direction too. One of the characteristic visual features of the arcade machines is the typical brightness of tube screens visible in the Asteroids image (Figure 7), as well as the vector graphics of games like Battlezone (Figure 6) that resembled a 3D wireframe view mode.. Figure 6: Battlezone is one of the examples of that wireframe view made by the vector graphics of the time. [ F6].. 21.
(22) Mario Tormo García. Final Degree project. Figure 7: This image shows the game Asteroids with that glow and chromatic aberration characteristic of tube screens. [F7].. The computer graphics of that time looked the same. Films such as Tron (1982), whose plot revolves around a videogame programmer who enters a digital world, demonstrates the relevance that technology was having in the society of the time and is also one of the visual references for this project (Figure 8). From 2010 onwards, nostalgic artistic movements began to emerge trying to evocate those features, they are known by many names such as 'Retrowave', 'Synthwave', ‘Vaporwave’ or simply 'AESTHETICS'. This is the moment when the sequel Tron: Legacy ( Figure 9) came out, which gave a more updated vision of this same artistic style.. 22.
(23) Mario Tormo García. Final Degree project. Figure 8: Tron (1982) whose aesthetics are largely due to Moebius, Syd Mead and Peter LLoyd. [F8].. Figure 9: Tron: Legacy(2010). [F9].. From all these examples we can deduce several common features: The importance of shapes and contours, and the use of colors and glowing lights. The use of shapes and contours : as it can be appreciated from the images referenced in this section (Figures 6, 7, 8 and 9), straight lines are predominant, but whether is due to the technical difficulties in the first two images (Figures 6 and 7) or due to an artistic choice in the second pair (Figures 8 and 9), it can be discerned a trend to avoid complex shapes and highlight them with lines that often follow the contour. These very standards will be applied to this project, both for scenarios, traps, enemies and their projectiles which will avoid the use. 23.
(24) Mario Tormo García. Final Degree project. of curves; only the player and the elements with which he can interact safely will have rounded shapes. This will serve an essential purpose, to help the player visually differentiate dangerous elements from those that are harmless. Furthermore, the player and the enemies will be textured emphasizing the edges of the geometry simulating the wireframe view.. Figure 10: Some of the initial design proposals for the player’s ship. Although the intention was for the player’s ship to be rounded it couldn’t have a completely circular shape as the player needs to easily distinguish where his character is facing. Some of the first designs of the ship can be appreciated in Figure 10. The use of colors and glowing lights: in Figure 11 can be seen a typical effect on cathode ray screens, chromatic aberration, in which the additive primary colours of light, which are nothing more than the values of the red, green and blue lights that are added together to obtain any colour, appear slightly separated and create a kind of multicoloured outline around the objects. This effect is not very difficult to obtain and can be a good addition to approach the nostalgic aesthetic that is wanted to achieve. In addition to that, a certain glow can be appreciated in the same image as the white light contrast against the black background of the screen, the same in the other images. That was a technical limitation in video games’ case because some of the machines were only capable to show a few colors and having most of the screen in black consumed fewer resources; although this didn't affect movies, as Tron (1982) was inspired by arcade video games it continued with the same aesthetics of glowing, spot colors on dark backgrounds, and since Tron: Legacy (2010) is a sequel it continued with that same style by adding a few changes. One of those changes is the color palette, while the original film has a wider range. 24.
(25) Mario Tormo García. Final Degree project. of colors, the continuation is mainly based on the use of blue, white and orange lights combined with dark backgrounds. In this project a similar approach to the 2010 film will be made, with much less variety of colors in contrast to black; hot and cold neon lights will be used in the same way as shapes to differentiate between harmless (cold colors) and enemies or traps (warm colors, normally associated with danger).. Figure 11: An example of chromatic aberration from the game in a zoomed area.. 3.2 Game Design · Mechanics: Probably the movement mechanic is the most important in the game, from the beginning it was clear that the player should have a lot of inertia to better convey the feeling of floating in space, this is something that Asteroids captures very well despite being an extremely simple game. This type of movement means that it costs a little to reach maximum acceleration, change direction or simply brake. To counteract the slow acceleration and braking we have the other two mechanics (they are actually very closely linked, to the point that one is a direct consequence of the other), the firing and the impulse/recoil. The shot can be charged, with the projectile becoming increasingly larger, damaging and faster; serving this to eliminate enemies or interact with switches. When the shot is released, it emits a large amount of energy directly proportional to the time it has been loaded, translating this into a force that pushes the player in the opposite direction. This pushing force, recoil or dash serves multiple purposes and allows the player to achieve an incredible speed from standing and to brake dry when there is a lot of inertia. This can serve multiple purposes, from gaining momentum, dodging traps or enemies or quickly changing course depending on the direction in which the shot is fired compared to the direction of the inertia carried by the ship itself. All this, wisely used in addition to the mechanics of movement, can help to provide a more precise and stimulating control that it would seem at first. But using that impulse doesn’t come at any cost, since every shot will consume an equivalent percentage to the charging. 25.
(26) Mario Tormo García. Final Degree project. time of the ammo meter but also the health meter as both stats will become the same; that means that, attacking a lot can leave you with little health to survive or little ammunition to escape and, likewise, if the player receives a lot of damage he may have little ammunition left to attack or start a getaway; however, although while charging shots the bar will keep lowering, there is a limit for charging so the player could never die only by charging even though it will leave its health/ammo at minimum. To regenerate the bar, it will be necessary to go a while without pressing the shooting button, being more vulnerable during that period. That offers a great risk/reward mechanic and brings a little more strategy to the gameplay. Of course, to make a good profit of the mechanics the other systems need to work together in the same direction. There will be traps that force the player to make quick and precise movements, fire-activated switches that start a countdown forcing the player to speed up and take more risks, turrets that need to be killed by directing its own missiles to them and avoiding them at the last time… All those things and more serve to give variety and depth to the mechanics, but it is useless that they all work well if the interaction between the player and its environment is very basic and dull. In other words, there's no point having a character with the same abilities as Super Mario if the platforms aren't set up properly, the enemies are boring and all the characteristics offered by the character are not taken advantage of. · Game Feel: It is known as game feel or game juice that intangible feeling of response that makes the player feel satisfied when interacting a game. Sometimes games have incredible mechanics that work perfectly, awesome art style, animations and a great level design but don’t hook the player up. This often happens because the game doesn't feel good. Some small tricks that can be added to fix that and although the base being the same and at first glance not seeming so important, they make a big difference to game juice. In Figure 12 and Figure 13 can be seen the difference between having game feel features and not, for more explanations and examples you can see this talk [Game Feel Talk]. These are the ones appearing in the game: Camera shake is one of the most popular features used for that purpose, having a camera that trembles when there is a big impact on screen, helps to bring more physicality to the action, as real cameras are affected by the environment. Smooth camera, a camera that doesn’t follow the character position with exact precision, but takes its time to catch up the target when speeds up, it is more related with real cameras and cameramen. Applying a muzzle flash effect to the shot helps giving more punch to the action despite the caused damage being the same. Knockback animations for the enemies when they are impacted by the projectiles add weight to the shots. Similarly works the enemy flash animation, which also conveys the player that the enemy is receiving damage. A similar animation can be applied to the player’s ship too. Flash screen animation another way to know when the player is taking damage.. 26.
(27) Mario Tormo García. Final Degree project. Freezing time for a few milliseconds is a good way to make any clash more impactful, but it can’t be for too long or the people playing it would feel the game is struggling and it is unstable.. Figure 12: This is an example of the project in a late state with all the game feel features deactivated. [ F12].. Figure 13: This is a GIF of the game in the same state but with all those features activated. [F13].. 27.
(28) Mario Tormo García. Final Degree project. · Level Design: Is how to place the diverse elements in the environment to guide the player and transmit him some specific emotion, while keeping the difficult progression and level of entertainment. Despite being a single level, this can be divided among several rooms, although some of them are more corridor-shaped; each one having its purpose. From the initial and final, to combat, traps and puzzle rooms. First room: The player begins in an empty safe room with a closed door at the front, where he can learn the main controls without any threat. To the right there is a hallway, the only place he has access to at the moment, at the end of it there is a switch that opens the door when activated. To turn it on it needs to be hit by a player’s projectile and a countdown will begin while the gate opens. There is little time to reach it before the countdown ends and the door closes again, this way we make sure that the player knows how to shoot and use the recoil to propel himself before leaving the starting zone. When the player arrives at the end of the corridor where the first switch is placed, the end of the level can be seen behind a wall, which helps the player to know his objective right from the beginning and to orientate him spatially. Also, some kinds of beacons are placed near relevant objects like switches and doors to make their recognition easier. All these explanations about the first room can be better seen in Figure 14.. 28.
(29) Mario Tormo García. Final Degree project. Figure 14: This is the layout of the first mode captured from the “Scene” view in Unity and scheme explaining the path to follow.. Second room: Next there is a greater room with the first menaces, a static and a rotating trap, there is a switch in front of the entrance, but now it opens one door and closes another. This is a twist of the first puzzle and this time not only the player has to be quick but also avoid the traps at the same time. When the switch is activated, the first door is closed blocking the player’s path and only leaving free the way full of traps on the right. If the player arrives at the second door before the time is up, he can go to the next room, otherwise, he can go back through the same path full of traps or use the shortcut that is no longer blocked by the door to try again. All these explanations can be better seen in Figure 15.. 29.
(30) Mario Tormo García. Final Degree project. Figure 15: Layout of the second room, when the switch is activated, the door next to it closes so the player has to search another route.. Third room: The following room is the first combat room where two basic enemies need to be destroyed to open the path forward. Fourth room: When you defeat those enemies, a corridor full of traps that links with the next combat room is shown. Here two more kinds of traps are introduced, the saw blades and the smashing trap that closes suddenly and is avoidable by using the impulse. This time there isn’t a countdown so the player can take its time looking at the traps and knowing how to avoid them carefully. Fifth room: As soon as the player enters the room a new enemy, a turret, will start shooting remote-controlled missiles to the player. As it is a new enemy and he might be caught unprepared, there is a wall in front of him that stops the missiles, a kind of cover which can be used by the player to observe, understand a think safely. Sixth room: After the player discovers how to defeat the turret, the last hallway is opened, is larger, has two consecutive smashing traps and now saw blades are bigger and move sideways. This is a twist of the fourth room. Seventh room: The last trial is a fight in a bigger room against three regular enemies and one turret combined, here the player will need to focus and use all the things learned before to unlock the goal and end the level.. 30.
(31) Mario Tormo García. Final Degree project. 4 Work development 4.1 Technical development ·Player mechanics: As the player’s mechanics are few and they are strongly connected, it is preferable if they are programmed together in the same script (PlayerScript, F igure 16) allowing much easier communication between them. Since the player’s movement is intended to be floaty with great inertia like in Asteroids, instead of programming it like the vast majority of games, by having a speed value and calculating its position based on this and the elapsed time, the movement needs to be implemented by physics. Unity already has a remarkable physics engine with numerous options and functions, it only needs to be added a rigidbody to the object and then use some of the functions designed to apply forces to an object. The Update() function is executed per frame being ideal for catching input signals, this is where the WASD key pressing is detected, each of which corresponds to a direction on the horizontal and vertical axes. This values are then stored and multiplied by the corresponding force to apply it in the direction desired; this is done in the FixedUpdate(), which is very similar to the Update() function but is called in a regular timeline, meaning that the time between calls is always the same, that is useful for making the physics calculations and changes on the rigidbodies. At first the function AddRelativeForce() was chosen to apply the forces for the player movement on the FixedUpdate(), which receives a vector3 for the direction and magnitude and a ForceMode for the type of force; but it was lastly replaced by AddForce() because the intention was to apply the forces globally in regardless of the player’s orientation and after some failures trying to fix it, the mistake was discovered. the ForceMode used was Force a s it is the default type.. 31.
(32) Mario Tormo García. Final Degree project. Figure 16: Activity Diagram (UML) for the PlayerScript.. Another problem detected was that when the player tried to go diagonally, due to the sum of the forces, the ship moved faster. Luckily that was easy to fix as the only thing to do was normalize the forces using the Vector3.normalized property on the input vector. Then it was time to make the ship rotate facing the cursor to aim properly, there is a function in Unity called LookAt() that rotates the object facing a previously passed GameObject as an attribute, but since the cursor was a 2D image moving in the Screen’s plane and not a GameObject, the solution wasn’t so trivial. Following the Unity [S. shooter tutorial], a Ray was projected from the camera to the “Floor” plane to obtain the collision point towards whose X and Y direction needed the ship to look, RaycastHit. After that, all that was left was to get the vector direction from the player position to the mouse position and apply the rotation to the transform using Quaternion.LookRotation().. 32.
(33) Mario Tormo García. Final Degree project. For gameplay’s sake the cursor required to be visible and replaced by another image, that was done in a simple script called MouseScript. All the information for that was found in Unity’s documentation [Unity manual]. After achieving the player’s rotation another mistake was noticed, as it seemed to rotate well but with some small angle error that might be problematic when implementing the shooting mechanic because the greater the distance between the player and the objective, the greater the error would be. Having tried almost everything to fix that, it was discovered that when changing the cursor image with SetCursor() it sets by default the pointer cursor as the top left corner of the image, but the image supplied was designed to have the pointer at the centre. Once that was discovered the solution was straightforward. The projectiles were created as particle systems following this [Projectile tutorial] to take the profit of all the visual effects that can be implemented with this versatile tool. Colliders and scripts to write its behaviour were added and the enemies’ projectiles were created by inheritance. The parent script was called ProjectileController. W hen created the PlayerScript passes the damage value to the projectile using the method setDamage(), after that in the Start() function is called the method setProjectileData() which takes care of updating the size, the speed and the range of the projectile depending on the damage value set before. In the Update() function is calculated the position of the transform by multiplying the speed value by its forward direction and the Time.deltatime property, that stores the elapsed time between the calls of the Update() function. On the OnTriggerEnter() function it is checked which is the object whose collision has been detected with, and if it is an enemy, the damage will be infringed to it, then the projectile will be destroyed. If it is another projectile it will check whose damage value is greater and the one with the lower one will be destroyed, which means that the projectiles can also be used to stop enemies attacks. If no object has collided and the projectile reaches its range distance it will disappear too. The next implementation was the shooting mechanic. The first thing to do was adding an empty object at the point from which the projectiles will be fired, in such way that its position is passed to the function that instantiates the projectiles along its forward direction; the backward direction of the empty object will also be useful to know in which direction the recoil force has to be applied. The mouse input detection was done at first in the FixedUpdate() of the PlayerScript because the impulse force has to be applied while the projectile is instantiated, and the FixedUpdate() is for the physics; but it skipped some inputs so the mouse detection was moved to the Update() and a bool variable was actualized for the FixedUpdate() to check and know when to add the impulse. That impulse was applied again thanks to AddForce() but this time using Impulse as the ForceMode. The bullet’s damage and the amount of impulse received are calculated with a Lerp() function between a maximum and a minimum value depending on the amount of. 33.
(34) Mario Tormo García. Final Degree project. health/ammo consumed during the charging process which occurs from the moment the mouse click is pressed until it is released. A system that increased the speed at which the health/ammo bar lowered when loading the attack was originally developed. Once the mouse had been clicked, the descent speed was constant until reaching half of a time limit value, from this half until reaching the total time, the descent speed increased until reaching the maximum. But this has been discarded because it was not well balanced. There was no reason for the player to charge its shot as using regular shots, by the sum of forces, resulted in reaching more speed while spending lesser health/ammo. To solve that, for each shot, a constant amount of health/ammo plus the variable part that depends on the charged time are removed; Besides, the regeneration takes a second to activate and it accelerates with time. These two measures serve to balance the use of normal shots and charged shots since for the latter are insignificant changes.. Figure 17: Activity Diagram (UML) for the PlayerProjectileScript.. ·Camera: For the camera movement a tutorial from the Brackeys channel was followed [Camera tutorial]. A script called CameraController is attached to the camera and has a public variable, smoothSpeed, that controls the speed at which the camera moves from the current position to the desired position. The smoothedPosition is obtained by lerping the. 34.
(35) Mario Tormo García. Final Degree project. actual position and the desired one using the smoothSpeed by Time.deltatime as the interpolant. Another Brackeys tutorial [Camera shake tutorial] was used for developing the screen shake using coroutines (functions that can pause the execution, return the control to Unity and continue where they were in the next frame). The function is quite simple and only receives two arguments, the duration of the effect and its magnitude. While the time has not been fulfilled, in each iteration the x and y values of the new camera position are calculated using a random number between -1 and 1 and then multiplied by the magnitude. The result is set as the new camera position and the process is repeated until it is time. When finished, it returns the camera to its original position. ·Enemies AI: After a lot of thinking about how to make the enemies surround the player the following idea came up. Unity already has a pathfinding system called Navmesh that after a series of adjustments is capable of finding the shortest path and controlling the movement of a character from its position to another one assigned through NavMeshAgent.destination. If it was going to be used then it would only be necessary to give it the positions where the enemies should be positioned and Unity would take care of the rest, however, this system has its limitations and if the objective is mobile, the positions of the targets have to be updated continuously. Besides this still does not allow enemies to surround the player and reorganizing depending on the remaining amount of them or placing themselves in shooting positions avoiding obstacles between them and the player, all this is managed by script. A script for spawning objects in a circle was developed. CreateObjectsAround checks if the objects have already been instantiated, if not, it creates a new array of GameObjects of length objectsAmount (an attribute of the class that specifies how many objects will be created) and divides 360 by objectsAmount to obtain the separation angle between the objects when instantiated. With a for loop every object is created in its respective place of the array using Instantiate() at a radius distance from the spawner position, radius is another of the attributes and specifies the distance between the spawner and the spawned objects. Then, the position is transformed using RotateAround() giving the angle obtained before and multiplying it by the index of the for loop to get the corresponding rotate angle of each object. Another version of the script is called EnemySurroundingGoalSpawner and inherits from CreateObjectsAround. It is thought to spawn around the player the targets that the enemies will have to follow. It works similarly, but this time the objectives are instantiated as children of the player as they need to move along with him. That makes them inherit the player’s rotation as well, but that effect is not desired so their positions will need to be reset every frame using the method updatePositions(). That method goes through every object in the array and updates them to maintain their relative position to the parent. There is an additional method for when an enemy is killed, decreaseAmountByOne() deletes the targets and if there is at least one lasting, it creates and places the number of targets required. When the player enters a trigger collider, placed at the beginning of every fighting room, it sends how many enemies will appear in that room to the player’s script. 35.
(36) Mario Tormo García. Final Degree project. EnemySurroundingGoalSpawner, to create the right amount of targets, and to the CreateObjectsAround o f the spawner which is in charge of instantiating the enemies. Enemies' AI is controlled by Unity's navmesh, but their behavior is defined by script. At first, in the Start() function, the player is set as the destination of the enemy, then, in the Update() the enemy is forced to face the player using LookAt(). After that, if there is an object between the enemy and the player is checked with the checkObstacles(), which looks for collisions sending a Physics.Raycast() in player’s direction. If there is an obstacle, the player will be set as the destination of the enemy, since that means that the enemy doesn’t have a clear way to shoot him; if there is no obstacle the target assigned will be set as the destination. When a target created around the player enters the trigger area of the enemy and the enemy doesn’t have an objective yet, if the objective isn’t occupied by another enemy it is set as the destination of the current enemy and the ObjectiveOccupation is set to true. Likewise, when the target assigned to the enemy leaves the trigger zone ObjectiveOccupation is set to false and the player is the destination again. Whether the player is in range to be shoot or not and when it will get shot are decided by TryToShoot(). If the distance between them is below the range value and enough time has elapsed since the last shot was fired, a random function with a defined hit percentage decides if it is time to shoot or not, if not, starts all over. The internal functioning of the EnemyScript can be seen better in Figure 18, and the final result in Figure 19.. 36.
(37) Mario Tormo García. Final Degree project. Figure 18: Activity Diagram (UML) for the EnemyScript.. 37.
(38) Mario Tormo García. Final Degree project. Figure 19: A look of the enemies’ AI. [ F19].. A small knockback effect (variable according to the power of the player’s shot) has been added to the enemies employing a coroutine. When receiving or firing a shot, they will receive a small shift in that direction. The ideal would have been to implement it as a force in the desired direction using the physics engine and the AddForce() function, but as the enemies were being controlled by the navmesh, this was incompatible with physics control. The screen freeze function was developed following this tutorial [Screen freeze tutorial] to call it whenever a bullet hits an enemy. It is done by changing the timeScale property to zero for a small period. Next was time to program the turret enemy. This has a simple script that makes the turret always face the player with the LookAt() function and fires a single missile directed to him at a time, it checks if the missile can be fired because the other one has already been destroyed and then the shootMissile() method is called. TakeDamage() is public and it is called by the missile whenever a collision with the turret occurs, it starts the corresponding animations, calls the camera shake and camera freeze coroutines, subtracts the missile damage from the turret health and if the result is less than or equal to zero, destroys the turret. The missile script is a bit more complex. As the missile itself will be the only way to destroy the turret, it will cause damage on the turret whenever it collides, but as the missile is instantiated next to the turret we don’t want it to explode as soon as it is created, for that, a bool variable is put to true when the turret leave the trigger collider. The missile must follow the player with a delay so that the player can direct it towards the enemy and move away at the last moment to crash it against the turret. At first, the navMeshAgent was used for controlling the missile and through the script the player’s position was transmitted as the target every defined period. But when was tested, it made. 38.
(39) Mario Tormo García. Final Degree project. clear that it wasn’t the right approach as the missile could dodge obstacles between it and the player and would always reach the player’s last position and then change direction to his newest position. The intention was for the missile to advance forward to crash into the turret or a wall even if the player has dodged them. At last the movement was programmed by script. The movement is controlled in the Update(), the missile advances forward updating its transform.position and then the method TurnToPlayer() is executed. This method gets the actual missile rotation and the rotation it should have when facing the player with Quaternion.LookRotation(); then, those two rotations are lerped using Time.deltatime multiplied by a rotationSpeed as the interpolant. That allows control to the rotation velocity of the missile giving the player enough time to dodge it with an impulse at the last moment. All these methods working can be seen in Figure 20.. Figure 20: A look of the turret and missile’s AI. [F20].. 4.2 Artistic development Audio: A lot of time has been spent listening and choosing the most fittable sounds and music pieces for the game from the sound Libraries. When adding them to Unity there are two options, to add sounds in 2D or 3D, the difference is that the 2D sounds are heard the same from any point and the 3D depends on the distance between the AudioSource and the Listener. For the music or the timer, 2D audios have been used, while 3D audio has been chosen for shots, traps or doors. Some modifiers have also been applied to volume, tone and speed; for example, during the last seconds of the timer, the audio is accelerated to tell the player that there is little time left. The volume and pitch of the audio of the player's shots have also been modified and depending on how long it has been charged, it will sound higher or lower. Furthermore, not every sound needs to be executed on awake so some of these parameters need to be controlled by a script.. 39.
(40) Mario Tormo García. Final Degree project. Art: ·3D art: The characters and projectile models (Figure 21) were done in Blender as it was necessary for doing the unwrap and applying its respective textures, since the stage and the traps will have a material with a specific shader, they wouldn’t need unwrapping and could be created using the ProBuilder tool in Unity (Figure 22).. Figure 21: The 3D models of the player, regular enemy and turret (Top). The models of the player, regular enemy and turret’s projectiles (Bottom).. Figure 22: Some of the traps and the door model done with ProBuilder (top). Saw blade and light beam done in Blender (bottom).. 40.
(41) Mario Tormo García. Final Degree project. As it can be appreciated, the models are pretty simple and follow the stated rules in the design process; traps and enemies are pointy whereas the player’s ship and its projectiles are round. ·Texturing: It was decided on following the wireframe style where the player and enemies’ ships have the edges of their models highlighted, so it was partly necessary that they were simple models. Black and white textures were chosen for the emission maps (Figure 23) because this way it was easier to adjust the color of the enemies without having to change the textures. Final results of the texturing in Figure 24.. Figure 23: The textures used for the player and enemies’ albedo properties and as emission maps.. 41.
(42) Mario Tormo García. Final Degree project. Figure 24: Final look of the textures applied to the player and enemies.. Some other maps were done, for example those hexagonal cells for the floor shader as that kind of pattern can be also seen in other futuristic movies and games (Figure 25).. Figure 25: One example of the tileable texture used for the floor shader.. All those textures were made in Photoshop. ·UI elements: these elements were also done using Photoshop and following some tutorials in YouTube [UIT]. For the logo design it is tried to imitate he Outrun titles style, but having the shape of the player’s ship as the background (Figure 28). For the buttons, panels and health bar the same style has been targeted but more simplified and focusing on the outlines (Figures 26, 27 and 28).. 42.
(43) Mario Tormo García. Final Degree project. Figure 26: Some of the UI elements of the menus.. Figure 27: The shot power meter and the health/ammo bar.. 43.
(44) Mario Tormo García. Final Degree project. Figure 28: A glimpse of the main menu with the UI elements integrated.. Post-processing: Unity provides some post-processing tools that can be used to improve the visual appealing of the game, although it is not recommended to abuse using them as some of the effects can be pretty demanding. The difference between using them and not can be appreciated in Figure 29. These are the ones used in this game: ·Bloom: This is an effect in which light seems to extend beyond the edges of a light source. It is something that occurs in real cameras and, in video games serves to enhance the illusion of extremely bright light. In this case, it has been used to achieve that neon result in materials with emissive properties. ·Chromatic aberration: As mentioned before, it was subtly used to imitate the image emitted by the cathode-ray tube screens. ·Lens distortion: Curves the image creating a fisheye-like result. In this project, it has been used lightly to imitate the curvature of the old screens. ·Grain: As other effects above, was used to mimic the look of elder cameras and projections. ·Vignette: Radially and gradually darkens the edges of the screen with the selected color. It has been used in the player’s damage animation to tint the edges of the screen red.. 44.
(45) Mario Tormo García. Final Degree project. Figure 29: Here can be seen the difference between using post-processing (left) and not (right).. Along with the Vignette effect many of them were also used to make the animation of receiving damage, which had to be developed by script since the Unity animation system does not allow access to the parameters of the post-processing effects. The content of this script is only a coroutine that is called when the player is hurt and is responsible for increasing their respective values for a specified time and return them to their initial values. Particle effects: For the game, many effects of particles have been developed although most of them show many similarities. That is because it was decided to reuse some elements as textures or the particles’ shapes, as a way of obtaining a similar style. The muzzle flash effect (Figure 30) uses a texture of a cartoonish explosion with transparencies applied to a cone. It flashes followed by a burst where a bunch of particles is emitted forward at the same time and then a kind of smoke circle expands until disappearing where the shot took place.. 45.
(46) Mario Tormo García. Final Degree project. Figure 30: The muzzle flash effect.. For the missile explosion (Figure 31) it is done a similar effect but this time, instead of a cone-shape explosion there are three desynchronized billboard explosions followed by a burst of particles in all directions.. Figure 31: The missile explosion effect.. 46.
(47) Mario Tormo García. Final Degree project. The missile’s trail (Figure 32) has a very simple but appealing effect where two kinds of triangle-shaped particles are continuously emitted in world space, that means that they don’t move relative to the object but its own speed which is different for each one, same with the rotational velocity.. Figure 32: The missile’s trail effect. Shaders: One of the initial purposes of this project was to learn how to use the Unity Shader Graph tool. Because of that, most of the development time of these shaders was spent looking for documentation. Although these shaders are not very complex, the entry level for using the level is a little high, as it is necessary to learn a lot of information [S. graph manual] [S. graph tutorial] about what most nodes do to know what is being done.. 47.
(48) Mario Tormo García. Final Degree project. Figure 33: Neon walls shader (1).. Figure 34: Neon walls shader (2)).. 48.
(49) Mario Tormo García. Final Degree project. The shader works in such a way that it paints with a certain color the faces whose normal points upwards and with another color (emissive) the others. Its node distribution can be appreciated in Figures 33 and 34, for the explanation, each number in brackets corresponds to the node numbers shown in the figures. Making the dot product (2) from the normal vector of the world space (1) by the specified direction we obtain a mask (3) that can be already applied to paint the faces with different colors, however it is needed to paint only the faces whose normal is completely vertical, for that it is used the step function (4), to filter the normals according to the specified value. With this result, one applies as a mask for the Albedo property of the material, and the other with the inverted values (5) as a mask for the emission property. The values used for the neon walls shader in the walls’ material can be seen in Figure 35 and a GIF showing the shader functioning, in Figure 36.. Figure 35: These are the values used in the material for the shader, Vector1 is the value used to filter in the Step function.. Figure 36: A visual reference of the shader function with a lower Vector1 value. [ F36].. 49.
(50) Mario Tormo García. Final Degree project. Figure 37: Shader Graph, floor shader (1).. Figure 38: Shader Graph, floor shader (2).. In the case of the floor shader, its node distribution can be appreciated in Figures 37 and 38. A texture (2) is used this time as a mask. With the tiling and offset node, the user can control the tile scalability of the texture (1) or the noise (8). The texture mixed with a color is used for the albedo property using a multiply node (3). Step functions are used for filtering the values of the texture (4) and the noise (10), with both results combined, the emission mask (5) is obtained, the effect that illuminates the edges of the hexagons as if it were a wave. To complete the effect, a time function is added to add movement and multiplied by a value to control the speed (7). The values used for the floor shader in the floor’s material can be seen in Figure 39.. 50.
(51) Mario Tormo García. Final Degree project. Figure 39: The values used in the material, the Vector1 property controls the scale of the noise.. 51.
(52) Mario Tormo García. Final Degree project. 52.
(53) Mario Tormo García. Final Degree project. 4.3 Results Source code: https://github.com/mariot11/SuperNeonFire.git Gameplay video: https://drive.google.com/drive/folders/1aBg_PdCqD2i5H9v7kPZmvMeBAGoFJ6v3?usp=shar ing Looking at the initial objective, which was to develop a demo that would show the basis of the gameplay with an aesthetic close to a final product, I think that has met expectations. The aesthetic referents can be clearly observed and although it is not a game that demands a lot technically due to its simplicity in shapes and textures, it manages to be clear for the player partly thanks to that simplicity but without ceasing to be visually attractive. All the bugs founded were solved and besides some minor objectives like adding sound effects to the menu that were put aside, the game feels solid. As expected, the gameplay is more focused on the movement rather than shooting, since the player will spend most of his time trying to avoid the traps and finding the way forward instead of fighting and in the few encounters with enemies, the movement will also be important as they are designed to have to dodge their shots and flee from them. In those terms, compared with Asteroids feels more profound as the possibilities are greater without resulting overwhelming, thanks to the game design introducing the new concepts like switches, traps or enemies step by step. That helps to reinforce the idea of an arcade-inspired game but up to date. Below are a series of images in which different parts of the level such as traps or turrets with all the effects applied can be appreciated.. 53.
(54) Mario Tormo García. Final Degree project. Figure 40: Result image 1.. Figure 41: Result image 2.. As can be seen in the two images (Figure 40 and 41), the same aesthetic code is maintained throughout the level helping to give more cohesion to the style. It will be between several levels where a greater aesthetic difference will be appreciated, while all along with one level the same pattern will be followed.. 54.
(55) Mario Tormo García. Final Degree project. 5. Final planning The initial planning was made taking into account the first delivery date of the memory. The weekly schedule was kept until the fourth week more or less, but the development of the AI of the enemies had its complications and ended up prolonging. Until the tenth week, the hope of being able of getting close to the initial planning was maintained, but from there the tasks were prolonged more than due and the planning had to be reorganized to adjust it to more real deadlines, having as objective the date of the second delivery. In spite of this, new problems arose since the process of level design got a bit stuck and the subsequent modeling of the scenario with the ProBuilder tool also took many more hours than expected, as the first results were not optimal and a large part of the scenario had to be reworked. It was at this point that it was decided to use trello to keep better control of tasks. In addition to all this, a series of bugs were detected that had to be fixed. The new cursor wasn't precise and it affected the aiming and the rotation of the player ship, some enemies lost the target and stood still after one of them was killed, the guided missile rotated at different speeds, etc. The solution of these errors and some more had priority over other tasks. As well as tasks like adding all the features of Game Feel that were not in the initial planning and had to be added to get a better experience. This meant that tasks such as programming the menu, creating user interface art and adding audio had to be reduced in time, so the result in these sections is not at the same level. The creation of the shaders turned out to be easier than expected once the operation of some key nodes was understood, although the biggest problem came when looking for the information necessary to understand it; that's why shaders as one of glitch effect or another of chromatic aberration were discarded for the second planning and they were replaced by the effects of postprocessing in spite of offering more limited options for the user. It should also be noted that other features such as the increasing rate of descent of the health/ammo meter when charging the shot were discarded once programmed because they did not fit well into the gameplay. It was also necessary to take an alternative path in the creation of the AI of the enemies, but the result was similar to what was expected. Finally, as far as working hours are concerned, it is possible that the limit of 300 hours was exceeded, perhaps staying closer to 400 hours and without having finished at 100% since there is still room for improvement in aspects such as the design and operation of the interfaces and the music could be replaced by original pieces that get more closer to the retrowave style.. 55.
(56) Mario Tormo García. Final Degree project. 56.
(57) Mario Tormo García. Final Degree project. 6. Conclusions and future work 6.1 Conclusions In spite of all the difficulties, a first level that works as a demo by bringing together the essential features that defined the original idea has been developed, that means a game inspired by arcades without much complexity but with a remarkable difficulty and mechanics that serve various purposes such as shooting, which in this game is used both to attack enemies as to activate switches, gain impulses, dry braking or change direction. For these mechanics to work and feel deep and fun the design has to follow, the enemies try to surround you or the turrets die with their own missiles to ensure that the player makes use of the shot and its recoil force in various ways. The same is intended with the use of timer switches or different traps. All these elements are presented gradually, starting at a save area and trying to introduce the different types of enemies and traps one by one to make sure that the player learns to overcome them so later they can appear combined to increase the difficulty without becoming unfair. The player's movement mechanic was created by assigning a Rigidbody to the player’s ship to make use of the Unity physics engine. Both the standard movement with the keys W, A, S and D and the impulse received after each shot have been programmed using AddForce() allowing the forces to be added or subtracted to achieve the desired control. To make the response of the game feel better, a series of features were added such as camera shake, camera freeze, knockback animations, hit animations, muzzle flash effects, etc. Most of them to add more strength and impact feeling to the shots and as can be appreciated in the GIFs, the difference is remarkable. For the enemies AI there were difficulties to achieve the objective of surrounding the player so an alternative way was taken in which a series of empty objects are created around the player, as many as enemies, and these are assigned as targets of the enemies as they enter their action radius. In spite of this, the results obtained are similar to what was expected at the first moment. Regarding missile guidance, several difficulties were also encountered, but in this case, they were resolved as expected. Regarding the mechanics of risk/reward, health and ammunition meters have been joined, making them share the same value. Besides, to regenerate this value the player must remain a while without firing, being more vulnerable. This generates situations in which, for example, the player has little health/ammo and must decide if it is worth using what is left in a loaded attack to eliminate the enemy, to run away or if it is better not to shoot and try to recover. This system works well in combat but loses relevance in the more abundant trap sections. In spite of having completed what was initially planned, the objective has not been fully achieved. The final look of the game is satisfactory. The visuals are appealing and the references are visible without feeling like a copy. The shapes are easily recognisable and help to distinguish. 57.
(58) Mario Tormo García. Final Degree project. the elements despite the colour palette not being very wide. The key to the neon look has been the use of emitting colours in the shaders and the post-processing bloom effect; other effects such as noise, chromatic aberration or lens distortion have also helped to imitate the retro-futuristic style. The particle effects created provide greater visual richness while still fitting into the same aesthetics and the time spent reading information about Shader Graph and creating shaders for the walls and floor has served to learn more about this tool and how shaders work in general. Overall, it is believed that a satisfactory final appearance both in the visual section has been achieved, mentioned above, and in the gameplay area since the game feels good and all the bugs found during development have been corrected. The only sections that are at a lower level are the UI and the sound part, perhaps because they were the last tasks of development and had less time for being polished.. 6.2 Future work Now that the core of the game is created, there are many ways in which the project can be expanded. The most obvious is the creation of new levels introducing new enemies, traps and puzzles more complicated. For example, the way it has been developed allows changing the colors of the scenario easily to distinguish the levels (Figure 42). Going a step further, you could also add boss fights at the end of each level or succession of levels. Neither would it be difficult to develop alternative game modes such as races against the clock or against an AI, or one about resisting waves of enemies. All in all, the possibilities that open up are very broad.. Figure 42: An example of a possible future level with a different color scheme.. 58.
(59) Mario Tormo García. Final Degree project. Bibliography References: [Unity manual] - Last Access: 02/07/2019 https://docs.unity3d.com/es/current/Manual/UnityManual.html [S. shooter tutorial] - Last Access: 02/07/2019 https://youtu.be/R8O8Y6xP79w [Projectile tutorial] - Last Access: 02/07/2019 https://youtu.be/xenW67bXTgM [Camera tutorial] - Last Access: 02/07/2019 https://youtu.be/MFQhpwc6cKE [Camera shake tutorial] - Last Access: 02/07/2019 https://youtu.be/9A9yj8KnM8c [Screen freeze tutorial] - Last Access: 02/07/2019 https://youtu.be/ji-2t_JLkB4 [S. graph manual] - Last Access: 02/07/2019 https://docs.unity3d.com/Packages/[email protected]/manual/index.html [S. graph tutorial] - Last Access: 02/07/2019 https://youtu.be/oHPrMjAIBZc [Game Feel Talk] - Last Access: 02/07/2019 https://youtu.be/AJdEqssNZ-U Tools: [Unity] - Last Access: 02/07/2019 https://unity.com/es [ProBuilder] - Last Access: 02/07/2019 https://assetstore.unity.com/packages/tools/modeling/probuilder-2-x-111418. 59.
(60) Mario Tormo García. Final Degree project. [ProGrids] - Last Access: 02/07/2019 https://assetstore.unity.com/packages/tools/modeling/progrids-2-x-111425 [TextMesh Pro] - Last Access: 02/07/2019 https://assetstore.unity.com/packages/essentials/beta-projects/textmesh-pro-84126 [Universal Sound Fx] - Last Access: 02/07/2019 https://assetstore.unity.com/packages/audio/sound-fx/universal-sound-fx-17256 [Ultimate Game Music Collection] - Last Access: 02/07/2019 https://assetstore.unity.com/packages/audio/music/orchestral/ultimate-game-music-collection -37351 [Blender] - Last Access: 02/07/2019 https://www.blender.org/ [Photoshop] - Last Access: 02/07/2019 https://www.adobe.com/es/products/photoshop.html?promoid=PC1PQQ5T&mv=other [Google Drive] - Last Access: 02/07/2019 https://www.google.com/intl/es_ALL/drive/ [Trello] - Last Access: 02/07/2019 https://trello.com/ [GitHub] - Last Access: 02/07/2019 https://github.com/ GIFS: [F12] - Last Access: 02/07/2019 https://imgur.com/ypEgNkh [F13] - Last Access: 02/07/2019 https://imgur.com/Yg9Gnxj [F19] - Last Access: 02/07/2019 https://imgur.com/EPOdL5Y [F20] - Last Access: 02/07/2019 https://imgur.com/e4JihN2 [F36] - Last Access: 02/07/2019 https://imgur.com/N6LxeR3. 60.
(61) Mario Tormo García. Final Degree project. Figures: [F1] - Last Access: 13/07/2019 https://www.wired.com/2016/11/pinout-game/amp [F2] - Last Access: 13/07/2019 https://www.mobygames.com/game/geometry-wars-3-dimensions-evolved/promo/promoIma geId,108545/ [F6] - Last Access: 13/07/2019 https://videogamehistory.fandom.com/wiki/Battlezone [F7] - Last Access: 13/07/2019 http://www.classicgaming.cc/classics/asteroids/ [F8] - Last Access: 13/07/2019 https://www.xataka.com/cine-y-tv/cuando-a-tron-le-negaron-el-oscar-de-efectos-especiales-p or-considerar-que-utilizar-ordenadores-era-trampa/amp [F9] - Last Access: 13/07/2019 https://www.imdb.com/title/tt1104001/mediaviewer/rm267237376. Thanks to: Luis Amable García Fernández Begoña Martínez Salvador José Martínez Sotoca Sergio Montellano Cuartero Josep Tormo García Paula Val Corvera. 61.
(62)
Figure
![Figure 9: Tron: Legacy(2010). [F9] .](https://thumb-us.123doks.com/thumbv2/123dok_es/7220872.427574/23.894.131.765.536.893/figure-tron-legacy-f.webp)
+7


Documento similar
In 2013 the company employed over 350 people and was still managed by the fifth generation of the Garay family, a point of reference in Spanish industrial activity.. La indu-
This conception forces the design process on the fundamental problem of the identity of each architecture: what a character/architecture is, what is its role in the whole scene/city
Bearing in mind the need to coschedule distributed applications in Clusters or NOWs when they are executed jointly with local workload, two coscheduling techniques have been
The following figures show the evolution along more than half a solar cycle of the AR faculae and network contrast dependence on both µ and the measured magnetic signal, B/µ,
The conclusions of the present work can be summarized as follows: i) the EB beam that is used to image the sample, carries an electromagnetic field that produces SPR in the Ag
While Russian nostalgia for the late-socialism of the Brezhnev era began only after the clear-cut rupture of 1991, nostalgia for the 1970s seems to have emerged in Algeria
What is perhaps most striking from a historical point of view is the university’s lengthy history as an exclusively male community.. The question of gender obviously has a major role
Conclusions: These findings indicate that some of the long-term changes in metabolic and reproductive parameters induced by MD, such as advanced pubertal onset and
