Contribution to Asterisk Open Source Project
93
0
0
Texto completo
(2) Contribution to Asterisk Open Source Project. (2009) Sergio González Martín This document is licensed under the Creative Commons v3 by-ncsa license. For more information look at Annex A or refer to http:// creativecommons.org/licenses/by -nc-sa/3.0/. ii.
(3) Contribution to Asterisk Open Source Project. Abstract. With this final master thesis we are going to contribute to the Asterisk open source project. Asterisk is an open source project that started with the main objective of develop an IP telephony platform, completely based on Software (so not hardware dependent) and under an open license like GPL. This project was started on 1999 by the software engineer Mark Spencer at Digium. The main motivation of that open source project was that the telecommunications sector is lack of open solutions, and most of the available solutions are based on proprietary standards, which are close and not compatible between them. Behind the Asterisk project there is a company, Digum, which is the project leading since the project was originated in its laboratories. This company has some of its employees fully dedicated to contribute to the Asterisk project, and also provide the whole infrastructure required by the open source project. But the business of Digium isn't based on licensing of products due to the open source nature of Asterisk, but it's based on offering services around Asterisk and designing and selling some hardware components to be used with Asterisk. The Asterisk project has grown up a lot since its birth, offering in its latest versions advanced functionalities for managing calls and compatibility with some hardware that previously was exclusive of proprietary solutions. Due to that, Asterisk is becoming a serious alternative to all these proprietaries solutions because it has reached a level of maturity that makes it very stable. In addition, as it is open source, it can be fully customized to a given requirement, which could be impossible with the proprietaries solutions. Due to the bigness that is reaching the project, every day there are more companies which develop value added software for telephony platforms, that are seriously evaluating the option of make their software fully compatible with Asterisk platforms. All these factors make Asterisk being a consolidated project but in constant evolution, trying to offer all those functionalities offered by proprietaries solutions. This final master thesis will be divided mainly in two blocks totally complementaries. In the first block we will analyze Asterisk as an open source project and Asterisk as a telephony platform (PBX). As a result of this analysis we will generate a document, written in English because it is Asterisk project's official language, which could be used by future contributors as an starting point on joining Asterisk. On the second block we will proceed with a development contribution to the Asterisk project. We will have several options in the form that we do the contribution, such as solving bugs, developing new functionalities or start an Asterisk satellite project. The type of contribution will depend on the needs of the project on that moment. iii.
(4) Contribution to Asterisk Open Source Project. iv.
(5) Contribution to Asterisk Open Source Project. Contents Acknowledgments...............................................................................................iii Abstract...............................................................................................................v 1. Introduction.....................................................................................................1 1.1. Objectives.................................................................................................1 1.2. Motivations...............................................................................................2 1.3. Scope........................................................................................................3 1.4. Expectations of the Contribution..............................................................4 1.5. Document Structure.................................................................................4 2. The Asterisk Open Source Community............................................................5 2.1. Project Tools..............................................................................................5 2.1.1. Web....................................................................................................6 2.1.2. MailMan..............................................................................................7 2.1.3. Subversion.........................................................................................8 2.1.4. Mantis................................................................................................8 2.1.5. Review Board.....................................................................................9 2.1.6. IRC Channels......................................................................................9 2.1.7. Wiki..................................................................................................11 2.1.8. Forums.............................................................................................11 2.1.9. Knowledge Base (KBPublisher).........................................................12 2.1.10. Blogs..............................................................................................12 2.1.11. Local Tools......................................................................................12 2.2. Established Procedures...........................................................................13 2.2.1. Getting Started................................................................................13 2.2.2. Coding for Asterisk...........................................................................13 2.2.3. Testing Asterisk and Reporting Issues..............................................15 2.2.4. Project Recommendations................................................................16 2.3. Community Key People...........................................................................17 2.4. Asterisk Project Events...........................................................................17 3. The Asterisk PBX............................................................................................19 3.1. State of the Art.......................................................................................19 3.2. Asterisk PBX Architecture.......................................................................21 3.2.1. Loadable Module APIs......................................................................22 3.2.2. Asterisk Core....................................................................................23 3.3. Asterisk Installation and Configuration...................................................24 3.3.1. Dial Plan...........................................................................................30 3.3.2. VoIP Protocols...................................................................................34 3.3.3. Command Line Interface (CLI).........................................................41 3.3.4. Asterisk Gateway Interface (AGI).....................................................42 3.3.5. Asterisk Manager Interface (AMI).....................................................45 3.4. Asterisk Code Structure..........................................................................50 3.4.1. Asterisk's Satellite Projects..............................................................53 3.4.2. Coding Guidelines............................................................................53 4. Contributing to Asterisk project.....................................................................57 4.1. Contributing with a Janitor Project..........................................................57 v.
(6) Contribution to Asterisk Open Source Project. 4.1.1. Choosing a project...........................................................................58 4.1.2. Project Analysis................................................................................59 4.1.3. Development of the Janitor Project..................................................60 4.1.4. Commit changes to the project........................................................61 4.2. Contribution 1: Reporting a bug..............................................................64 4.2.1. Extracting information about the bug..............................................64 4.2.2. Reporting the bug............................................................................66 4.3. Contribution 2: Working on a bug solution..............................................66 4.3.1. Working on the bug..........................................................................66 4.3.2. Contributing the resolution..............................................................69 4.4. Contribution 3: Testing a patch for a new feature...................................69 4.4.1. Testing the patch..............................................................................69 4.4.2. Giving feedback from the patch.......................................................72 4.5. Contribution 4: Testing a patch to solve a bug........................................72 4.5.1. Testing the patch..............................................................................72 4.5.2. Giving feedback from the patch.......................................................73 5. Conclusions...................................................................................................74 References.........................................................................................................76 Appendix A – Creative Commons BY-NC-SA License .........................................78 License.......................................................................................................78 Creative Commons Notice..........................................................................84 Appendix B - Digium Open Source Software Project Submission Agreement....86. vi.
(7) Contribution to Asterisk Open Source Project. 1. Introduction. The Open Source community has been growing up the last years with a great quantity of projects being created and some of them becoming a reference on their own areas of interest. Some examples of these open source leading projects are Apache as the most widely used web server, PHP reaching an important quote of web pages developed or Eclipse being one of the integrated development environment (IDE) most widely used. All these projects have been growing thanks to their contributors and the community of persons that they have behind. Another one of these projects which is growing very fast the last years is Asterisk. The Asterisk project is battling in a field, the telephony platforms, which, as a telecommunication field, has a large tradition of proprietary solutions and platforms, so it is an area where an open source project has an special interest. In this final master thesis we will analyze the project and proceed with a contribution to the Asterisk project to study all the aspects regarding the contribution to an open source project.. 1.1. Objectives. This final Master thesis is defined as the last subject (PFM) of the Master of Science in Free Software of the Universitat Oberta de Catalunya [1]. For that reason, we will try to apply all, or at least a part, of the knowledge gained during the different subjects of that Master. To achieve that we will establish some initial objectives which we will try to accomplish during the development of the current thesis. Those initial objectives are: ●. Study the internal operation of an open software community.. ●. Study the steps to be followed to start a collaboration with an open software project.. ●. Study the architecture and code of the Asterisk IP Private Branch Exchange (PBX).. ●. Write a document which could serve to future Asterisk contributors as an introductory manual, which will ease the task of introducing themselves on the Asterisk project. This will be a part of the current document.. ●. Taking advantage that Asterisk is an open source product, we will execute 1.
(8) Contribution to Asterisk Open Source Project. an analysis of the source code to establish a base for future contributions. ●. Do several contributions to the project in the way that we find more suitable, once we have deeply analyzed the Asterisk project.. This last objective is the main final objective of this final master thesis, which is reflected on the title of the thesis, but to accomplish this objective, all the rest objectives must be accomplished.. 1.2. Motivations. As this final master thesis is conceived as the summarizing subject of the Master of Science on Free Software, it should make use of most of the competencies acquired during the study of previous subjects by developing a complete work. Regarding the thematic of this thesis, as most of the elective subjects that I have coursed are of a technical thematic, such as software development or networking, this will be mainly a technical application project. Due to the nature of the Asterisk PBX, this thesis will cover the following areas of interest: ●. Free Software, as Asterisk is an open source community.. ●. C language software development, as our main contribution will consist in coding several issues, such as bugs or new features, for the Asterisk PBX, which source code is written in C.. ●. IP Telephony, as Asterisk is an IP based PBX, we will take contact with some IP telephony related technologies such us protocols and codecs. It will we interesting to distinguish which of them are open and which are proprietaries.. ●. Networking, as Asterisk is an IP based PBX, underlying it will be the networking layer which will interfere in the correct function of the PBX.. A part from the academic motivation, I also have a professional motivation. Nowadays I work in a company [3] that develops a software suite for Call/Contact Centers and ACD (Automatic Call Distribution) environments. I take part of the development of a proxy which allows the communication between the rest of applications of the suite, which originally were developed to work with proprietary PBX (Avaya, Nortel and Ericsson), with an Asterisk PBX environment. For that reason, gaining a deep knowledge of the Asterisk PBX will be a help for my professional work.. 2.
(9) Contribution to Asterisk Open Source Project. 1.3. Scope. In this thesis the main objective is to contribute to the Asterisk open source project by developing some code for the project. But, in order to achieve that, there are several tasks that must be completed previously. First of all, we need to perform a deep analysis of the open source project and its community with the objective of getting a first contact with it and to learn how the community functions internally. Two points of special interest will be discovering all the tools available to work with the Asterisk project and how should them be used. Once we have studied the community itself the next step will be the study the product produced by it, that is, the Asterisk IP PBX itself. We will study its architecture, the way it is configured to work properly and, the most important part, the source code which, being an open source project, is freely accessible. Once we have studied all those technical aspects of the project we will focus on introducing ourselves in the Asterisk community, it is all the required steps to do a contribution to the project for all the possible types of contributions available (developing code, testing functionalities, documenting, ...). From this point and all the aforementioned, we will construct a section on the thesis document which will be intended to be used by future contributors to ease its introduction to the Asterisk project. It's due to that reason that we have chosen an open license, like is the Creative Commons license, to the current document so it will be freely accessible and modifiable by future contributors, and it has been written in English language since it is the official language of the project. Finally, the last point regarding this final master thesis, will be a contribution to the project, which, as it is the title of the thesis, will be the main objective of it. As the contributions will depend on the needs of the Asterisk project, we cannot define them at this point of the project. The only that we know is that, for coding contributions, there exists some projects called Janitor Projects [4] that serve as an introductory point on coding for Asterisk PBX. These project basically are some code maintenance tasks, so don't have a critical risk for Asterisk. So the first step of our contribution will be selecting one of these projects a solve it. Then, once we have developed the whole project, we will need that someone with write permissions on Asterisk's Subversion commits our code to the trunk. That's due to by default a new developer won't have write permissions to the repository. It only will be granted once the developed has proved its value by developing some contributions of good quality. Then we will study the Asterisk's needs of the moment and will choose which will be our next contributions based on that.. 3.
(10) Contribution to Asterisk Open Source Project. 1.4. Expectations of the Contribution. Before starting the study of Asterisk, we will define what are our expectations from contributing to an open source project as is Asterisk, to check later, when we have done the contribution, if we have accomplished them. First of all we expect that, due to the open source nature of the project, we will have an easy access to all the required information about the project which we allow that we can introduce ourselves to the project. Another point that we expect is to have a direct contact with the people of the community which will help us in this task of introducing to the project. Once we have introduced ourselves to the project we expect to have direct contact with the project developers because we will need help to define the kind of contribution that we will do. In that point, we also expect a direct communication with the project developers in order to guide us in the way in that our contribution is developed.. 1.5. Document Structure. On next sections we will proceed with the contribution to the Asterisk project. First of all we will describe the Asterisk project, describing its structure, the procedures and methodologies defined on it, the available infrastructure and the different ways of contributing with the project as well as the steps to follow to start a contribution with Asterisk open source project. Next we will introduce us on the project main product: the Asterisk PBX. In this section we will analyze Asterisk as a Software product and as an IP telephony platform. As a Software product we will study its code, how it's organized, which functionalities are currently developed and how the different parts are connected through its internal architecture. As a telephony platform we will study how it works, how is the configuration process and which compatibilities and supports currently offers. Following, once we have studied the Asterisk community and we have some knowledge about the Asterisk PBX and its code, we will proceed with some contributions to the Asterisk project, trying to develop some fixes and/or new features required by the project. To achieve that first of all we will join the community and start a first contribution through the development of one of the available Janitor Projects. Finally we will evaluate our contribution exposing some conclusions about it, checking if our initial expectations have been fully or partially accomplished. 4.
(11) Contribution to Asterisk Open Source Project. 2. The Asterisk Open Source Community. Telecommunications is probably the last major electronic industry that has remained untouched by open source. Manufacturers still build solutions very expensive, incompatible with other manufacturers' solutions, of a complicated configuration and running on an obsolete hardware. To avoid all those problems, the Asterisk project was started. The Asterisk open source project was started by Digium's engineer Mark Spencer, who nowadays is still leading the Asterisk's community. One of the majors achievements of the Asterisk project is that it has been generated among technology professionals, networking professionals and information professionals who, while traditionally have been at odds with each other, in the Asterisk's community they share they efforts. The members of the Asterisk community are generally welcoming new users but as the project is growing up so fast and many people is gaining interest on it, they become tired of being asked about that kind of questions whose answers can often be obtained independently. So self-teaching skills are expected for new contributors of the project. New users don't fit any particular stereotype. While some will spend hours researching and experimenting with Asterisk, others are uninterested in such issues and want a simple way to get Asterisk set up and running. Inside the community, there are people with different skills sets and attitudes, so in order they can work together for the best profit to the Asterisk project, there are some tools and procedures required and offered by the project.. 2.1. Project Tools. At this point, we are going to analyze all the tools offered by the project to its community to help them in the task of contributing to the project. All that community tools are maintained by Digium. We will also study the tools that we will need to have installed on our local machine when contributing to the Asterisk project. We will require all these tools, those which are local and those which are accessible remotely via web access, to continue with the development of this thesis and complete our main objective which is the contribution to the Asterisk project.. 5.
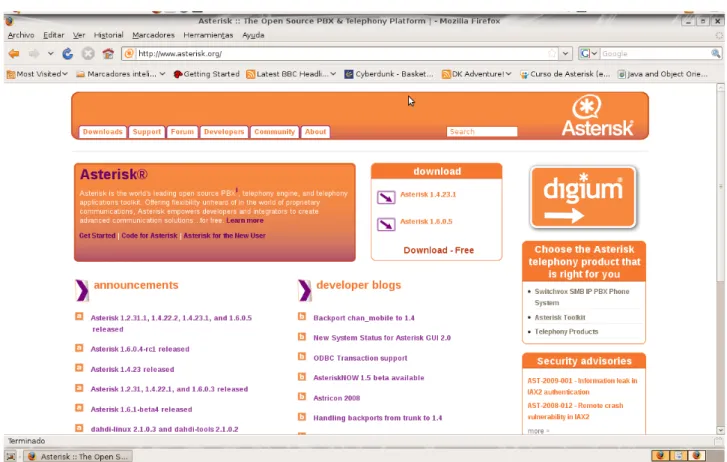
(12) Contribution to Asterisk Open Source Project. 2.1.1. Web. The Asterisk project is centralized on its web [2]. From that web page we have an easy access to all the rest of the tools provided by the open source project. There is also a lot of information about the project and its structure and operation. It's mainly divided in six areas, accessible through a corresponding button:. Fig. 1: Asterisk main webpage. ●. Downloads: From that area we have access to download all the packages related to the project. There are available those of the last stable version, the beta version and release candidate, and all the previously stable version.. ●. Support: In this section we have access to helpful documentation about Asterisk PBX which should be consulted prior to reporting a bug or asking a question to the community.. ●. Forum: A direct access to the project's official forums.. ●. Developers: From this section we have access to helpful information for Asterisk developers. There is defined the way in the Asterisk code is 6.
(13) Contribution to Asterisk Open Source Project. maintained, how can it be accessed and modified and some guidelines to keep in mind when developing for Asterisk ●. Community: In this section are located all the ways in which we can contact with the Asterisk community. ●. About: In this section some miscellaneous information is provided.. 2.1.2. MailMan. The Asterisk community has an e-mail distribution list tool with MailMan [6]. Within those lists some aspects of Asterisk are discussed, depending on the thematic of the list. There are defined several distribution lists, but probably the more interesting are the following: ●. asterisk-users: This list is the most used of all. There are discussed a lot of thematics on it, like configuration aspects, integration with third parties or developments around asterisk (but not inside it).. ●. asterisk-dev: In this list there are discussions regarding the development of Asterisk.. ●. asterisk-bugs: In this list are discussed the solution of these bugs that aren't of trivial resolution.. ●. asterisk-commits: In this list there are automatic generated e-mails when a commit is done to the asterisk project on subversion.. For our proposals, the asterisk-dev list is the list that is more interesting to be subscribed to than the others, although the asterisk-users list could be helpful while we study how asterisk works and how should it be configured. Despite this, we will only subscribe to the asterisk-dev list because it is of special interest for our final master thesis and if we needed any information regarding any other list, the archives of all the lists are accessible from [6]. So we will be able to consult any message of any lists if were needed. To subscribe ourselves to the asterisk-dev, first of all we need to go to [6] and select the corresponding list. Then we have to introduce, in the corresponding field, the e-mail address where we want to receive the e-mails from that list. In that process we have the interesting option of receiving digest e-mails instead one copy of all the e-mails. That's interesting for disk space option, and more due to the fact that the whole list archive is freely accessible, so if we need additional information we can find it. Once we have submitted that information, we will receive a confirmation e-mail that is sent to confirm the authenticity of the given e-mail address. That e-mail contents a link which serves as confirmation of our e-mail address, and once we have accessed to that link we 7.
(14) Contribution to Asterisk Open Source Project. will start receiving e-mails from the list. Another option to confirm address is by replying the sent e-mail without modifying the subject field, since it contents an identifier number.. 2.1.3. Subversion. The source code of the asterisk project is maintained through a Subversion repository [7]. In that repository are maintained the code of the main Asterisk project and the source code of other Asterisk related project and some projects “satellite” to Asterisk. On next chapter we will study the source code organization of Asterisk more in depth. We can have anonymous access to it in read only mode to checkout the code and review it, but we won't be able to commit our code to Asterisk's Subversion since the anonymous user doesn't have that kind of privileges. If we want to commit our changes, first of all we need to open an issue in the issue tracker (see section 2.1.4) and an senior Asterisk's developer with write privileges on Subversion should review it and commit it if convenient. Prior to gain the write privilege to Subversion repository, we need to prove our value by doing several contributions of proved quality to the project. Once done that, which is decided by the project leaders, we will have access to an Subversion user with write privileges and we will be able to commit our changes ourselves.. 2.1.4. Mantis. All the bugs and new features are tracked through Mantis [8]. To be able to report new issues, first of all we need to create a user. To do that we only have to provide an user name and a valid e-mail account. Then a confirmation e-mail is sent to the provided e-mail account in order to validate it. Done that, we have completed access to Mantis and we can report new issues and consult any existent issue. The Asterisk's bug tracker is used to track bugs and documentation elements that need to be discussed in a permanent, semi-threaded manner and which can more easily store programmatic or textual difference files ("diff -u") in a manageable way. The Mantis bug tracker is designed to allow the user community to work on different issues so that the brunt of the work is moved from the shoulders of the small development staff onto the more distributed group. 8.
(15) Contribution to Asterisk Open Source Project. The primary use of the bug tracker system is to track bugs, where "bug" means anything that causes unexpected or detrimental results in the Asterisk PBX. The secondary purpose it's to track some of the miscellaneous issues surrounding Asterisk, such as documentation and commentary.. 2.1.5. Review Board. Asterisk project offers a tool for reviewing the source code developed for some new features or resolutions for bugs with Review Board [9]. With this tool, the new code developed when resolving non trivial bugs or implementing new features, can be published in a user friendly way and other developers can review the code and make any suggestion if needed. For a better communication purpose, this tool is connected with the asterisk-dev mail distribution list so every time a new review is posted, a new e-mail is sent to the distribution list so all the Asterisk's developers are informed. This tool is still in a beta state since it has been recently implanted. To access to this tool we need a user name and password which is the same as that created for accessing Mantis. But before we can access, we need to read and sign the Digium Open Source Software Project Submission Agreement (see appendix B) which is a license agreement according to which Digium has license to use, reproduce, modify or redistribute any work submitted to the project.. 2.1.6. IRC Channels. The Asterisk community also needs a way to communicate instantly and it's granted with IRC Channels. In the IRC server Freenode [9], there exists some groups in which different Asterisk's communities, such us developers or users, can dialogue about the project. The official language for all the channels, except for those language specific, is English. The channels that currently exists at Freenode related with the Asterisk project are: ●. #asterisk: Channel for general asterisk issues. This is the place where help can be found for using and configuring Asterisk. This channel will be of special interest in this final master thesis when we will be introducing ourselves to the Asterisk PBX (see next section).. ●. #asterisk-br: Channel for the Brazilian Asterisk community where aspects regarding Asterisk can be discussed in Brazilian.. 9.
(16) Contribution to Asterisk Open Source Project ●. #asterisk-bugs: Channel to discuss if a reported issue is really a bug and to discuss the solution of it. This channel is directly connected with the Mantis system so every time a bug is reported or a bug is solved an automatic message is sent to this chat.. ●. #asterisk-commits: This channel is directly connected with the Subversion system so every time a new commit is done or a merge conflict appears, a new message is sent to the channel.. ●. #asterisk-cpp: This is a channel for the Asterisk C++ project, which is a project that is trying to adapt asterisk code to C++.. ●. #asterisk-dev: This is the Asterisk development channel. It is the place to discuss development issues such us new features for the project or the resolution of non trivial bugs. This channel will be of special interest in this final master thesis when we will be performing the contribution to the Asterisk project. It's connected with Subversion so with certain messages sent to the channel, a bot is called that can make some queries to Subversion. For instance, if there is a discussion about a certain commit number, it can be consulted through a message which return the description associated to the commit.. ●. #asterisk-doc: This is the place where documentation issues are discussed.. ●. #asterisk-es: Channel for the Spanish Asterisk community where aspects regarding Asterisk can be discussed in Spansih.. ●. #asterisk-gui: This is the channel to discuss issues about the Asterisk-GUI project, which is a graphical interface for administering Asterisk.. ●. #asterisk.de: Channel for the Deutsch Asterisk community where aspects regarding Asterisk can be discussed in German.. ●. #asterisknow: In this channels is intended for discussing issues about the AsteriskNOW project, which is a customized Linux distribution which includes Asterisk ready to use.. ●. #asteriskru: Channel for the Russian Asterisk community where aspects regarding Asterisk can be discussed in Russian.. Once we have reviewed the different IRC channels available at Freenode, we will need to create a user in order to access them, specially the aforementioned #asterisk and #asterisk-dev which are the most interesting for our purposes. To do that, we need to access via an IRC client to the Freenode server and send a messages some messages. First of all, with (1) we connect our client to an IRC server, which in this case is Freenode server. Then, we need to select a nickname (2) that we want to register and use later. This nickname shouldn't be previously registered because it must be unique. If the nickname is available 10.
(17) Contribution to Asterisk Open Source Project. the server will response us remarking that. Then we need to send a message (3) to register definitively the nickname giving a password and an e-mail address. After that, a good option could be to set hidden our e-mail address, which could be done with message (4), so it isn't visible for the rest of the users. And finally, the last step will be identifying ourselves with the nickname and password previously registered with (5), and once we are inside Freenode we can join the IRC channels of our interest. /server irc.freenode.net /nick OurNickname. (1) (2). /msg nickserv register <your-password> <your-email> /msg nickserv set hidemail on. (3). (4). /msg NickServ IDENTIFY <your-password>. (5). 2.1.7. Wiki. Although it isn't Asterisk project specific, it exists a wiki [11] which is considered the official wiki of the project. This wiki include a lot of information about VoIP (Voice over Internet Protocol) in general, and Asterisk in particular. Prior to this wiki, there existed an Asterisk documentation web page [12] which is intended to be the official documentation page for the Asterisk project, but nowadays it's unavailable due to a reconstruction of the site. Associated to the Asterisk documentation page, there exists a book [5] which is considered the bible of the project, a must-read for every new Asterisk community member.. 2.1.8. Forums. There also are some forums offered by Digium [13], where different information related with Asterisk can be found. It's a place where we can post any problem regarding the Asterisk configuration and the response will be public so anyone with the same problem will have the solution accessible.. 11.
(18) Contribution to Asterisk Open Source Project. 2.1.9. Knowledge Base (KBPublisher). This tool [14] is a searchable library of troubleshooting advice and current information updated by Digium support technicians. In this library we can found how some common configuration errors can be corrected and how a certain hardware should be configured in order to work properly with Asterisk.. 2.1.10. Blogs. The last tool offered by the Asterisk project, are the developers blogs [15]. In those blogs developers explain their ideas for new developments on Asterisk and their current developments for the project.. 2.1.11. Local Tools. Finally we will analyze the tools that we will need to have installed on our local machine in order to contribute to the Asterisk project in the frame of our final master thesis. This will be the environment that we will use to work with Asterisk and to complete the current final master thesis. Those indispensable tools are: ●. Linux distribution: Ubuntu Desktop 8.10. We will use a distribution with a x-window environment based on Gnome, as it is Ubuntu.. ●. Web Browser: Mozilla Firefox 3.1. This will be required to access all the project tools aforementioned.. ●. Integrated Development Environment (IDE): Netbeans IDE 6.1. To analyse the code and develop new code we will use this IDE which, despite it was created to work with Java, it has got a good plug-in to work with C/C++.. ●. Office application suite: OpenOffice.org 2.4.: To create documentation during this final master thesis.. ●. Subversion client: Netbeans plug-in. To access to the Subversion repository and get the last version of the code available for Asterisk, we will use the plug-in of Netbeans which will ease the task of updating the code and accessing to previous versions of the source code.. ●. Development libraries: In order to compile Asterisk we need to have 12.
(19) Contribution to Asterisk Open Source Project. installed some development libraries. ●. Project Planning tool: Planner 0.14.3. To keep the planning of the final Master thesis we will require this tool.. ●. IRC chat: Xchat-GNOME 0.24.1. To have a graphical access to the Freenode IRC server we will use this tool.. 2.2. Established Procedures. Once we have studied all the tools offered and required to work with the Asterisk project, we will describe all the procedures defined within the project. All those procedures are public and can be consulted on the project main web page. Those procedures basically define the steps to be followed when doing a common action with the community, such as reporting a new bug or committing a new code development.. 2.2.1. Getting Started. When someone wants to introducer himself to the Asterisk PBX, there exists an established procedure which consists of the following steps: 1. Choose the Asterisk version that best fits our needs. 2. Learn Asterisk architecture and features by reading some given resources. 3. Download and install the chosen version of Asterisk. 4. Learn Asterisk's configuration aspects by reading some given resources.. 2.2.2. Coding for Asterisk. When we are going to code for Asterisk, having knowledge in a few key areas regarding coding for Asterisk will be extremely helpful in getting the code committed to the SVN repository for the Asterisk project (as initially we won't have write access to the respository). We should follow some steps described in 13.
(20) Contribution to Asterisk Open Source Project. this project' standard procedure: 1. First of all we need to get the latest version of the source code of Asterisk. 1.1 Optional: If we have been granted with a workspace in SVN, we will need to configure it in order to be able to commit our work to it. 2. Review the code structure to familiarize with it. 3. Build asterisk to check that we can compile it properly, which will be needed when developing for Asterisk. To do that we will need to have installed ncurses, openssl, zlib and their associated devel packages. 4. Prior to start writing code for Asterisk, we need to read the coding guidelines document, which is available on Subversion repository of Asterisk, and which explains the standard formatting that we will need to implement when writing code for Asterisk. 5. Once we have learned the rules for coding for Asterisk, we need to decide what will be our contribution. If it's our first contribution, the Asterisk project has defined several projects, that are called “Janitor Projects” and are intended to be a nice starting point for new developers. Those projects basically cover several code maintenance tasks, which let new developers to take a first code with the Asterisk source code. On the other hand, if we are experienced contributors our contribution could be any. 6. During the process of developing the contribution, if it's a non trivial development, we will need help from the rest of the development community to solve it in the best way for the project. In this case we will need to request a code review (using the code review tool showed on section 2.1.5) from the rest of asterisk developers. 7. Then, when we have finished our contribution, it will be the point of having it reviewed by the community. As we won't have write access to the Subversion repository, we will need to create Every new development submitted to Subversion has associated a license agreement between the developer and Digium which grant the redistribution rights to Digium. The developer maintain its copyright over the source code developed. This way of work is very similar to that followed by the MySQL project.. 14.
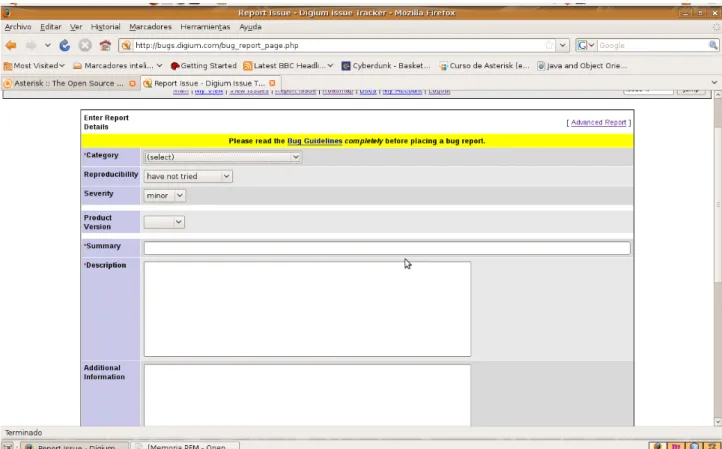
(21) Contribution to Asterisk Open Source Project. 2.2.3. Testing Asterisk and Reporting Issues. Once a new feature o bug patch development has been finished for the Asterisk project, exhaustive testing is required before it could be committed to the Asterisk's SVN repository. However, SVN maintainers and Bug Marshals do not have the time to test every patch or new feature. For this reason the project requires also contributors on performing this task. Working relationships are developed among Asterisk users on the #asterisk-dev and #asteriskbugs IRC channels and mailing lists so that patches can be tested thoroughly. Once a bug has been found, it's defined a procedure to follow for create a new issue on Mantis (seen at section 2.1.4) trying to minimize the time in which it's solved: 1 Extract SVN revision number through command svn info: If this is not the most updated SVN version, we should get the latest version of the code and check again if the problem still occurs. We must do that because this bug could be already fixed on the latest version. 2 Get platform (O/S): Provide the distribution and version of software you are currently running ("Linux Redhat 9.0" as an example). 3 Reproducing the problem: We should be able to explain the steps to follow to reproduce the problem. If it isn't really repeatable we'll need to be extremely detailed in giving our configuration notes and including as much debug information as possible, as non-repeatable problems tend to be almost impossible to guess resolution types. 4 Getting debugging output: Include all the outputs from various traces, debugging, etc, as attachments and not as pasted text in the bug report. The bug tracker does funky things with line wrapping, etc. and an attached file makes more sense. 5 Make sure the bug doesn't already exist on Mantis: This may take some time, but duplication is a real problem to the project. In addition, reading the other bugs we might find something useful. 6 Open bug on Mantis: To do that we will need to provide the following information: 6.1 Naming the report: It's very important to name the issue appropriately. A detailed and good short description will help the bug marshals and developers to browse through the bug tracker and find your issue quickly. It is common use on the Asterisk bug tracker to put the text (minus quotes, but including brackets) of "[patch]" as the first part of a bug short description when the particular bug includes a source code patch. This helps the developers sort things appropriately 15.
(22) Contribution to Asterisk Open Source Project. (we'll let you guess which bugs get worked on first). 6.2 Categorize the issue: We must add our issue into the proper category because it ease developer's work. 6.3 Use polite language: When describing the issue, we should use complete sentences, capitalization, and avoid slang. This specially applies to non-native English speakers who may have picked up bad habits from IRC channels. 7 Commit the new bug: Once we have added all the information, we only need to submit it and the bug would be created. Following the described procedure our bug will be submitted to the bug tracking system and then it will be studied and solved by Asterisk's developers.. 2.2.4. Project Recommendations. Finally, there are also defined some considerations that should be followed for achieving a better quality of the Asterisk PBX. ●. ●. ●. What will slow down my bug/patch from being looked at: ○. No patch code (for features or some bugs). ○. Poor descriptions. ○. No back trace or debug information (in crash instances). ○. No follow up to questions by others. ○. Not having a contributor license agreement on file with Digium. What will speed up my bug/patch being implemented? ○. Testing by 1 or more others to reproduce events or use patch. ○. Good discussion by others in the bug notes. ○. Clear C code with excellent comments. ○. Clear debugging packet traces (for protocol-level VoIP issues). What does the Asterisk community need? ○. More testing by everyone to keep developer head-scratching time to a 16.
(23) Contribution to Asterisk Open Source Project. minimum. Testing award you karma points in the issue tracker.. 2.3. Community Key People. Finally we will present some people that have a key role inside the Asterisk project: ●. Mark Spencer: He is the founder of Digium, Inc., in 1999 as Linux Support System while he still was a student of computer engineering at Auburn University. He used his Linux and C code knowledge to develop his own PBX, what was the beginning of Asterisk. As Asterisk gained popularity, Spencer shifted his business from Linux support to supporting Asterisk and opening up the telecommunication market. Today he is the Chairman and CTO of Digium. He is widely regarded as the pioneer of open source telephony and gives frequent keynote addresses to large technology audiences.. ●. Russell Bryant: He is a Software Engineer graduated from Clemson University in the Fall of 2006. Since 2004 he has been a core member of the Asterisk development team. He became Asterisk's first release mantainer when Asterisk 1.0 was released at the first Astricon in 2004. Since then he has contributed to almost all areas of Asterisk development. In 2005 he was hired by Digium where he works up today.. ●. John Todd: He is the Asterisk's community manager at Digium. His main responsibilities are the management of all the community tools, such as Subversion repository or Mantis bug tracking.. ●. Joshua Colp (file): He is a software developer and a core developer of Asterisk. He's originally from Nova Scotia, Canada but currently live in New Brunswick. He works full time at Digium developing for Asterisk. Among other developments, he has developed VLDTMF (Variable length DTMF), the speech recognition API or non-blocking Logger. calls either synchronously or asynchronously to a device with the same feature set available to all other applications.. 2.4. Asterisk Project Events. Related to the Asterisk community, there has been established some events where people related with the Asterisk project can met together. The most 17.
(24) Contribution to Asterisk Open Source Project. important among them is the AstriCon, a three day conference about Asterisk which is celebrated yearly. AstriCon's mission is to expand awareness and knowledge of Asterisk. Asterisk developers and experts gather from miles around to become a part of AstriCon, the first official Digium sanctioned Asterisk Event. Since this year the Asterisk project has been added to the Google summer of code. The Google summer of code offer the possibility to students of working in some real world projects. This year, some of the Asterisk's core developers have offered to mentor some students while they develop their Google summer of code project on the Asterisk project.. 18.
(25) Contribution to Asterisk Open Source Project. 3. The Asterisk PBX. In this section we will introduce the Asterisk PBX. To achieve this, first of all we will review the state of the art in the telephony PBX solutions fields. Done that, we will present the Asterisk architecture, how it's installed and configured. Finally we will review the code structure of the Asterisk project doing a brief introduction to some Asterisk satellite projects.. 3.1. State of the Art. The Asterisk project was started as the first open source for IP telephony platforms and so there aren't any precedent of those platforms in the open source field. Regarding the open solutions we only find Trixbox, which started on 2004 as a fork from Asterisk (starting named as Asterisk@Home) with the main objective of developing an integrated solution for small office and home (SOHO) environments. So it is only a reduced version of Asterisk which can be run on computers less powerful. We also find other open source projects that, although aren't designed to work as PBX and with no so many functionalities as actually offers Asterisk (as it is a mature project), they are presented as alternatives started by developers that weren't agreed with some decisions taken by the Asterisk project. Those projects still require a lot of development to be done in order to achieve an state of maturity similar to that of the Asterisk project. Some of these projects are: ●. FreeSwitch [16]: This project is formed by some libraries which offer a communications platform. We could obtain a PBX based on those libraries which could be an alternative to Asterisk but all this development is still to be done.. ●. SipX (SIP PBX for Linux) [17]: It is an IP PBX which offers features very similar to Asterisk but with different implementations. It is probably the open source alternative closest to Asterisk in functionalities despite its community and its importance is lesser. SipX cooperates with the FreeSWITCH project since uses libraries from it for its multimedia server.. ●. OpenPBX [18]: This project, started inside the Voicetronix enterprise, offers a PBX solution with a very easy configuration and a fast deployment. The source code is very compact since it only is formed but 19.
(26) Contribution to Asterisk Open Source Project. over 1000 of Perl code lines. Due to its reduced size, it should be compared with the Trixbox project instead the Asterisk project. ●. PBX4Linux [19]: It is an ISDN PBX which connects ISDN phones, ISDN lines and H.323 gateways. Since it is limited to the ISDN technology, its possibilities are by far lesser than those of Asterisk PBX. It can be considered a dead project because there hasn't been any new release since 2005.. ●. CallWeaver (originally OpenPBX.org) [20]: Started as a fork of the Asterisk project but it hasn't achieved so many importance as the Asterisk projecte. Due to that, the development done in this project has been lesser, so this PBX offers less functionalities than Asterisk.. As we have aforementioned, the only alternatives to Asterisk being capable of offering a similar set of functionalities are proprietaries solutions. Those solutions aren't completely software and require of some kind of specific hardware to its functioning, and in most cases this hardware is completely not compatible among different vendors. So an important part of the cost of the proprietary PBXs, in addition to the licenses cost, is due to the price of the specific hardware required by the proprietary solution. Some of the vendors with a big market quote are Avaya, Nortel and Cisco. The Asterisk project was started on 1999 (version 0.1) by Mark Spencer at LSS (currently renamed to Digium) due to the lack of an open source quality solution on the PBX field. It become popular on year 2002, and since then it has been growing in popularity and improving its performance and features offered. There has been four stable major version launched up to nowadays, which are: ●. 1.0: launched on 2002 and the last version has been 1.0.12.. ●. 1.2: launched on 2005 and the last version has been 1.2.31.1.. ●. 1.4: launched on 2006 and the last version published is 1.4.25.. ●. 1.6: launched on the second half of 2008 and is the current trunk base version.. Asterisk is presented as a quality telephony solution, which hasn't got attached the purchase of any license neither the purchase of any specific Hardware, but it let choose the hardware more suitable for the requirements of every environment, in addition to allow, due to its open source nature, doing modifications in the source code to have a customized version of Asterisk. In addition to the project, Digium offers additional version of Asterisk which require a license payment. Those solutions basically are based on the Asterisk open source PBX but offer support and additional services to it associated to this licensing.. 20.
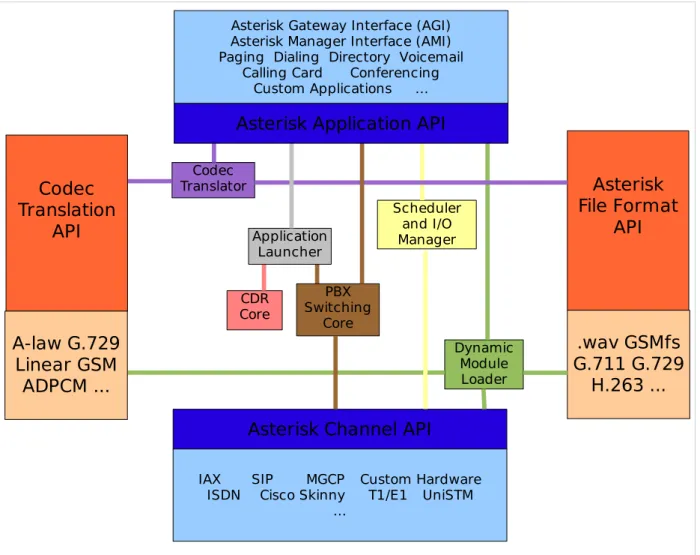
(27) Contribution to Asterisk Open Source Project. 3.2. Asterisk PBX Architecture. The Asterisk PBX has changed from previous versions, specially a big architectural change was done from version 1.2 to version 1.4. As we will work version over the trunk version of Asterisk, which is 1.6, we will focus on this version. Asterisk architecture [2, 5] is fundamentally very simple, but different from most telephony products. Essentially Asterisk acts as a middleware, connecting telephony technologies on the bottom, to telephony applications on top, creating a consistent environment for deploying a mixed telephony environment. Telephony technologies can include VoIP services like H.323, SIP, IAX and MGCP (both gateways and telephones), as well as more traditional TDM technologies like T1, E1, ISDN PRI, POTS and PSTN services, Basic Rate ISDN (BRI) and more. Telephony applications include features such as call bridging, conferencing, voicemail, auto attendant, custom IVR scripting, call parking, intercom and more.. Asterisk Gateway Interface (AGI) Asterisk Manager Interface (AMI) Paging Dialing Directory Voicemail Calling Card Conferencing Custom Applications .... Asterisk Application API Codec Translation API. Codec Translator Scheduler and I/O Manager. Application Launcher CDR Core. Asterisk File Format API. PBX Switching Core. A-law G.729 Linear GSM ADPCM .... Dynamic Module Loader. Asterisk Channel API IAX SIP MGCP ISDN Cisco Skinny .... Fig. 2: Asterisk PBX Architecture. 21. Custom Hardware T1/E1 UniSTM. .wav GSMfs G.711 G.729 H.263 ....
(28) Contribution to Asterisk Open Source Project. Asterisk has been carefully designed for maximum flexibility. Specific API (Application Programming Interface) are defined around an advanced, central PBX core system. The advanced core handles the internal interconnection of the PBX, cleanly abstracted from the specific protocols, codecs and hardware interfaces from the telephony applications which allows Asterisk to use any suitable hardware and technology available now or in the future to perform its essential functions - connecting hardware and applications. Using these APIs, Asterisk achieves a complete abstraction between its core functions as a PBX server system and the varied technologies existing (or in development) in the telephony field. The modular form is what allows Asterisk to seamlessly integrate both currently implemented telephony switching hardware and the growing Packet Voice technologies emerging today. The ability to load codec modules allows Asterisk to support both the extremely compact codecs necessary for Packet Voice over slow connections such as a telephone modem while still providing high audio quality over less constricted connections. The application API provides for flexible use of application modules to perform any function flexibly on demand, and allows for open development of new applications to suit unique needs and situations. In addition, loading all applications as modules allows for a flexible system, giving administrators the ability to design the best suited path for callers on the PBX system and modify call paths to suit changing communication needs. Asterisk's core contains several engines that each play a critical role in the software's operation. When Asterisk is first started, the Dynamic Module Loader loads and initialize each of the drivers, which provide channel drivers, file formats, call detail record back ends, codecs, applications and more, linking them with the appropriate internal APIs. Then, the Asterisk's Switching Core begins accepting calls from interfaces and handling them according to the dialplan, using the Application Launcher for ringing phones, connecting to voicemail, dialing out outbound trunks, etc. The core also provides a standard Scheduler and I/O Manager that applications and drivers can take advantage of. Asterisk's Codec Translator permits channel which are compressed with different codecs to seamlessly talk to one another. Most of Asterisk's usefulness and flexibility come from the applications, codecs, channel drivers, file formats, and more, which plug into Asterisk's various programming interface.. 3.2.1. Loadable Module APIs. Four APIs are defined for loadable modules, facilitating hardware and protocol abstraction. Using this loadable module system, the Asterisk core does not have to worry about details of how a caller is connecting, what codecs are in use, etc. 22.
(29) Contribution to Asterisk Open Source Project ●. Channel API: The channel API handles the type of connection a caller is arriving on, being it a VoIP connection, ISDN, PRI, Robbed bit signaling, or some other technology. Dynamic modules are loaded to handle the lower layer details of these connections.. ●. Application API: The application API allows for various task modules to be run to perform various functions. Conferencing, Paging, Directory Listing. Voicemail, In-line data transmission, and any other task which a PBX system might perform now or in the future are handled by these separate modules.. ●. Codec Translator API: Loads codec modules to support various audio encoding and decoding formats such as GSM, Mu-Law, A-law, and even MP3.. ●. File Format API: Handles the reading and writing of various file formats for the storage of data in the file system.. 3.2.2. Asterisk Core. A part of the aforementioned APIs, the rest of required PBX operations are performed by the Asterisk core, in addition to the interaction with the APIs. The main features performed by the core of Asterisk are: ●. PBX Switching: The essence of Asterisk, is a Private Branch Exchange Switching system, connecting calls together between various users and automated tasks. The Switching Core transparently connects callers arriving on various hardware and software interfaces.. ●. Application Launcher: Launches applications which perform services for uses, such as voicemail, file playback, and directory listing.. ●. Codec Translator: Uses codec modules for the encoding and decoding of various audio compression formats used in the telephony industry. A number of codecs are available to suit diverse needs and arrive at the best balance between audio quality and bandwidth usage.. ●. Scheduler and I/O manager: Handles low-level task scheduling and system management for optimal performance under all load conditions.. ●. Dynamic Module loader: It allows that all the modules of every API can be loaded and unloaded on real time.. 23.
(30) Contribution to Asterisk Open Source Project. 3.3. Asterisk Installation and Configuration. When we decide to install an instance of the Asterisk PBX we have different options. First of all we need to decide which version of those available we want to install. Currently there are mainly three active branches of the project: the 1.6 branch (also the trunk of the project) which is the trunk version and it is where new features are developed; the 1.4 branch, which was the previous development branch, where some new features are developed and bugs are solved; and the 1.2 branch, where only critical bugs are solved. If we are wishing to have the last version of Asterisk with new features then we should try a 1.6.X version of Asterisk, but if we are looking for a more stable version of Asterisk we should choose either 1.2.X or 1.4.X version, although it's recommended to use 1.4.X versions over 1.2.X since it's architecture makes it more reliable. Another election that we need to do is the way in we will install Asterisk. We have several option to do that. First of all there are pre-compiled packages for some distributions like Red Hat (RPM packages) or Debian (DEB packages) which ease the installation of Asterisk. Installing Asterisk in this way has the drawback that we won't have the maximum performance that we could have with our machine since it isn't compiled explicitly for our machine configuration. To avoid this drawback we should compile Asterisk from source code. This can be done by downloading a tarball with the selected version or obtaining the source code from Subversion repository. There exist another option to have an Asterisk PBX installation that is probably the easiest way. It consist in an Asterisk related project, called AsteriskNOW [21], which consist in a customized GNU/Linux distribution (based on CentOS) which has Asterisk pre-installed and once we install the distribution on a machine we have Asterisk running properly. In our case, we will use the trunk version (1.6 branch) of Asterisk, since our main objective of the final master thesis is to develop over it. And we will install it from source code obtained from Subversion, since the trunk version is only available from the Asterisk's Subversion repository. Prior to install Asterisk PBX it's recommended to install some packages which contain drivers that we could need in the future and it's a good idea to install them from the beginning. Those packages are libPRI (libraries for PRI interfaces), dahdi-linux (drivers for the Digium Hardware for Asterisk) and dahdi-tools (tools for configuring the Digium Hardware drivers). Those packages can be also obtained from Subversion. Since our objective in this final Master thesis is to contribute only on the Asterisk main project, we won't need to install the Subversion's trunk version of those packages and we can get any release of them in a tar.gz format and compile and install them. The steps that we will follow to install Asterisk on our environment will be the 24.
(31) Contribution to Asterisk Open Source Project. following: 1. Obtain the source code from Subversion. This can be done with the command: svn. checkout. http://svn.digium.com/svn/asterisk/trunk. (6). If we wanted to obtain any branch instead of the trunk version, we only need to change the trunk directory for that of the corresponding branch. 2. Check that we have all the required libraries and tools for compiling Asterisk with all its features since we don't know initially in which area of Asterisk will be our contribution. Those are the gcc, gcc-c++ and make compilers and libraries ncurses-devel, libtermcap-devel, kernel-devel, openssl-devel, unixODBC-devel, newt-devel, zlib-devel and libtool, among others. 3. Configure the source code to our specific machine, by executing the following command from the path where we have downloaded the Asterisk source code: ./configure. 4. Compile. (7). the. source. code. from. the. configuration. done:. make (8). 5. Installation. of. the. generated. binaries:. make install (9). 6. Create. a. make samples. 7. Run. Asterisk.. sudo asterisk. base. configuration:. (10). This. must. be. done. with. root. privileges:. (11). Done that we will have Asterisk installed but without being configured. Asterisk PBX has a enormous number of interface types to which can connect. These include Analog interfaces (such as your telephone line and analog telephones), Digital circuits (such as T1 and E1 lines) or VoIP protocols (such as SIP and IAX). Asterisk doesn’t requires any specialized hardware (not even a sound card) even though it is common to expect a telephone system to physically connect to a voice network. There are many types of channel cards that allow us to connect your Asterisk to things like analog phones or PSTN circuits, but they are not essential to the functioning of Asterisk. On the user (or station) side of the system, we can choose from all kinds of softphones that are available for Windows, Linux, and other operating systems, or use almost any physical IP 25.
(32) Contribution to Asterisk Open Source Project. phone. On the carrier side, if we don’t connect directly to a circuit from your central office, you can still route your calls over the Internet using a VoIP service provider. In order to achieve this operation on the PBX, we have to configure Asterisk properly. Asterisk configuration is based in some configuration files located on the /etc/asterisk directory. All these files have got a similar structure; basically they are text files which content some sections or categories (identified because they have []) and on every section there are a collection of parametervalue pairs. The most important files that we will need to firstly configure to have our Asterisk installation running properly are: ●. asterisk.conf: This file defines the location for the configuration files, the spool and the modules as well the location to write the log files. It's recommended to use the default settings unless we know the implications of changing them. Basically it's formed by a [directories] section which defines the locations aforementioned, and a [options] section which can define some start up options.. ●. modules.conf: This file controls which modules are loaded or not on the start up. The file only contains a [modules] section in which we specify which modules must be loaded on start up and which mustn't.. ●. manager.conf: This file contains the configurations for the Manager Interface (AMI, see section 3.3.5) connections.. ●. extensions.conf: This file contains all the asterisk dial plan (see section 3.3.1).. ●. sip.conf: In this file the SIP protocol is configured. The authentication for endpoints, such as SIP phones and service providers, is also configured on this file. Asterisk uses this file to determine which calls are willing to accept and where those calls should go in relation to the dial plan.. ●. iax.conf: Similar to sip.conf, in this file the IAX2 (Inter Asterisk eXchange revision 2) protocol is configured.. ●. logger.conf: In this file log files are configured, specifying which files are generated and which level of log messages are written on every file.. ●. rtp.conf: This file controls the RTP (Real-time Transport protocol) ports that Asterisk uses to generate and receive RTP traffic. The RTP protocol is used by SIP, H.323, MGCP and possibly other protocols to carry media between endpoints.. Done that we will have our Asterisk PBX ready to use. The next step that we will review in order to have a complete knowledge of the Asterisk installation are the default directories related with Asterisk: ●. /etc/asterisk: As we have seen, this directory contains the Asterisk 26.
(33) Contribution to Asterisk Open Source Project. configuration files. ●. /usr/lib/asterisk/modules/: This directory contains all of the Asterisk loadable modules. Within this directory are the various applications, codecs, formats, and channels used by Asterisk. By default, Asterisk loads all of these modules at startup. Any module can be disabled in the modules.conf file, but we must be aware that certain modules are required by Asterisk or are dependencies of other modules. Attempting to load Asterisk without these modules will cause an error at startup.. ●. /var/lib/asterisk/: This directory contains the astdb file and a number of subdirectories. The astdb file contains the local Asterisk database information, which is somewhat like the Microsoft Windows Registry. The Asterisk database is a simple implementation based on v1 of the Berkeley database. The db.c file in the Asterisk source states that this version was chosen for the following reason: “DB3 implementation is released under an alternative license incompatible with the GPL. Thus, in order to keep Asterisk licensing simplistic, it was decided to use version 1 as it is released under the BSD license”. The subdirectories on this directory are: ○. agi-bin/: The agi-bin/ directory contains your custom scripts, which can interface with Asterisk via the various built-in AGI applications.. ○. firmware/: contains firmware for various Asterisk-compatible devices. It currently contains only the iax/ subdirectory, which holds the binary firmware image for Digium’s IAXy.. ○. images/: Applications that communicate with channels supporting graphical images look in the images/ directory. Most channels do not support the transmission of images, so this directory is rarely used. However, if more devices that support and make use of graphical images are released, this directory will become more relevant.. ○. keys/: Asterisk can use a public/private key system to authenticate peers connecting to your box via an RSA digital signature. If you place a peer’s public key in your keys/ directory, that peer can be authenticated by channels supporting this method (such as the IAX2 channels). The private key is never distributed to the public. The reverse is also true: you can distribute your public key to your peers, allowing you to be authenticated with the use of your private key. Both the public and private keys—ending in the .pub and .key file extensions, respectively—are stored in the keys/ directory.. ○. moh/: When you configure Asterisk for Music on Hold, applications utilizing this feature look for their MP3 files in the moh/ directory. Asterisk is a bit picky about how the MP3 files are formatted, so you should use constant bitrate (CBR) encoding and strip the ID3 tags from your files.. ○. sounds/: All of the available voice prompts for Asterisk reside in this directory. The contents of the basic prompts included with Asterisk are 27.
(34) Contribution to Asterisk Open Source Project. in the sounds.txt file located in the Asterisk source code directory. Contents of the additional prompts are located in the sounds-extra.txt file in the directory to which you extracted the asterisk-sounds package earlier in this chapter. ●. /var/spool/asterisk/: The Asterisk spool directory contains several subdirectories, including dictate/, meetme/, monitor/, outgoing/, system/, tmp/, and voicemail/. Asterisk monitors the outgoing directory for text files containing call request information. These files allow the generation of a call simply by moving the correctly structured file into the outgoing/ directory. Call files being placed into the outgoing/ directory can contain useful information, such as the Context, Extension, and Priority where the answered call should start, or simply the application and its arguments. You can also set variables and specify an account code for Call Detail Records. The content of its subdirectories are: ○. dictate/: This directory is the default location where the Dictate() dial plan application looks for files.. ○. meetme/: This directory is the location where MeetMe() dial application conference recordings are saved.. ○. monitor/: Recordings from either one-touch recording (the w and W flags to the Dial() application), the MixMonitor(), or Monitor() applications are stored in this directory.. ○. system/: This directory is used by the System() application for temporary storage of data.. ○. tmp/: This directory is used, to hold temporary information. Certain applications may require a place to write files to before copying the complete files to their final destinations. This prevents two processes from trying to write to and read from a file at the same time.. ○. voicemail/: All voicemail and user greetings are contained within the voicemail/ directory. Extensions configured in voicemail.conf that have been logged in to at least once are created as subdirectories of voicemail/.. ●. /var/run/: This directory contains the process ID (PID) information for all active processes on the system, including Asterisk (as specified in the asterisk.conf file). Note that /var/run/ is OS-dependent and may differ.. ●. /var/log/asterisk/: This directory is where Asterisk logs information. The type of information being logged to the various files can be configured by editing the logger.conf file located in the /etc/asterisk/ directory. Basic configuration of the logger.conf file ○. cdr-crv/: The /var/log/asterisk/cdr-csv directory is used to store the CDRs in comma-separated value (CSV) format. By default information is stored in the Master.csv file, but individual accounts can store their own CDRs in separate files with the use of the accountcode option (see Appendix A for more information). 28.
(35) Contribution to Asterisk Open Source Project. The last point that we should know is how to run Asterisk PBX. Asterisk can be loaded in a variety of ways. The easiest way is to start Asterisk by running the binary file directly from the Linux command-line interface. If we are running on a system that uses the init.d scripts, you can easily start and restart Asterisk that way as well. However, the preferred way of starting Asterisk is via the safe_asterisk script. The Asterisk binary is, by default, located at /usr/sbin/asterisk. If we run /usr/sbin/asterisk, it will be loaded as a daemon. There are also a few switches we should be aware of that allow us to (re)connect to the Asterisk CLI, set the verbosity of CLI output, and allow core dumps if Asterisk crashes (for debugging with gdb). Asterisk needs to be executed with root privileges so it can performs all the required operations to run. To explore the full range of options, run Asterisk with the -h switch (12): # /usr/sbin/asterisk -h. (12). Next is a list of the most commonly used options: ●. -c: Console. This will start Asterisk as a user process (not as a server),. and will connect you to the Asterisk CLI. This option is good when we are debugging your startup parameters, but should not be used for a normal system (if Asterisk is already running, this option will not work and will issue a complaint). ●. -v: Verbosity. This is used to set the amount of output for CLI debugging.. The more “v”s, the more verbose. ●. -g: Core dump. If Asterisk were to crash unexpectedly, this would cause a. core file to be created for later tracing with gdb. We generally do not use this in production, unless we are writing code for Asterisk and want to debug any resulting crashes. ●. -r: Remote. This is used to reconnect remotely to an already running. Asterisk process. (The process is remote from the standpoint of the console connecting to it but is actually a local process on the machine. This has nothing to do with connecting to a remote process over a network using a protocol such as IP, as this is not supported). This is the most common option and it is what we would use to connect to Asterisk on a system where it is running as a daemon/service that was started by init at boot time. ●. -x "<CLI command>": Execute. Using this command in combination with -r. allows us to execute a CLI command without having to connect to the CLI and type it manually. An example would be to send a restart, which we would do by typing asterisk -rx "reload" from the command line.. 29.
(36) Contribution to Asterisk Open Source Project. 3.3.1. Dial Plan. The dial plan is truly the heart of any Asterisk system, as it defines how Asterisk handles inbound and outbound calls. In a brief, it consists of a list of instructions or steps that Asterisk will follow. Unlike traditional phone systems, Asterisk’s dial plan is fully customizable. To successfully set up our own Asterisk system, we will need to understand the dial plan. The Asterisk dial plan is specified in the configuration file named extensions.conf. The dial plan is made up of four main concepts: contexts, extensions, priorities and applications. If we installed the sample configuration files when we installed Asterisk, with command (10), we will most likely have an existing extensions.conf file. 3.3.1.1. Contexts Dial plans are broken into sections called contexts. Contexts are named groups of extensions, which serve several purposes. Contexts keep different parts of the dial plan from interacting with one another. An extension that is defined in one context is completely isolated from extensions in any other context, unless interaction is specifically allowed. Contexts are denoted by placing the name of the context inside square brackets ([ ]). The name can be made up of the letters A through Z (upper- and lowercase), the numbers 0 through 9, and the hyphen and underscore. For example, a context for incoming calls looks like this: [incoming]. All of the instructions placed after a context definition are part of that context, until the next context is defined. At the beginning of the dial plan, there are two special contexts named [general] and [globals]. The [general] section contains a list of general dial plan settings (which we'll probably never have to worry about), and the [globals] context contains the definition of global variables that could be used on all the dial plans defined. So we must avoid the use of context names [general] and [globals]. When we define a channel (which is how we connect things to the system), one of the parameters that is defined in the channel definition is the context. In other words, the context is the point in the dial plan where connections from that channel will begin. Another important use of contexts (perhaps the most important) is to provide security. By using contexts correctly, we can give certain callers access to features (such as long distance calling) that aren’t made available to others. If we don’t design our dial plan carefully, we may inadvertently allow others to fraudulently use our system. 30.
Figure
+2
Documento similar
We have empirically studied the impact of packet sampling on the open-source Skype traffic detector Skypeness, which is based on three statistical features of Skype traffic:
For the case of Corporate main-inventors with Academic co-inventors, patents show a basicness index that is smaller than when only Academic inventors are involved, but higher than
The GPSTk project is an advanced open source GNSS data processing suite initiated and supported by the Applied Research Laboratories of the University of Texas (ARL:UT), aiming
In this thesis, we have focussed on two different aspects of the pathway: in the first place, we have analysed the in vivo effects of the pharmacological inhibition of PI3K, a
We have also used a different tumour model to analyse the mitogenic signalling from apoptotic cells. We have so far tested the role of
Once we have described our design: a six cavity system with the capacitive and induc- tive irises, the next step consists of finding the critical coupling point in which we get the
Sovereignty: Freedom of access and implementation from design to production Open Collaboration: Faster time to market, community, leverage existing open
In this work we validate that the use of few shot learning techniques can transfer knowledge from a well defined source domain from Colon tissue into a more generic domain composed
