DISEÑO E IMPLEMENTACIÓN DE SOLUCIÓN LAN / WAN USANDO CISCO IOS
VÍCTOR JULIO MARTÍNEZ BARRIOS
UNIVERSIDAD NACIONAL ABIERTA Y A DISTANCIA
ESCUELA DE CIENCIAS BÁSICAS, TECNOLOGÍA E INGERIERÍA
INGENIERÍA DE SISTEMAS
ITAGÜÍ
DISEÑO E IMPLEMENTACIÓN DE SOLUCIÓN LAN / WAN USANDO CISCO IOS
VÍCTOR JULIO MARTÍNEZ BARRIOS
Informe para optar al título de ingeniero de sistemas
Profesor
Giovanni Alberto Bracho, tutor del curso
UNIVERSIDAD NACIONAL ABIERTA Y A DISTANCIA
ESCUELA DE CIENCIAS BÁSICAS, TECNOLOGÍA E INGERIERÍA
INGENIERÍA DE SISTEMAS
ITAGÜÍ
3
Itagüí, 13 de junio de 2018
NOTA DE ACEPTACION
______________________________
______________________________
______________________________
______________________________
______________________________
______________________________
______________________________
______________________________
Presidente del jurado
______________________________
4
AGRADECIMIENTOS
5
TABLA DE CONTENIDO
INTRODUCCIÓN ... 8
1. 1
DESCRIPCIÓN DEL ESCENARIO PROPUESTO ... 9
1.1
ESCENARIO ... 9
1.2
TOPOLOGÍA DE RED ... 9
2. DESARROLLO DE LAS ACTIVIDADES ... 10
2.1 CONFIGURACIÓN DIRECCIONAMIENTO IP ... 10
2.2 CONFIGURACIÓN OSPF ... 16
2.3 CONFIGURACIÓN DE VLAN Y PUERTOS ... 26
2.4 DESHABILITAR DNS LOOKUP EN S3 ... 30
2.5 CONFIGURACIÓN IP DE LOS SWITCHES ... 30
2.6 DESACTIVAR INTERFACES NO USADAS ... 30
2.7 IMPLEMENTAR DHCP Y NAT PARA IPV4 ... 33
6
LISTA DE TABLAS
Tabla 1 Direccionamiento IP ... 12
LISTA DE FIGURAS
Ilustración 1 Topología de la red ... 9
Ilustración 2 Topología realizada en Packet Tracer ... 12
Ilustración 3 Configuración OSPF ... 16
Ilustración 4 Evidencia configuración OSPF ... 17
Ilustración 5 Configuración de OSPF R1 ... 18
Ilustración 6 Configuración OSPF R2 ... 18
Ilustración 7 Configuración OSPF R3 ... 19
Ilustración 8 Evidencia interfaces pasivas ... 20
Ilustración 9 Interfaces pasivas y no pasivas ... 21
Ilustración 10 Establecimiento de ancho de banda ... 23
Ilustración 11 Costo de la métrica ... 24
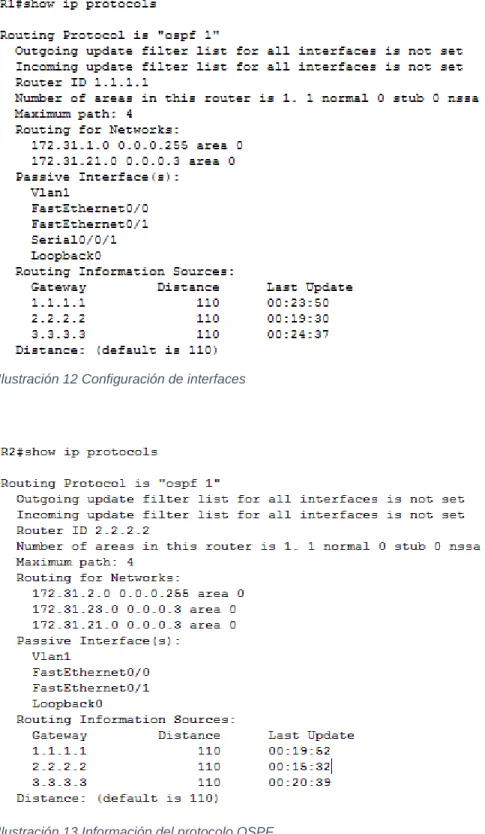
Ilustración 12 Configuración de interfaces ... 25
7
RESUMEN
El presente informe contiene el desarrollo de la prueba de habilidades prácticas del
diplomado de profundización cisco (diseño e implementación de soluciones
integradas LAN / WAN).
El mismo aborda las temáticas revisadas en los módulos CCNA I y CCNA II del
curso antes mencionado, entre los que se destacan:
Configuraciones básicas de SWITCH y ROUTERS
Configuración de direccionamiento IP para los diferentes componentes de
una topología de red
Configuración del protocolo OSPF
Uso de las VLAN y su configuración
Implementación de DHCP y NAT
Aplicación de listas de control de acceso
8
INTRODUCCIÓN
El presente informe se entrega como evidencia del desarrollo de las actividades
concernientes a la evaluación final (prueba de habilidades prácticas) del curso
“Diplomado de profundización cisco (diseño e implementación de soluciones
integradas LAN / WAN)”.
9
1. 1
DESCRIPCIÓN DEL ESCENARIO PROPUESTO
1.1 ESCENARIO
Una empresa de Tecnología posee tres sucursales distribuidas en las ciudades
de Bogotá, Medellín y Bucaramanga, en donde el estudiante será el
administrador de la red, el cual deberá configurar e interconectar entre sí cada
uno de los dispositivos que forman parte del escenario, acorde con los
lineamientos establecidos para el direccionamiento IP, protocolos de
enrutamiento y demás aspectos que forman parte de la topología de red.
1.2 TOPOLOGÍA DE RED
10
2. DESARROLLO DE LAS ACTIVIDADES
2.1 CONFIGURACIÓN DIRECCIONAMIENTO IP
Configurar el direccionamiento IP acorde con la topología de red para cada uno
de los dispositivos que forman parte del escenario.
Configuración básica de los routers:
Router>enable
Router#configure terminal
Enter configuration commands, one per line. End with CNTL/Z.
Router(config)#hostname R1
R1(config)#no ip domain-lookup
R1(config)#service password-encryption
R1(config)#enable secret class
R1(config)#line console 0
R1(config-line)#password cisco
R1(config-line)#login
R1(config-line)#line vty 0 15
R1(config-line)#password cisco
R1(config-line)#login
R1(config-line)#exit
R1(config)#banner motd #Prohibido el acceso no autorizado#
R1(config)#line console 0
R1(config-line)#loggin synchronous
R1(config-line)#end
R1#
%SYS-5-CONFIG_I: Configured from console by console
R1#copy run start
Destination filename [startup-config]?
11
[OK]R1#
El mismo procedimiento fue aplicado a los routers R2 y R3.
Configuración básica de los switches
S1> S1>enable
S1#configure terminal
Enter configuration commands, one per line. End with CNTL/Z. S1(config)#no ip domain-lookup
S1(config)#hostname S1 S1(config)#line console 0 S1(config-line)#password cisco S1(config-line)#login
S1(config-line)#loggin synchronous S1(config-line)#line vty 0 15 S1(config-line)#password cisco S1(config-line)#login
S1(config-line)#exi
S1(config)#enable secret class S1(config)#service password-encry
S1(config)#banner motd #Prohibido el acceso no autorizado#
S3>enable
S3#configure terminal
Enter configuration commands, one per line. End with CNTL/Z. S3(config)#hostname S3
S3(config)#no ip domain-lookup S3(config)#enable secret class S3(config)#line console 0 S3(config-line)#password cisco S3(config-line)#login
S3(config-line)#loggin synchrono S3(config-line)#line vty 0 15 S3(config-line)#password cisco S3(config-line)#login
S3(config-line)#end S3#
%SYS-5-CONFIG_I: Configured from console by console
S3#configure terminal
Enter configuration commands, one per line. End with CNTL/Z. S3(config)#service password-encry
S3(config)#banner motd #Prohibido el acceso no autorizado# S3(config)#end
S3#
12
Ilustración 2 Topología realizada en Packet TracerTabla de direccionamiento:
Tabla 1 Direccionamiento IP
Disposit
ivo Interfaz Dirección IP
Mascara de subred
Gateway predetermin ado
R1 F0/0 172.31.1.1 255.255.255.
0 N/A
S0/0/0 172.31.21.1 255.255.255.
252 N/A
R2
F0/0 (Simulac ión internet)
209.165.200. 225
255.255.255.
248 N/A
S0/0/0 172.31.23.1 255.255.255.
13
S0/0/1 172.31.21.2 255.255.255.
252 N/A
Lo4 10.10.10.10 255.255.255. 255
R3 S0/0/1 172.31.23.2 255.255.255.
252 N/A
Lo4 192.168.4.0 255.255.255.
255 N/A
Lo5 192.168.5.0 255.255.255.
255 N/A
Lo6 192.168.6.0 255.255.255.
255 N/A
S1 192.168.99.2
S3 192.168.99.3
PC-A NIC 172.31.1.2 255.255.255.
0 172.31.1.1
PC-C NIC 172.31.1.3 255.255.255.
0 172.31.1.1
PC -
Internet NIC
209.165.200. 230 255.255.255. 248 209.165.200. 225
R1(config)#interface fastEthernet 0/0
R1(config-if)#description Conecta al R1 (Medellin) a las VLAN 30 (Administracion) y 40 (Mercadeo)
R1(config-if)#ip address 172.31.1.1 255.255.255.0 R1(config-if)#no shutdown
R1(config-if)#interface s0/0/0
R1(config-if)#description Conecta al R1 (Medellin) con R2(Bogota) R1(config-if)#ip address 172.31.21.1 255.255.255.252
R1(config-if)#clock rate 128000 R1(config-if)#no shutdown R1(config-if)#
R1(config-if)#end R1#
%SYS-5-CONFIG_I: Configured from console by console
R1#copy run start
Destination filename [startup-config]? Building configuration...
[OK]
R2#configure terminal
Enter configuration commands, one per line. End with CNTL/Z. R2(config)#interface s0/0/0
R2(config-if)#description % Incomplete command.
R2(config-if)#description Conecta al R2 (Bogota) y el R3 (Bucaramanga) R2(config-if)#ip address 172.31.23.1 255.255.255.252
14
%LINK-5-CHANGED: Interface Serial0/0/0, changed state to down R2(config-if)#interface s0/0/1
R2(config-if)#description Conecta R2(Bogota) con R1(Medellin) R2(config-if)#ip address 172.31.21.2 255.255.255.252
R2(config-if)#no shutdown
R2(config-if)#
%LINK-5-CHANGED: Interface Serial0/0/1, changed state to up
R2(config-if)#end R2#
%SYS-5-CONFIG_I: Configured from console by console
R2#
%LINEPROTO-5-UPDOWN: Line protocol on Interface Serial0/0/1, changed state to up
R2#copy run start
Destination filename [startup-config]? Building configuration...
[OK] R2#
R2(config)#interface fa0/0
R2(config-if)#description Salida a internet
R2(config-if)#ip address 209.165.200.225 255.255.255.248 R2(config-if)#no shutdown
R2(config-if)#
%LINK-5-CHANGED: Interface FastEthernet0/0, changed state to up
R2(config-if)#
R2(config)#interface lo4
R2(config-if)#
%LINK-5-CHANGED: Interface Loopback4, changed state to up
%LINEPROTO-5-UPDOWN: Line protocol on Interface Loopback4, changed state to up
R2(config-if)#ip address 10.10.10.10 255.255.255.255 R2(config-if)#end
R3#configure terminal
Enter configuration commands, one per line. End with CNTL/Z. R3(config)#banner motd #Prohibido el acceso no autorizado# R3(config)#interface s0/0/1
15
R3(config-if)#ip address 172.31.23.2 255.255.255.252 R3(config-if)#no shutdown
R3(config-if)#
%LINK-5-CHANGED: Interface Serial0/0/1, changed state to up
R3(config-if)#
%LINEPROTO-5-UPDOWN: Line protocol on Interface Serial0/0/1, changed state to up
R3(config-if)#end R3#
%SYS-5-CONFIG_I: Configured from console by console
R3(config)#interface lo4
R3(config-if)#
%LINK-5-CHANGED: Interface Loopback4, changed state to up
%LINEPROTO-5-UPDOWN: Line protocol on Interface Loopback4, changed state to up
R3(config-if)#ip address 192.168.4.0 255.255.255.255 R3(config-if)#
R3(config-if)#end R3#
%SYS-5-CONFIG_I: Configured from console by console
R3#configure terminal
Enter configuration commands, one per line. End with CNTL/Z. R3(config)#interface lo5
R3(config-if)#
%LINK-5-CHANGED: Interface Loopback5, changed state to up
%LINEPROTO-5-UPDOWN: Line protocol on Interface Loopback5, changed state to up
R3(config-if)#ip address 192.168.5.0 255.255.255.255 R3(config-if)#interface lo6
R3(config-if)#
%LINK-5-CHANGED: Interface Loopback6, changed state to up
%LINEPROTO-5-UPDOWN: Line protocol on Interface Loopback6, changed state to up
R3(config-if)#ip address 192.168.6.0 255.255.255.255 R3(config-if)#end
R3#
16
R3#copy run startDestination filename [startup-config]? Building configuration...
[OK] R3#
2.2 CONFIGURACIÓN OSPF
Configurar el protocolo de enrutamiento OSPFv2 bajo los siguientes criterios:
Ilustración 3 Configuración OSPF
Configuración del protocolo OSPFv2:
R1(config)#router ospf 1
R1(config-router)#network 172.31.1.0 0.0.0.255 area 0 R1(config-router)#network 172.31.21.0 0.0.0.3 area 0 R1(config-router)#end
R2#configure terminal
Enter configuration commands, one per line. End with CNTL/Z. R2(config)#router ospf 1
R2(config-router)#network 172.31.2.0 0.0.0.255 area 0 R2(config-router)#network 172.31.23.0 0.0.0.3 area 0 R2(config-router)#network 172.31.21.0 0.0.0.3 area 0 R2(config-router)#network 209.165.200.224 0.0.0.7 area 0 R2(config-router)#
R3#configure terminal
Enter configuration commands, one per line. End with CNTL/Z. R3(config)#router ospf 1
17
Ilustración 4 Evidencia configuración OSPFConfiguración de ID para los router a través de direcciones loopback:
R1(config)#interface lo0
R1(config-if)#
%LINK-5-CHANGED: Interface Loopback0, changed state to up
%LINEPROTO-5-UPDOWN: Line protocol on Interface Loopback0, changed state to up
R1(config-if)#ip address 1.1.1.1 255.255.255.255 R1(config-if)#
R2#configure terminal
Enter configuration commands, one per line. End with CNTL/Z. R2(config)#interface lo0
R2(config-if)#ip address 2.2.2.2 255.255.255.255 R2(config-if)#end
R3#configure terminal
Enter configuration commands, one per line. End with CNTL/Z. R3(config)#interface lo0
18
Ilustración 5 Configuración de OSPF R119
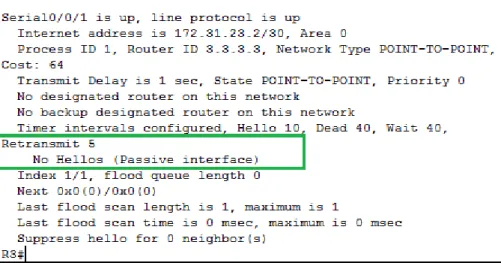
Ilustración 7 Configuración OSPF R3Configuración de interfaces LAN como pasivas:
Inicialmente se emite el comando passive-interface default en los routers
para que todas las interfaces pasen al modo pasivo:
R1(config)#router ospf 1 R1(config-router)#passi
R1(config-router)#passive-interface default R1(config-router)#
00:08:58: %OSPF-5-ADJCHG: Process 1, Nbr 2.2.2.2 on Serial0/0/0 from FULL to DOWN, Neighbor Down: Interface down or detached
R2#configure terminal
Enter configuration commands, one per line. End with CNTL/Z. R2(config)#router ospf 1
R2(config-router)#passive-interface default R2(config-router)#
00:09:33: %OSPF-5-ADJCHG: Process 1, Nbr 3.3.3.3 on Serial0/0/0 from FULL to DOWN, Neighbor Down: Interface down or detached
R2(config-router)#
R3#configure terminal
Enter configuration commands, one per line. End with CNTL/Z. R3(config)#router ospf 1
20
R3(config-router)#endR3#
%SYS-5-CONFIG_I: Configured from console by console
Ilustración 8 Evidencia interfaces pasivas
Posteriormente se activa en cada router las interfaces adecuadas como
no pasivas:
R1(config)#router ospf 1
21
Ilustración 9 Interfaces pasivas y no pasivasR2#configure terminal
Enter configuration commands, one per line. End with CNTL/Z. R2(config)#router ospf 1
R2(config-router)#no passive-interface s0/0/1 R2(config-router)#no passive-interface s0/0/0 R2(config-router)#end
22
R3(config)#router ospf 123
Establecer el ancho de banda para enlaces seriales:
R1(config)#interface s0/0/0 R1(config-if)#bandwidth 128 R1(config-if)#end
Ilustración 10 Establecimiento de ancho de banda
R2(config)#interface s0/0/0 R2(config-if)#bandwidth 128
R2(config-if)#interface s0/0/1 R2(config-if)#bandwidth 128 R2(config-if)#end
24
Ajustar el costo en la métrica en S0/0/0 (R1 y R2)
R1#configure terminal
Enter configuration commands, one per line. End with CNTL/Z. R1(config)#interface s0/0/0
R1(config-if)#ip ospf cost 7500 R1(config-if)#end
R2#configure terminal
Enter configuration commands, one per line. End with CNTL/Z. R2(config)#interface s0/0/0
R2(config-if)#ip ospf cost 7500 R2(config-if)#end
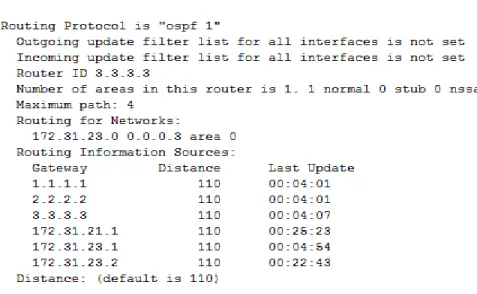
Verificar información de OSPF
Visualizar tablas de enrutamiento y routers conectados por OSPFv2
Ilustración 11 Costo de la métrica
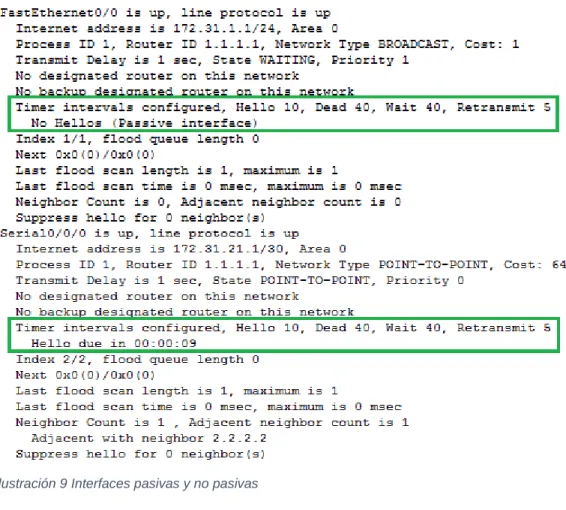
Visualizar lista resumida de interfaces por OSPF en donde se ilustre el costo de
cada interface
Se presenta error en la ejecución del comando
show ip ospf interface brief25
interfaces configuradas en cada router.
Ilustración 12 Configuración de interfaces
26
2.3 CONFIGURACIÓN DE VLAN Y PUERTOS
Creación de las VLANs
S1#vlan database
% Warning: It is recommended to configure VLAN from config mode, as VLAN database mode is being deprecated. Please consult user documentation for configuring VTP/VLAN in config mode.
S1(vlan)#vlan 30 VLAN 30 added: Name: VLAN0030 S1(vlan)#vlan 40 VLAN 40 added: Name: VLAN0040 S1(vlan)#vlan 200 VLAN 200 added: Name: VLAN0200
S1#configure terminal
Enter configuration commands, one per line. End with CNTL/Z. S1(config)#interface vlan 30
S1(config-if)#
%LINK-5-CHANGED: Interface Vlan30, changed state to up
S1(config-if)#desc
S1(config-if)#description Administracion S1(config-if)#end
27
%SYS-5-CONFIG_I: Configured from console by console
S1#configure terminal
Enter configuration commands, one per line. End with CNTL/Z. S1(config)#interface vlan 40
S1(config-if)#
%LINK-5-CHANGED: Interface Vlan40, changed state to up
S1(config-if)#descrip
S1(config-if)#description Mercadeo S1(config-if)#interface vlan 200 S1(config-if)#
%LINK-5-CHANGED: Interface Vlan200, changed state to up
S1(config-if)#desc
S1(config-if)#description Mantenimiento S1(config-if)#end
S1#
%SYS-5-CONFIG_I: Configured from console by console
S1#copy run start
S3#configure terminal
Enter configuration commands, one per line. End with CNTL/Z. S3(config)#interface vlan 40
S3(config-if)#
%LINK-5-CHANGED: Interface Vlan40, changed state to up
S3(config-if)#description Mercadeo S3(config-if)#interface vlan 30 S3(config-if)#
%LINK-5-CHANGED: Interface Vlan30, changed state to up
S3(config-if)#description Administracion S3(config-if)#interface vlan 200
S3(config-if)#
%LINK-5-CHANGED: Interface Vlan200, changed state to up
28
Configuración puertos troncales y de acceso
S1(config)#interface f0/3
S1(config-if)#switchport mode trunk
S1(config-if)#
%LINEPROTO-5-UPDOWN: Line protocol on Interface FastEthernet0/3, changed state to down
%LINEPROTO-5-UPDOWN: Line protocol on Interface FastEthernet0/3, changed state to up
%LINEPROTO-5-UPDOWN: Line protocol on Interface Vlan30, changed state to up
%LINEPROTO-5-UPDOWN: Line protocol on Interface Vlan40, changed state to up
%LINEPROTO-5-UPDOWN: Line protocol on Interface Vlan200, changed state to up S1(config-if)#switchport trunk native vlan 1
S1(config-if)#
S1(config)#interface f0/24
S1(config-if)#switchport mode trunk
S1(config-if)#
%LINEPROTO-5-UPDOWN: Line protocol on Interface FastEthernet0/24, changed state to down
%LINEPROTO-5-UPDOWN: Line protocol on Interface FastEthernet0/24, changed state to up
S1(config-if)#switchport trunk native vlan 1 S1(config-if)#
S1(config-if)#interface f0/1
S1(config-if)#switchport mode access
S1(config-if)#switchport access vlan 30 S1(config-if)#exit
S1#configure terminal
Enter configuration commands, one per line. End with CNTL/Z. S1(config)#interface f0/2
S1(config-if)#switchport mode access S1(config-if)#exit
S1(config)#
S1(config)#interface range f0/4 - f0/24 S1(config-if-range)#switchport mode access S1(config-if-range)#exit
29
S3#configure terminalEnter configuration commands, one per line. End with CNTL/Z. S3(config)#interface f0/3
S3(config-if)#switchport mode trunk
S3(config-if)#switchport trunk native vlan 1 S3(config-if)#interface f0/2
S3(config-if)#switchport mode access S3(config-if)#interface range f0/4 - f0/24 S3(config-if-range)#switchport mode access S3(config-if-range)#exit
S3#
%SYS-5-CONFIG_I: Configured from console by console
S3#copy run start
Destination filename [startup-config]? Building configuration...
[OK]
S3#configure terminal
Enter configuration commands, one per line. End with CNTL/Z. S3(config)#interface f0/1
S3(config-if)#switchport mode access S3(config-if)#switchport access vlan 30 S3(config-if)#exit
S3(config)#
Inter VLAN routing
S1#configure terminal
Enter configuration commands, one per line. End with CNTL/Z. S1(config)#interface vlan 30
S1(config-if)#ip address 192.168.30.2 255.255.255.0 S1(config-if)#no shutdown
S1(config-if)#exit
S1(config)#ip default-gateway 192.168.30.1 S1(config)#interface f0/3
S1(config-if)#switchport mode trunk
S3(config)#interface vlan 30
S3(config-if)#ip address 192.168.30.3 255.255.255.0 S3(config-if)#no shutdown
S3(config-if)#exit
S3(config)#ip default-gateway 192.168.30.1 S3(config)#interface f0/3
S3(config-if)#switchport mode trunk S3(config-if)#end
R1(config)#interface f0/0 R1(config-if)#no shutdown R1(config-if)#exit
30
R1(config-subif)#ip address 192.168.30.1 255.255.255.0 R1(config-subif)#end
2.4 DESHABILITAR DNS LOOKUP EN S3
S3#configure terminal
Enter configuration commands, one per line. End with CNTL/Z. S3(config)#no ip domain-lookup
S3(config)#end
2.5 CONFIGURACIÓN IP DE LOS SWITCHES
S1#configure terminal
Enter configuration commands, one per line. End with CNTL/Z. S1(config)#interface vlan 1
S1(config-if)#ip address 192.168.30.2 255.255.255.0 S1(config-if)#no shutdown
S1(config-if)#exit
S3(config)#interface vlan 1
S3(config-if)#ip address 192.168.30.3 255.255.255.0 S3(config-if)#no shutdown
S3(config-if)#end
2.6 DESACTIVAR INTERFACES NO USADAS
S1#configure terminal
Enter configuration commands, one per line. End with CNTL/Z. S1(config)#interface range f0/4 - f0/23
S1(config-if-range)#shutdown
%LINK-5-CHANGED: Interface FastEthernet0/4, changed state to administratively down
%LINK-5-CHANGED: Interface FastEthernet0/5, changed state to administratively down
31
%LINK-5-CHANGED: Interface FastEthernet0/7, changed state to administratively down
%LINK-5-CHANGED: Interface FastEthernet0/8, changed state to administratively down
%LINK-5-CHANGED: Interface FastEthernet0/9, changed state to administratively down
%LINK-5-CHANGED: Interface FastEthernet0/10, changed state to administratively down
%LINK-5-CHANGED: Interface FastEthernet0/11, changed state to administratively down
%LINK-5-CHANGED: Interface FastEthernet0/12, changed state to administratively down
%LINK-5-CHANGED: Interface FastEthernet0/13, changed state to administratively down
%LINK-5-CHANGED: Interface FastEthernet0/14, changed state to administratively down
%LINK-5-CHANGED: Interface FastEthernet0/15, changed state to administratively down
%LINK-5-CHANGED: Interface FastEthernet0/16, changed state to administratively down
%LINK-5-CHANGED: Interface FastEthernet0/17, changed state to administratively down
%LINK-5-CHANGED: Interface FastEthernet0/18, changed state to administratively down
%LINK-5-CHANGED: Interface FastEthernet0/19, changed state to administratively down
%LINK-5-CHANGED: Interface FastEthernet0/20, changed state to administratively down
%LINK-5-CHANGED: Interface FastEthernet0/21, changed state to administratively down
%LINK-5-CHANGED: Interface FastEthernet0/22, changed state to administratively down
%LINK-5-CHANGED: Interface FastEthernet0/23, changed state to administratively down
S1(config-if-range)#
32
S3(config-if-range)#shutdown%LINK-5-CHANGED: Interface FastEthernet0/4, changed state to administratively down
%LINK-5-CHANGED: Interface FastEthernet0/5, changed state to administratively down
%LINK-5-CHANGED: Interface FastEthernet0/6, changed state to administratively down
%LINK-5-CHANGED: Interface FastEthernet0/7, changed state to administratively down
%LINK-5-CHANGED: Interface FastEthernet0/8, changed state to administratively down
%LINK-5-CHANGED: Interface FastEthernet0/9, changed state to administratively down
%LINK-5-CHANGED: Interface FastEthernet0/10, changed state to administratively down
%LINK-5-CHANGED: Interface FastEthernet0/11, changed state to administratively down
%LINK-5-CHANGED: Interface FastEthernet0/12, changed state to administratively down
%LINK-5-CHANGED: Interface FastEthernet0/13, changed state to administratively down
%LINK-5-CHANGED: Interface FastEthernet0/14, changed state to administratively down
%LINK-5-CHANGED: Interface FastEthernet0/15, changed state to administratively down
%LINK-5-CHANGED: Interface FastEthernet0/16, changed state to administratively down
%LINK-5-CHANGED: Interface FastEthernet0/17, changed state to administratively down
%LINK-5-CHANGED: Interface FastEthernet0/18, changed state to administratively down
%LINK-5-CHANGED: Interface FastEthernet0/19, changed state to administratively down
33
%LINK-5-CHANGED: Interface FastEthernet0/21, changed state to administratively down
%LINK-5-CHANGED: Interface FastEthernet0/22, changed state to administratively down
%LINK-5-CHANGED: Interface FastEthernet0/23, changed state to administratively down
%LINK-5-CHANGED: Interface FastEthernet0/24, changed state to administratively down
S3(config-if-range)#
2.7 IMPLEMENTAR DHCP Y NAT PARA IPV4
Configuración DHCP R1
VLAN 30
R1#configure terminal
Enter configuration commands, one per line. End with CNTL/Z. R1(config)#ip dhcp pool ADMINISTRACION
R1(dhcp-config)#network 192.168.30.0 255.255.255.0 R1(dhcp-config)#dns-server 10.10.10.11
R1(dhcp-config)#default-router 192.168.30.1 R1(dhcp-config)#domain-name ccna-unad.com ^
% Invalid input detected at '^' marker. R1(dhcp-config)#
VLAN 40
R1(config)#ip dhcp pool MERCADEO R1(dhcp-config)#netwo
R1(dhcp-config)#network 192.168.40.0 255.255.255.0 R1(dhcp-config)#defaul
R1(dhcp-config)#default-router 192.168.30.1 R1(dhcp-config)#dns
R1(dhcp-config)#dns-server 10.10.10.11 R1(dhcp-config)#
Reserva de IPs para configuración estática
34
Configuración de NAT en R2
R2#configure terminal
Enter configuration commands, one per line. End with CNTL/Z.
R2(config)#ip nat pool INTERNET 209.165.200.225 209.165.200.228 netmask 255.255.255.248
R2(config)#access-list 1 permit 192.168.0.0 0.0.0.255 R2(config)#ip nat inside source list 1 pool INTERNET R2(config)#interface s0/0/0
R2(config-if)#ip nat inside R2(config-if)#interface s0/0/1 R2(config-if)#ip nat inside R2(config-if)#interface f0/0 R2(config-if)#ip nat outside R2(config-if)#
NAT estático al servidor Web
R2(config)#ip nat inside source static 10.10.10.10 209.165.200.229 R2(config)#interface s0/0/1
R2(config-if)#ip nat inside R2(config-if)#interface f0/0 R2(config-if)#ip nat outside
Configuración de listas de acceso
Configurar una lista de acceso para permitir que solamente el R1 acceda al R2
mediante telnet:
R2#configure terminal
Enter configuration commands, one per line. End with CNTL/Z.
R2(config)#access-list 101 permit tcp host 172.31.23.2 host 172.31.23.1 eq telnet
R2(config)#exit R2#
%SYS-5-CONFIG_I: Configured from console by console R2#
R2#configure terminal
Enter configuration commands, one per line. End with CNTL/Z. R2(config)#interface s0/0/0
R2(config-if)#ip access
R2(config-if)#ip access-group 101 in R2(config-if)#line vty 0 15
R2(config-line)#login local R2(config-line)#
35
04:52:50: %OSPF-5-ADJCHG: Process 1, Nbr 3.3.3.3 on Serial0/0/0 from FULL to DOWN, Neighbor Down: Interface down or detached
R2(config-line)#
Permitir que los hosts de Internet tengan acceso WWW al servidor web
simulado en el R2 por medio del acceso a la dirección de NAT estática
(209.165.200.229).
R2(config)#access-list 102 permit tcp any host 209.165.200.229 eq www R2(config)#interface f0/0
R2(config-if)#ip access-group 102 in R2(config-if)#
R2(config-if)#interface s0/0/0 R2(config-if)#ip access-group 102 in R2(config-if)#
R3#configure terminal
Enter configuration commands, one per line. End with CNTL/Z. R3(config)#interface s0/0/1
R3(config-if)#ip access-group 102 in R3(config-if)#end
R3#
%SYS-5-CONFIG_I: Configured from console by console
R3#copy run start
Destination filename [startup-config]? Building configuration...